Mazda 3 Service Manual: Trunk Lid Latch And Release Actuator Removal/Installation
1. Disconnect the negative battery cable..
2. Remove the trunk lid trim..
3. Disconnect the connector.
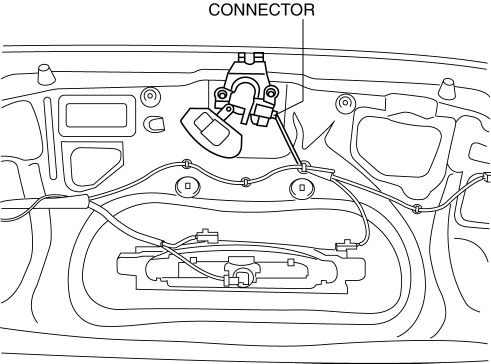
4. Remove the bolts.
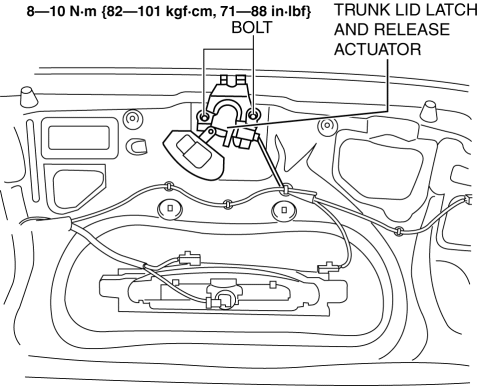
5. Remove the trunk lid latch and release actuator.
6. Install in the reverse order of removal.
 Trunk Lid Latch And Release Actuator Inspection
1. The following actuator and switch are integrated with the release actuator.
Inspect the trunk lid latch and release actuator according to each inspection procedure
for the following items.
...
 Trunk Lid Latch Switch Inspection
1. Disconnect the negative battery cable..
2. Remove the trunk lid trim..
3. Remove the trunk lid latch and lock actuator..
4. Press the latch in using a flathead screwdriver to inspect the latc ...
Other materials:
Power Brake Unit Inspection
NOTE:
The following inspection methods are simple inspection methods to judge the
function of the power brake unit.
If there is any malfunction in the power brake unit, replace the power brake
unit as a single unit.
Without Using SST
Operation inspection
1. With the eng ...
General Procedures (Suspension)
Wheel and Tire Installation
1. When installing the wheels and tires, tighten the wheel nuts in a criss-cross
pattern to the following tightening torque.
Tightening torque
88—118 N·m {9.0—12 kgf·m, 65—87 ft·lbf}
Suspension Links Removal/Installation
1. For the joint ...
Front Wheel Hub Bolt Replacement
1. Remove the brake calliper component and disc plate..
2. Remove the wheel hub bolt using the SST as shown in the figure.
NOTE:
When removing the wheel hub bolts, perform the work between range A shown
in the figure to assure a space for the bolt removal.
3. Place a new whe ...
