Mazda 3 Service Manual: Trunk Side Upper Trim Removal/Installation
1. Remove the rear seat cushion..
2. Remove the rear scuff plate..
3. Remove the tire house trim..
4. Open the cap.
5. Remove the screw.
6. Remove the fasteners.
7. Pull the trunk side upper trim in the direction of arrow, then detach the hooks and clips.
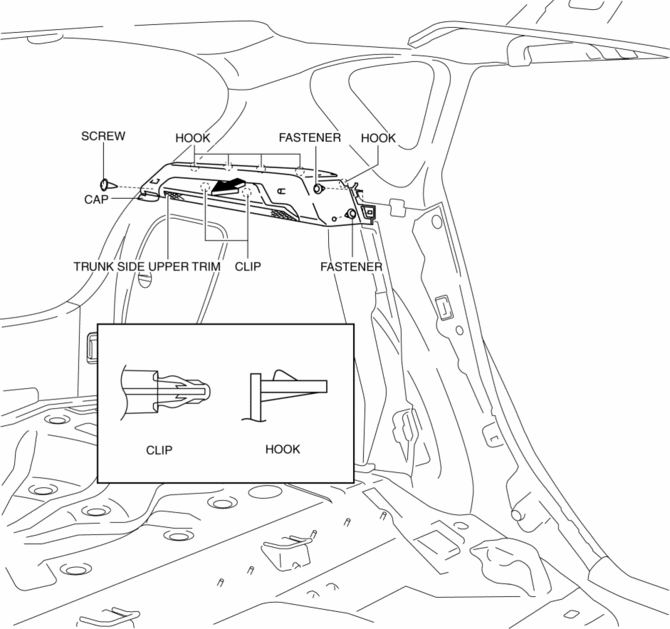
8. Install in the reverse order of removal.
 Side Wall Removal/Installation
1. Pull out the side wall in the direction shown in the direction of the arrow
shown in the figure, then remove the clips.
2. Remove the side wall in the direction of the arrow shown in the fi ...
 Assist Handle Removal/Installation
Assist Handle Removal
1. Insert a flathead screwdriver into the service hole and remove the assist
handle covers.
2. Remove the assist handle in the direction of the arrow (1) and (2), while ...
Other materials:
Vanity Mirror Illumination Bulb Removal/Installation
1. Disconnect the negative battery cable..
2. Insert a tape-wrapped fastener remover into the service hole, and pry it in
the direction indicated by the arrow to remove the lens.
3. Remove the vanity mirror illumination bulb.
4. Install in the reverse order of removal. ...
Rear Cross Traffic Alert (RCTA)
The Rear Cross Traffic Alert (RCTA) system is designed to assist the driver
in checking the
area to the rear of the vehicle on both sides while the vehicle is reversing by
alerting the
driver to the presence of vehicles approaching the rear of the vehicle.
The Rear Cross Traffic Alert (RCTA ...
Fuel Pump Control Module Inspection [Skyactiv G 2.0]
1. Perform the KOEO self-test..
2. Verify that a fuel pump control module related DTC is detected..
If DTCs are detected, repair the malfunctioning part according to the applicable
DTC troubleshooting..
If a DTC is not detected, go to the next step.
3. Inspect the followin ...
