Mazda 3 Service Manual: Washer Tank Removal/Installation
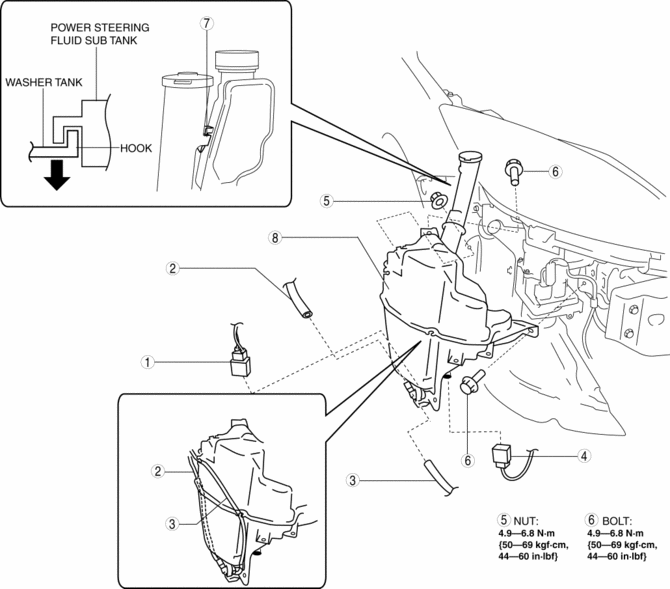
Vehicles with the washer fluid-level sensor
1. Disconnect the negative battery cable..
2. Remove the front bumper..
3. Remove in the order indicated in the table.
|
1 |
Washer motor connector |
|
2 |
Windshield washer hose |
|
3 |
Rear washer hose (5HB) |
|
4 |
Washer fluid-level sensor connector |
|
5 |
Nut |
|
6 |
Bolt |
|
7 |
Hook |
|
8 |
Washer tank |
4. Install in the reverse order of removal.
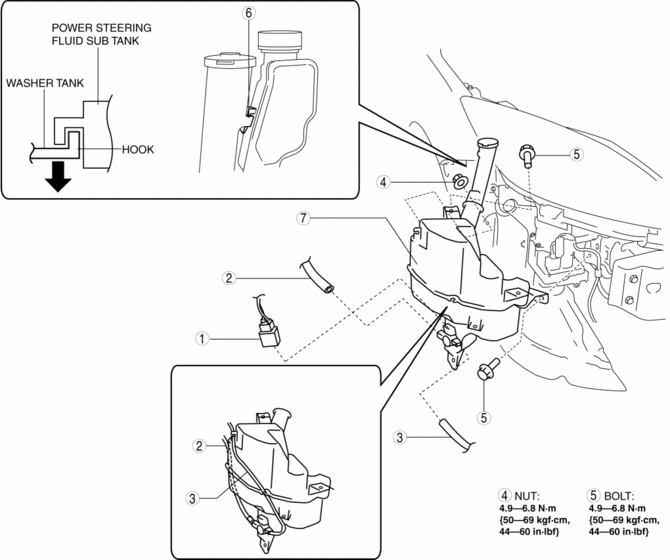
Vehicles without the washer fluid-level sensor
1. Disconnect the negative battery cable..
2. Remove the front bumper..
3. Remove in the order indicated in the table.
|
1 |
Washer motor connector |
|
2 |
Windshield washer hose |
|
3 |
Rear washer hose (5HB) |
|
4 |
Nut |
|
5 |
Bolt |
|
6 |
Hook |
|
7 |
Washer tank |
4. Install in the reverse order of removal.
 Washer Motor Removal/Installation
4SD
1. Disconnect the negative battery cable..
2. Remove the front mudguard (RH)..
3. Remove in the order indicated in the table.
1
Windshield washer hose
...
 Windshield Washer Hose Removal/Installation
1. Remove the following parts:
a. Windshield wiper arm and blade.
b. Front fender molding.
c. Cowl grille.
d. Front mudguard (RH).
2. Disconnect joint pipes, then remove windshield washer ho ...
Other materials:
Aerodynamic Under Cover No.1 Removal/Installation
1. Remove the aerodynamic under cover No.2..
2. Peel off the front mudguard..
3. Remove the bolts and fastener.
4. Remove the aerodynamic under cover No.1 in the direction of the arrow shown
in the figure.
CAUTION:
Be careful not to damage the aerodynamic under cover No.1 durin ...
Starter Interlock Switch Removal/Installation [C66 M R]
1. Remove the battery cover..
2. Disconnect the negative battery cable..
3. Disconnect the starter interlock switch connector.
4. Remove the starter interlock switch from the pedal bracket.
5. Insert a new starter interlock switch into the pedal bracket hole in the direction
indicated ...
Front Bumper Reinforcement Removal/Installation
1. Disconnect the negative battery cable..
2. Remove the following parts:
a. Front bumper.
b. Seal plate.
3. Remove the bolts A.
4. Remove the bolts B.
5. Remove the front bumper reinforcement.
6. Install in the reverse order of removal. ...
