Mazda 3 Service Manual: Windshield Wiper Motor Disassembly/Assembly
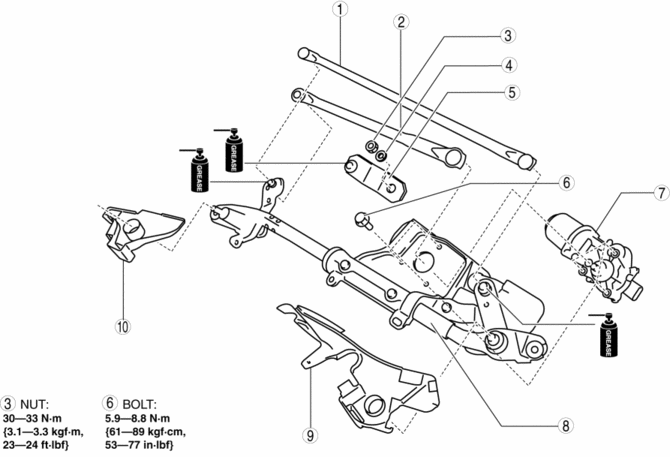
1. Disassemble in the order indicated in the table.
|
1 |
Wiper link No.1 (See Ball Joint Assembly Note.) |
|
2 |
Wiper link No.2 (See Ball Joint Assembly Note.) |
|
3 |
Nut |
|
4 |
Washer |
|
5 |
Crank arm |
|
6 |
Bolt |
|
7 |
Windshield wiper motor |
|
8 |
Main link (See Ball Joint Assembly Note.) |
|
9 |
Windshield wiper motor cover No.1 |
|
10 |
Windshield wiper motor cover No.2 |
2. Assemble in the reverse order of disassembly.
Windshield Wiper Motor Assembly Note
1. Connect the windshield wiper motor to the vehicle wiring harness connector, operate the windshield wipers, and then stop them at the auto stop position.
2. Disconnect the windshield wiper motor connector.
3. Install the windshield wiper motor to the main link and tighten the bolt.
4. Assemble the crank arm such that the crank arm and main link markings are aligned as shown in the figure.
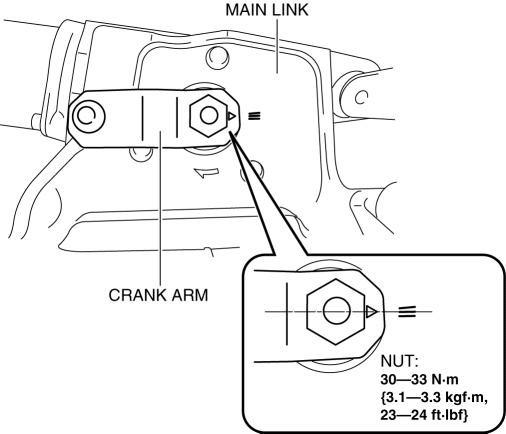
5. Install the washer and nut.
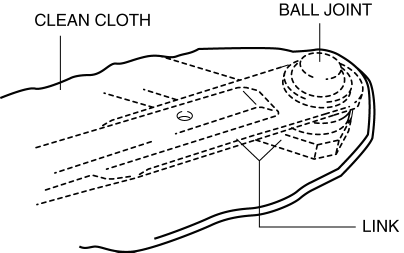
Ball Joint Assembly Note
1. Use a clean cloth to protect the link, and squeeze using pliers.
 Windshield Wiper Arm And Blade Removal/Installation
1. Remove in the order indicated in the table.
1
Cap
2
Nut
3
Windshield wiper arm
(See Windshield Wiper Arm Ins ...
 Windshield Wiper Motor Inspection
1. Disconnect the negative battery cable..
2. Remove the following parts:
a. Windshield wiper arm and blade.
b. Front fender molding.
c. Cowl grille.
d. Center cowl grille No.1, No.2
3. Di ...
Other materials:
Battery Recharging [Mzr 2.3 Disi Turbo]
Using GR8-1291:
(See GR8-1291 INSTANT TRAINING MODULE (VIDEO) .)
WARNING:
Keep all flames away from the battery, otherwise evaporated gas from the
battery fluid may catch fire and cause serious injury.
1. Remove the battery filler caps and check the water level. If necessary, add ...
General Procedures (Front And Rear Axles)
Wheel and Tire Installation
1. When installing the wheels and tires, tighten the wheel nuts in a criss-cross
pattern to the following tightening torque.
Tightening torque
88—118 N·m {9.0—12 kgf·m, 65—87 ft·lbf}
Connector Disconnection
1. Disconnect the negative batte ...
Overloading
WARNING
Be careful not to overload your vehicle:
The gross axle weight rating (GAWR)
and the gross vehicle weight rating
(GVWR) of the vehicle are on the
Motor Vehicle Safety Standard Label
on the driver's door frame. Exceeding
these ratings can cause an accident
or ve ...
