
Mazda 3 Service Manual: Auxiliary Jack Removal/Installation
1. Disconnect the negative battery cable..
2. Remove the following parts:
a. Upper panel.
b. Shift lever knob (MTX).
c. Selector lever knob (ATX).
d. Shift panel.
e. Side wall.
f. Console.
3. Remove the auxiliary jack in the direction of the arrow (2) shown in the figure while pressing the auxiliary jack tabs in the direction of the arrow (1).
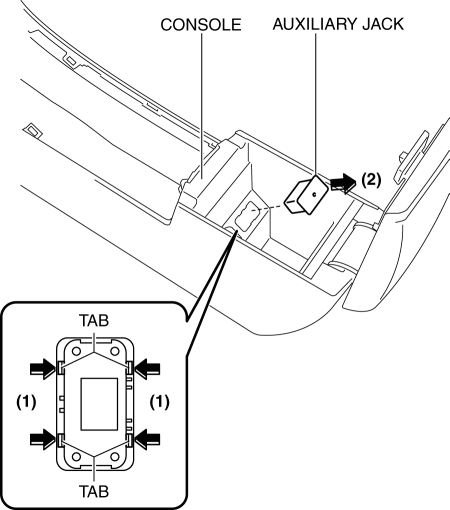
4. Install in the reverse order of removal.
 Auxiliary Jack Inspection
1. Disconnect the negative battery cable..
2. Remove the following parts:
a. Upper panel.
b. Shift lever knob (MTX).
c. Selector lever knob (ATX).
d. Shift panel.
e. Side wall.
f. Consol ...
 Auxiliary Jack/Usb Port
NOTE:
“iPod” is a registered trademark of Apple Inc. in the United States and other
countries.
Purpose, Function
The Auxiliary jack/USB port outputs the audio signals of co ...
Other materials:
Reporting Safety Defects
(U.S.A.)
If you believe that your vehicle has a defect which could cause a crash or
could cause
injury or death, you should immediately inform the National Highway Traffic
Safety
Administration (NHTSA) in addition to notifying Mazda Motor Corporation (Your
Mazda
Importer/Distributor).
If NHTSA re ...
Spark Plug Inspection [Mzr 2.0, Mzr 2.5]
Specification
Spark plug type
LFJD-18110, L3Y2-18110
Plug Gap Inspection
CAUTION:
To avoid possible damage to the tip, do not adjust the spark plug gap. (L3Y2-18110)
To prevent damaging the tip, use a wire type plug gap gauge when inspecting
the spark plug gap. (L3 ...
Antilock Brake System (ABS)
The ABS control unit continuously
monitors the speed of each wheel. If
one wheel is about to lock up, the ABS
responds by automatically releasing and
reapplying that wheel's brake.
The driver will feel a slight vibration in
the brake pedal and may hear a chattering
noise from the brake syst ...
