Mazda 3 Service Manual: B Pillar Upper Trim Removal/Installation
1. Remove the following parts:
a. Adjuster anchor cover.
b. Upper anchor installation bolts on the front seat belt.
c. Front scuff plate.
d. Rear scuff plate.
2. Partially peel back the seaming welt.
3. Remove the B-pillar lower trim..
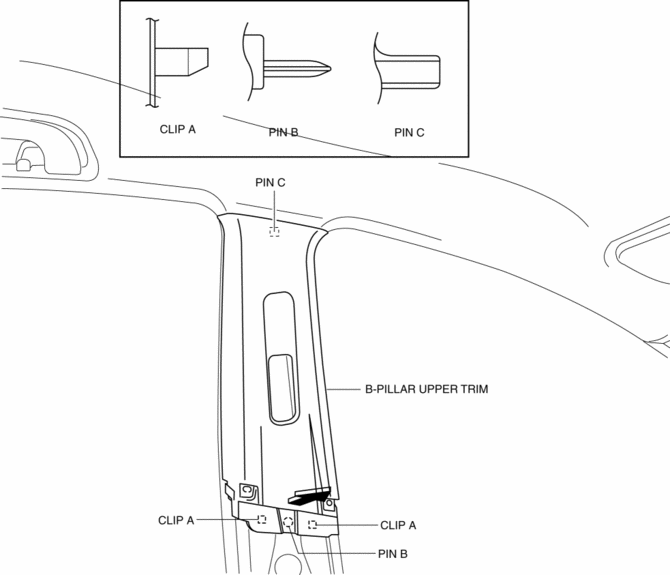
4. Grasp the lower end of the B-pillar upper trim, pull it in the direction of the arrow shown in the figure, and remove clips A, pin B, and pin C.

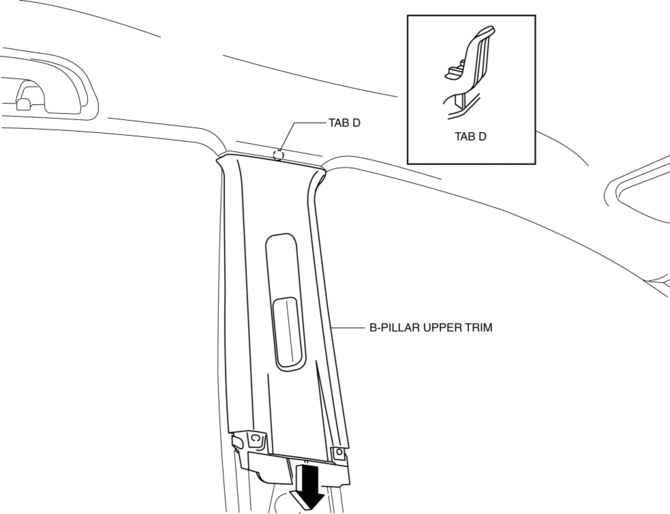
5. Remove the B-pillar upper trim in the direction of the arrow shown in the figure.

CAUTION:
-
When removing the B-pillar upper trim, be careful not to damage the tab D.
6. Install in the reverse order of removal.
 B Pillar Lower Trim Removal/Installation
1. Remove the front scuff plate..
2. Remove the rear scuff plate..
3. Partially peel back the seaming welt.
4. Pull the B-pillar lower trim in the direction of the arrow (1), (2) shown
in the ...
 C Pillar Trim Removal/Installation
4SD
1. Remove the following parts:
a. Rear seat cushion.
b. Rear scuff plate.
c. Tire house trim.
2. Partially peel back the seaming welt.
3. Pull the C-pillar trim in the direction of the ...
Other materials:
Wrench Indicator Light
When the ignition is switched ON, the
wrench indicator light is illuminated and
then turns off after a few seconds.
The wrench indicator light is illuminated
when the preset maintenance period
arrives. Verify the content and perform
maintenance.
Refer to Maintenance Monitor on .
Low ...
Control Valve Body Removal/Installation [FS5 A EL]
Primary Control Valve Body On-Vehicle Removal
WARNING:
A hot transaxle and ATF can cause severe burns. Turn off the engine and wait
until they are cool.
Using compressed air can cause dirt and other particles to fly out, causing
injury to the eyes. Wear protective eyeglasses w ...
Manual Transaxle Shift Mechanism Removal/Installation [A26 M R]
1. Remove the battery cover..
2. Disconnect the negative battery cable.
3. Remove the battery and battery tray..
4. Remove the air cleaner and air inlet hose..
5. Remove the aerodynamic under cover NO.2..
6. Remove the tunnel member (rear)..
7. Remove the upper panel..
8. Remove the sh ...
