Mazda 3 Service Manual: Disc Pad (Rear) Replacement
1. Remove in the order indicated in the table.
2. Install in the reverse order of removal.
3. After installation, pump the brake pedal a few times and inspect the following:
-
Parking brake lever stroke
-
Brake drag
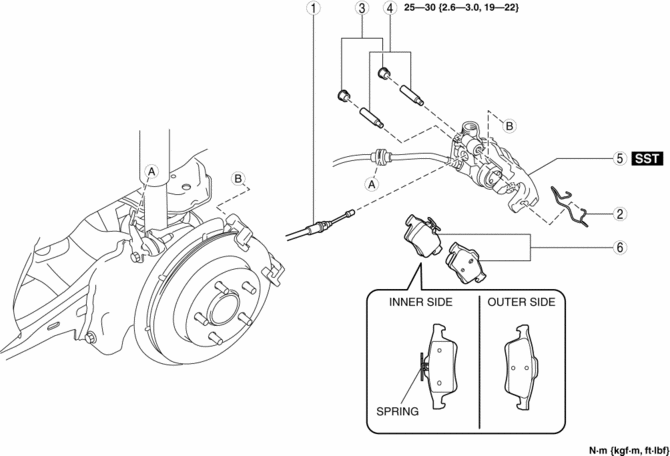
|
1 |
Parking brake cable (See PARKING BRAKE LEVER REMOVAL/INSTALLATION.) |
|
2 |
Retaining clip (See REAR BRAKE (DISC) REMOVAL/INSTALLATION.) |
|
3 |
Cap |
|
4 |
Bolt |
|
5 |
Caliper (See Caliper Installation Note.) |
|
6 |
Disc pad |
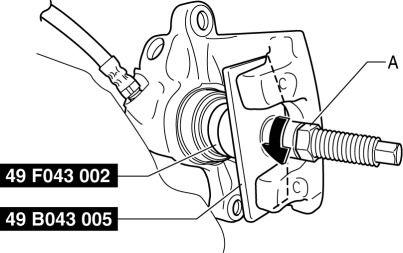
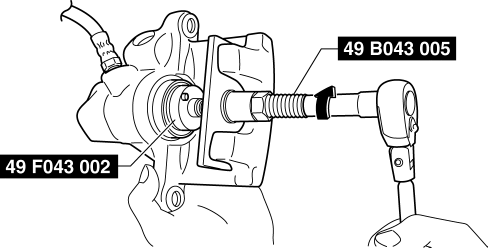
Caliper Installation Note
1. Clean the exposed area of the piston.
2. Install the SST
(49 F043 002) to the SST
(49 B043 005).
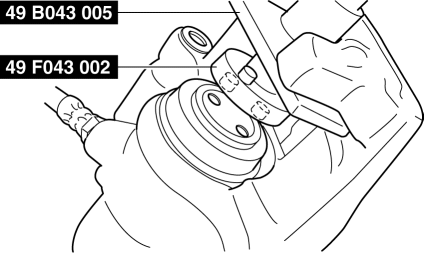
3. Align the SST
projection to the piston groove.
4. Rotate part A on the SST
in the direction of the arrow and secure the SST
to the caliper.
5. Rotate the SST
in the direction of the arrow and push the piston completely into the caliper.
NOTE:
-
Even with the piston completely pushed in, the top of the piston projects from the dust seal by approximately 2 mm
{0.09 in}
.
6. Rotate part A on the SST
in the direction of the arrow using the tool and remove the SST
from the caliper.
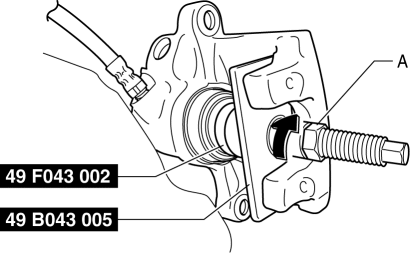
7. Install the caliper to the vehicle.
 Disc Pad (Front) Replacement [Mzr 2.3 Disi Turbo]
1. Remove in the order indicated in the table.
2. Install in the reverse order of removal.
3. After installation, pump the brake pedal a few times and verify that the brakes
do not drag.
...
 General Procedures (Brake)
Wheel and Tire Installation
1. When installing the wheels and tires, tighten the wheel nuts in a criss-cross
pattern to the following tightening torque.
Tightening torque
88—118 N· ...
Other materials:
Combination Switch Removal/Installation
CAUTION:
Handling the air bag module improperly can accidentally deploy the air bag
module, which may seriously injure you. Read the air bag system service warnings
and cautions before handling the air bag module..
1. Switch the ignition to off.
2. Disconnect the negative batte ...
Brake Fluid Pressure Sensor Inspection
1. Switch the ignition to off.
2. Install the SSTs to the master cylinder (secondary side) as shown in
the figure.
NOTE:
When installing the SST (49 D043 0A0) to the master cylinder, use
a commercially available flare nut wrench (flare nut across flat 12 mm {0.47
in}).
...
Operating the Radio
Radio ON
Press a band selector button ( )
to
turn the radio on.
Band selection
Successively pressing the band selector
button ( ) switches the bands as
follows: FM1→FM2→AM.
The selected mode will be indicated.
NOTE
If the FM broadcast signal becomes weak,
reception auto ...
