Mazda 3 Owners Manual: Closing the Hood
- Check under the hood area to make certain all filler caps are in place and all loose items (e.g. tools, oil containers, etc.) have been removed.
- Lift the hood, grasp the padded area on the support rod, and secure the support rod in the clip. Verify that the support rod is secured in the clip before closing the hood.
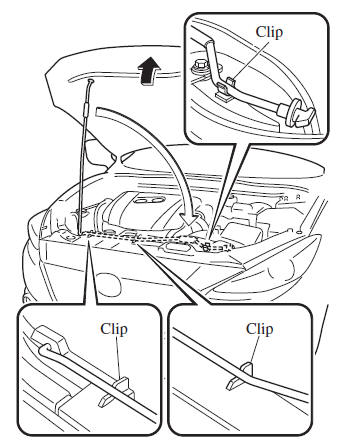
- Lower the hood slowly to a height of about 20 cm (7.9 in) above its closed position and then let it drop.
| CAUTION When closing the hood, do not push it excessively such as by applying your weight. Otherwise, the hood could be deformed. |
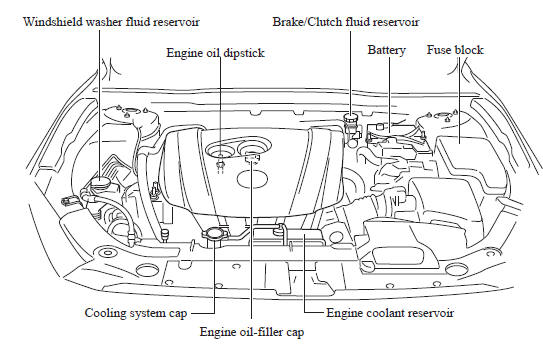
Engine Compartment Overview
 Opening the Hood
With the vehicle parked, pull the
release handle to unlock the hood.
Insert your hand into the hood opening,
slide the latch lever to the right, and lift
up the hood.
NOTE
T ...
 Engine Oil
NOTE
Changing the engine oil should be
performed by an Authorized Mazda
Dealer.
Refer to Introduction for
owner's responsibility in protecting your
investment. ...
Other materials:
Recommended Tire Inflation Pressure
On the tire label you will find the recommended tire inflation pressure in
both kPa and
psi for the tires installed as original equipment on the vehicle. It is very
important that the
inflation pressure of the tires on your vehicle is maintained at the
recommended pressure.
You should che ...
Brake Pedal Inspection
Pedal Height Inspection
1. Measure the distance from the center of the upper surface of the pedal pad
to the floor covering and verify that it is as specified.
If not within the specification, replace the brake pedal.
Brake pedal height (reference value)
MZR 2.0, SKYACTI ...
Seat Belt Extender
If your seat belt is not long enough, even
when fully extended, a seat belt extender
may be available to you at no charge from
your Authorized Mazda Dealer.
This extender will be only for you and for
the particular vehicle and seat. Even if it
plugs into other seat belts, it may not hold
in ...
