Mazda 3 Service Manual: Crankshaft Position (CKP) Sensor Inspection [Mzr 2.0, Mzr 2.5]
Visual Inspection
CAUTION:
-
When foreign material such as an iron chip is on the CKP sensor, it can cause abnormal output from the sensor because of flux turbulence and adversely affect the engine control. Be sure there is no foreign material on the CKP sensor when replacing.
-
Do not assemble the CKP sensor or change the installation position using any method other than the following. Otherwise, it could negatively affect engine controls, such as the ignition timing and fuel injection.
1. Remove the battery cover..
2. Disconnect the negative battery cable..
3. Perform the following procedure for easier access.
a. Remove the aerodynamic under cover No.2..
b. Remove the front splash shield (RH)..
4. Disconnect the CKP sensor connector.
5. Remove the CKP sensor..
6. Verify that there are no metal shavings on the sensor.
-
If there is a malfunction, remove any metal shavings that are adhering.
Air Gap Inspection
1. Verify that the CKP sensor is securely installed..
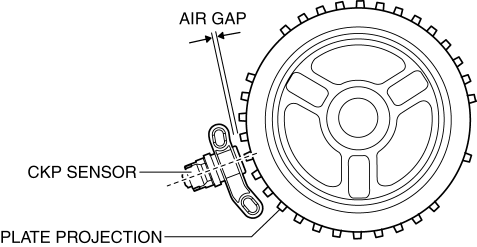
2. Using a thickness gauge, measure the air gap between the plate projections at the back of crankshaft pulley and the CKP sensor.

-
If not within the specification, inspect the plate projections for cracks or bending.
-
If there is any malfunction, replace the crankshaft pulley..
-
CKP sensor air gap
-
0.5—1.5 mm {0.02—0.05 in}
Voltage Inspection
CAUTION:
-
When foreign material such as an iron chip is on the CKP sensor, it can cause abnormal output from the sensor because of flux turbulence and adversely affect the engine control. Be sure there is no foreign material on the CKP sensor when replacing.
-
Do not assemble the CKP sensor or change the installation position using any method other than the following. Otherwise, it could negatively affect engine controls, such as the ignition timing and fuel injection.
-
If the wiring harnesses or waterproof connectors are damaged, water penetrating the connector will cause a sensor malfunction. To prevent this, be careful not to damage wiring harnesses or waterproof connectors.
1. Idle the engine.
2. Measure the CKP signal and verify that rectangular waves are produced..
-
If not as specified, replace the CKP sensor..
 Camshaft Position (CMP) Sensor Removal/Installation [Mzr 2.0, Mzr 2.5]
CAUTION:
When replacing the CMP sensor, make sure there is no foreign material on
it such as metal shavings. If it is installed with foreign material, the sensor
output signal will malfu ...
 Crankshaft Position (CKP) Sensor Removal/Installation [Mzr 2.0, Mzr 2.5]
Removal
CAUTION:
When foreign material such as an iron chip is on the CKP sensor, it can cause
abnormal output from the sensor because of flux turbulence and adversely affect
the engine ...
Other materials:
Front Combination Light Bracket Replacement
NOTE:
Verify that the front combination light is not damaged before using the repair
bracket for installation when the original brackets are damaged. If the front
combination light component is damaged, replace the light as a single unit.
1. Cut off the front combination light br ...
Seat Weight Sensor Inspection [Two Step Deployment Control System]
CAUTION:
If any of the following work is performed, perform the seat weight sensor
inspection using the M-MDS.
Removal of the passenger-side seat
Loosening and retightening of passenger’s seat fixing bolts
Or, the vehicle is involved in a collision
...
Variable Tumble Shutter Valve Actuator Inspection [Mzr 2.0, Mzr 2.5]
Operation Inspection
1. Remove the air hose..
2. Disconnect the vacuum hose from the variable tumble shutter valve actuator.
3. Connect a vacuum pump to the variable tumble shutter valve actuator.
NOTE:
Covered with a hood, the rod of the variable tumble shutter valve actuator
...
