Mazda 3 Owners Manual: Dashboard Illumination
When the position lights are turned on with the ignition switched ON, the brightness of the instrument panel illumination is dimmed.
NOTE When the position lights are turned on, the position lights indicator light in the instrument cluster turns on.
Refer to Headlights on .
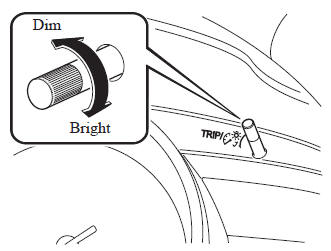
The brightness of the instrument panel and dashboard illuminations can be adjusted by rotating the knob.
- The brightness decreases by rotating the knob to the left. A beep sound will be heard when the knob has been rotated to the maximum dim position.
- The brightness increases by rotating the knob to the right.
Function for cancelling illumination dimmer
The illumination dimmer can be canceled by rotating the dashboard illumination knob to the right until a beep sound is heard while the instrument cluster is dimmed with the ignition switched ON.
If the instrument cluster's visibility is reduced due to glare from surrounding brightness, cancel the illumination dimmer.
NOTE
- When the illumination dimmer is canceled, the instrument cluster cannot be dimmed even if the position lights are turned on.
- When the illumination dimmer is canceled, the screen in the center display switches to constant display of the daytime screen.
 Fuel Gauge
The fuel gauge shows approximately
how much fuel is remaining in the tank
when the ignition is switched ON. We
recommend keeping the tank over 1/4 full.
Type A/Type B instrument cluster
Type ...
 Outside Temperature Display
When the ignition is switched ON, the
outside temperature is displayed.
NOTE
Under the following conditions, the
outside temperature display may differ
from the actual outside temperature
de ...
Other materials:
Clock
Setting the time
The clock can be set at any time when the
ignition is switched to ACC or ON.
To adjust the time, press the clock
button ( ) for about 2 seconds
until
a beep is heard.
The clock's current time will flash.
Time adjustment
To adjust the time, press the hour/
...
Windshield Defrosting and
Defogging
Set the mode selector dial to the
position and turn the fan control dial to the
desired speed.
In this position, the outside air position is automatically selected, and when
the fan control dial is ON, the air conditioner automatically turns on. The air
conditioner will directly dehumidify ...
Steering Gear And Linkage Disassembly
CAUTION:
To prevent damage to the steering gear, secure it to the vise using a copper
plate or clean cloth.
1. Disassemble in the order indicated in the table.
1
Floor seal
2
Oil pipe
3
Tie-rod end ...
