Mazda 3 Service Manual: Clutch Pedal Position (CPP) Switch Inspection [Mzr 2.0, Mzr 2.5]
Continuity Inspection
1. Verify that the CPP switch is installed properly..
2. Remove the battery cover..
3. Disconnect the negative battery cable..
4. Disconnect the CPP switch connector..
5. Verify that the continuity between CPP switch terminals A and B when the clutch pedal is depressed and when it is released is according to the following table:
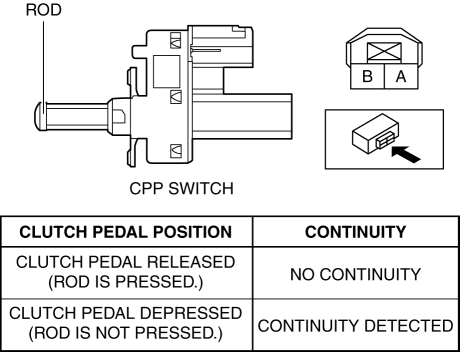
-
If not as verified, replace the CPP switch..
 Clutch Pedal Inspection [C66 M R]
NOTE:
For the clutch pedal inspection, note the followings and measure each inspection
location.
Measure the center of the upper surface of the pedal pad for each inspection.
...
 Clutch Pedal Position Switch Removal/Installation [C66 M R]
1. Remove the battery cover..
2. Disconnect the negative battery cable..
3. Disconnect the clutch pedal position switch connector.
4. Remove the clutch pedal position switch from the pedal brack ...
Other materials:
Antenna Amplifier Removal/Installation
With Audio Unit (Without Display)
1. Disconnect the negative battery cable..
2. Remove the rain sensor cover. (Vehicles with auto light/wiper system).
3. Disconnect the rain sensor connector. (Vehicles with auto light/wiper system)
4. Partially peel back the seaming welts.
5. Remove the fo ...
Battery Recharging [Mzr 2.3 Disi Turbo]
Using GR8-1291:
(See GR8-1291 INSTANT TRAINING MODULE (VIDEO) .)
WARNING:
Keep all flames away from the battery, otherwise evaporated gas from the
battery fluid may catch fire and cause serious injury.
1. Remove the battery filler caps and check the water level. If necessary, add ...
Customer Assistance (Mexico)
Your complete and permanent satisfaction is our business. We are here to
serve you. All
Authorized Mazda Dealers have the knowledge and the tools to keep your Mazda
vehicle in
top condition.
If you have any questions or recommendations for improvement regarding the
service of
your Mazda ...
