Mazda 3 Service Manual: Headlight Aiming
CAUTION:
-
If the headlight aiming is adjusted with cargo in the vehicle, it may not adjust correctly. Adjust the headlight aiming with the vehicle under the following conditions:
-
No occupants inside vehicle
-
Cargo other than spare tire, jack, and tools not loaded
-
Tire pressure is at specification.
-
Park the vehicle on level ground
NOTE:
-
The reflectors for the low and high beams are an integrated unit. Therefore, perform the headlight aiming adjustment on only the low beam.
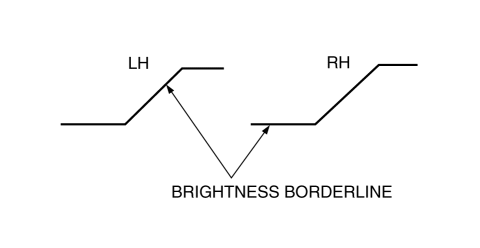
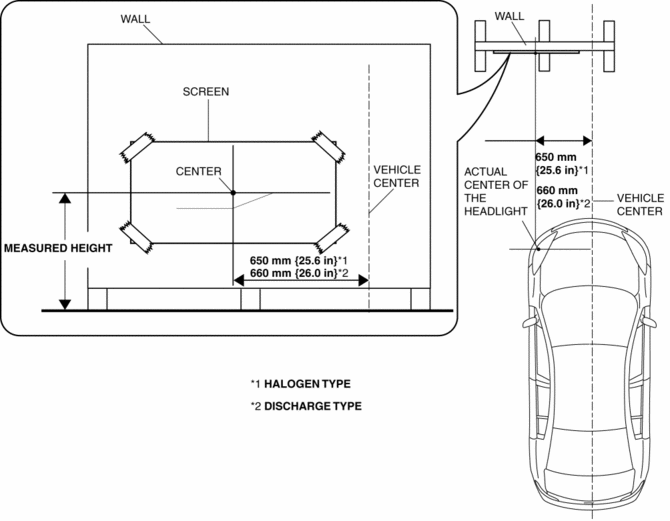
1. Point the headlight beams to a wall and verify that the headlight beams are as shown in the figure.
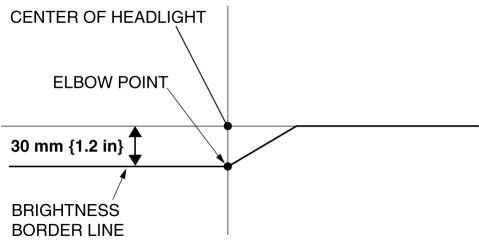
2. Make a screen as shown in the figure using double-weight, white paper.
3. Seat one person in the driver’s seat.
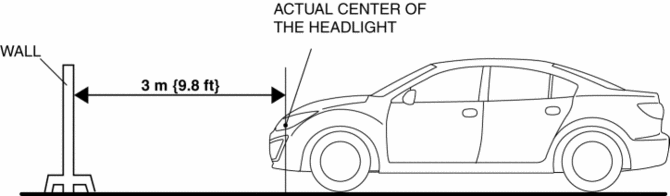
4. Line up the vehicle with the wall so that the center of the headlight is 3 m {9.8 ft}
away from the wall.
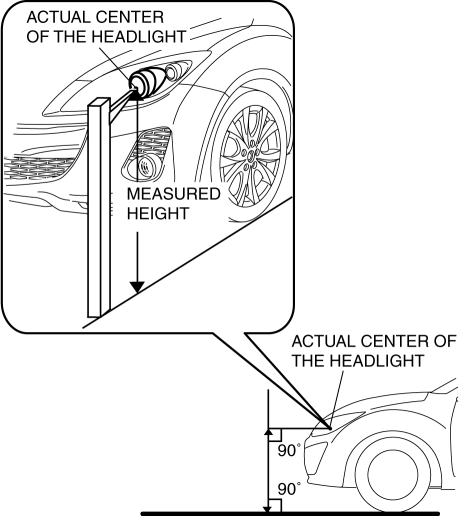
5. Measure the height at the center of the headlight.
NOTE:
-
Since the height of the vehicle varies depending on the vehicle situation, measure the height of the center of the headlight using the actual vehicle.
6. Align the center of the headlight with the center of the screen.
7. Block the light of the other headlight using a partition.
8. Start the engine.
NOTE:
-
If servicing is performed when the engine is stopped and the headlight illuminates, it could result in a discharged battery. For the aiming adjustment, start the engine and perform servicing while the engine is idling.
9. Turn on the headlight low beams.
10. Set the headlight leveling switch to the 0 position. (vehicles with headlight leveling system)
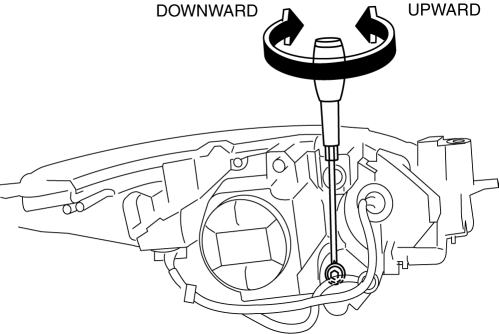
11. Verify that the elbow point of the headlight is in the position indicated on the screen.
-
If the elbow point is not in the position indicated on the screen, perform the following adjustment:
-
Insert a Phillips driver into the position shown in the figure and adjust the headlights.
 Front Side Marker/Front Turn Light Bulb Removal/Installation
1. Disconnect the negative battery cable..
2. Slightly bend back the front mudguard..
3. Rotate the front side marker/front turn light socket in the direction of the
arrow shown in the figure.
...
 Headlight Auto Leveling System Initialization
CAUTION:
If the headlight auto leveling initial setting is not stored correctly, the
headlight auto leveling system may not operate normally. To store the initial
setting correctly, perf ...
Other materials:
Parking Brake Cable Removal/Installation
1. Remove the following parts:
a. Upper panel.
b. Shift knob (MTX).
c. Selector lever knob (ATX).
d. Shift panel.
e. Side wall.
f. Console.
2. Remove the under cover..
3. Remove the tunnel member (rear). (MZR 2.0, MZR 2.5, MZR 2.3 DISI Turbo).
4. Remove the brace bar. (SKYACTIV-G ...
Windshield Washer Hose Removal/Installation
1. Remove the following parts:
a. Windshield wiper arm and blade.
b. Front fender molding.
c. Cowl grille.
d. Front mudguard (RH).
2. Disconnect joint pipes, then remove windshield washer hose B, C and D.
3. Remove the windshield washer hose B.
4. Disconnect windshield washer hose C fr ...
Split/One-piece Folding the
Seatback
By lowering the rear seatback(s) the
luggage compartment space can be
expanded.
WARNING
Do not drive the vehicle with occupants
on folded down seatback(s) or in the
luggage compartment.
Putting occupants in the luggage
compartment is dangerous because
seat belts cannot be ...
