Mazda 3 Service Manual: Heated Oxygen Sensor (HO2 S) Inspection [Mzr 2.0, Mzr 2.5]
HO2S Inspection
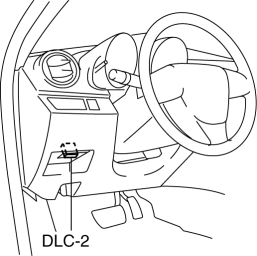
1. Connect the M-MDS to the DLC-2.

2. Switch the ignition to ON.
3. Warm up the engine to normal operating temperature.
4. Access the following PIDs using the M-MDS..
-
VSS (Vehicle speed)
-
RPM (Engine speed)
-
O2S12 (HO2S output voltage)
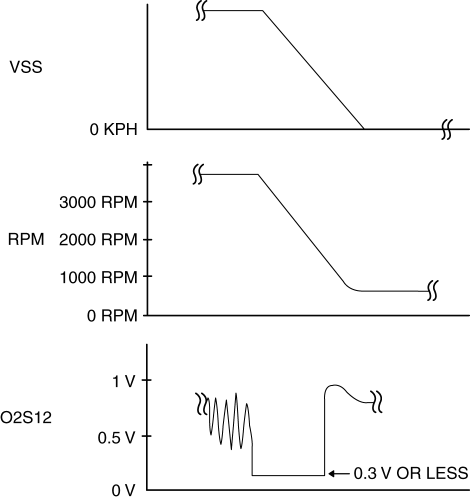
5. Drive the vehicle and decelerate the engine speed by releasing the accelerator pedal fully when the engine speed is 3,000 rpm or more
.
6. Verify that the HO2S outputs a voltage of 0.6 V or more
, one time or more, then verify that the HO2S voltage (PID: O2S12) is 0.3 V or less
while decelerating as shown in the figure.

-
If not as specified, replace the HO2S..
HO2S Heater Inspection
WARNING:
-
A hot engine and exhaust system can cause severe burns. Turn off the engine and wait until they are cool before removing the exhaust system.
1. Remove the battery cover..
2. Disconnect the negative battery cable..
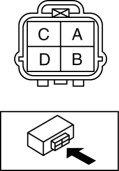
3. Disconnect the HO2S connector.
4. Measure the resistance between HO2S terminals C and D.

-
If not as specified, replace the HO2S..
-
HO2S heater resistance
-
2—50 ohms [normal temperature]
 Engine Coolant Temperature (ECT) Sensor Removal/Installation [Mzr 2.0, Mzr 2.5]
WARNING:
When the engine is hot, it can badly burn. Turn off the engine and wait until
it is cool before removing the ECT sensor.
ECT Sensor No.1
1. Remove the battery cover..
2. D ...
 Heated Oxygen Sensor (HO2 S) Removal/Installation [Mzr 2.0, Mzr 2.5]
WARNING:
A hot engine and exhaust system can cause severe burns. Turn off the engine
and wait until they are cool before removing the exhaust system.
1. Remove the battery cover..
2 ...
Other materials:
Drive Belt Removal/Installation [Skyactiv G 2.0]
WARNING:
A hot engine can cause severe burns. Turn off the engine and wait until it
is cool before servicing.
NOTE:
Remove/install the drive belt from the underside of the vehicle.
Generator Drive Belt Removal/Installation
CAUTION:
To prevent damage to the dri ...
Rear Center Speaker Removal/Installation
1. Disconnect the negative battery cable..
2. Remove the following parts:
a. Rear seat cushion.
b. Rear scuff plate.
c. Tire house trim.
d. C-pillar trim.
e. Rear package trim.
3. Remove the screw.
4. Disconnect the connector.
5. Remove the rear center speaker.
6. Install in ...
Magnetic Clutch Inspection [Manual Air Conditioner]
1. Connect battery to terminal A of magnetic clutch and ground to A/C compressor
body.
SKYACTIV-G 2.0
MZR 2.0
MZR 2.5
2. Verify that the magnetic clutch operates.
If there is any malfunction, replace the magnetic clutch.
...
