Mazda 3 Service Manual: Indirect Illumination Removal/Installation
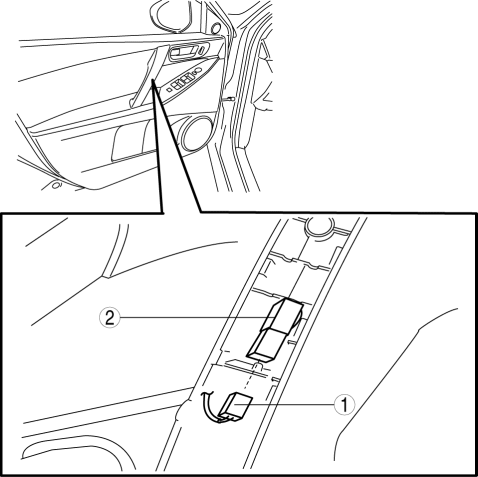
Power Window Switch (With power window switch indirect illumination)
1. Disconnect the negative battery cable..
2. Remove the assist handle cover..
3. Remove in the order indicated in the table.
|
1 |
Connector |
|
2 |
Power window switch indirect illumination |
4. Install in the reverse order of removal.
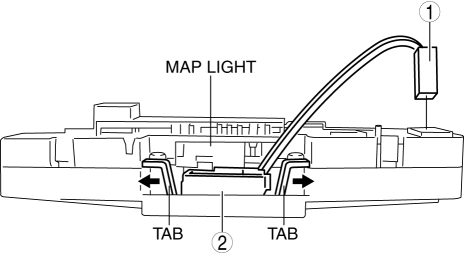
Console
1. Disconnect the negative battery cable..
2. Remove the map light..
3. Remove in the order indicated in the table.
|
1 |
Connector |
|
2 |
Console indirect illumination |
4. Install in the reverse order of removal.
 Inboard Light Removal/Installation
4SD
1. Disconnect the negative battery cable..
2. Remove the trunk lid trim..
3. Disconnect the connector.
4. Remove the nut.
5. Remove the bracket.
6. Remove the inboard light as shown ...
 Lighting System Personalization Features Setting Procedure
Auto Light System
1. Connect the M-MDS (IDS) to the DLC-2.
2. After the vehicle is identified, select the following items from the initial
screen of the IDS.
Select the “Module Pro ...
Other materials:
Restraints SST [Standard Deployment Control System]
49 H066 002
Deployment tool
49 D066 002
Adapter harness
49 L066 002
Adapter harness
49 B066 004
Adapter harness
49 N088 0A0
Fuel and Therm ...
Rear Outer Handle Removal/Installation
1. Fully close the rear door glass.
2. Disconnect the negative battery cable..
3. Remove the rear door trim..
4. Remove the service hole cover.
5. Remove the screw from the service hole.
NOTE:
The screw cannot be removed because of the stopper.
6. Press the tab on the ...
Oil Pump Removal/Installation [Mzr 2.3 Disi Turbo]
WARNING:
Hot engines and engine oil can cause severe burns. Turn off the engine and
wait until it and the engine oil have cooled.
A vehicle that is lifted but not securely supported on safety stands is dangerous.
It can slip or fall, causing death or serious injury. Never work ...
