Mazda 3 Service Manual: Light Switch Removal/Installation
1. Disconnect the negative battery cable..
2. Remove the column cover..
3. Disconnect the connector.
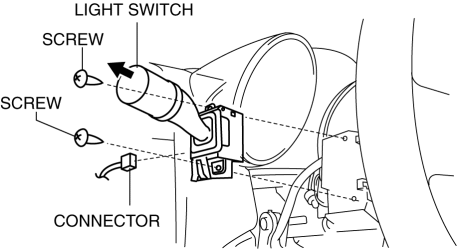
4. Remove the screws shown in the figure, then remove the light switch by pulling it in the direction of the arrow.
5. Install in the reverse order of removal.
 Light Switch Inspection
Vehicles Without Auto Light System
1. Disconnect the negative battery cable..
2. Remove the column cover..
3. Remove the light switch..
4. Verify that the continuity between the light switch te ...
 Exterior
...
Other materials:
Types of cameras and sensors used for the Advanced Park
The Subaru Solterra Advanced Park system relies on a network of high-precision
cameras and sensors designed to detect surrounding vehicles and environmental features,
helping the driver accurately identify suitable parking spaces and improve overall
parking efficiency.
Front camera
Sid ...
Brake/Clutch Fluid
Inspecting Brake/Clutch Fluid Level
WARNING
If the brake/clutch fl uid level is low, have
the brakes inspected:
A low brake/clutch fl uid level is
dangerous.
A low level could indicate brake lining
wear or a brake system leak which
could cause the brakes to fail and lead ...
Engine Disassembly/Assembly [Mzr 2.3 Disi Turbo]
1. Remove the engine from the transaxle..
2. Remove the intake-air system..
3. Remove the exhaust system..
4. Remove the generator..
5. Remove the EGR valve..
6. Remove the ignition coils..
7. Remove the high pressure fuel pump and high pressure fuel pump cover..
8. Remove the fuel inj ...
