Mazda 3 Service Manual: Passenger Compartment Temperature Sensor Removal/Installation [Full Auto Air Conditioner]
1. Disconnect the negative battery cable..
2. Remove the following parts:
a. Front scuff plate.
b. Front side trim.
c. Dashboard under cover.
d. Upper panel.
e. Shift lever knob (MTX).
f. Selector lever knob (ATX).
g. Shift panel.
h. Side wall.
i. Console.
j. Hood release lever.
k. Lower panel (driver-side).
3. Disconnect the passenger compartment temperature sensor connector.
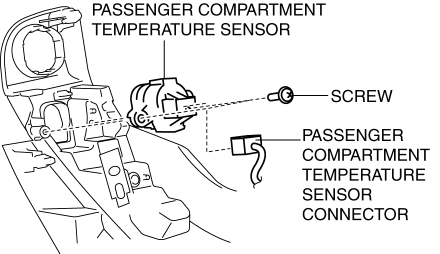
4. Remove the screw.
5. Remove the passenger compartment temperature sensor.
6. Install in the reverse order of removal.
 Passenger Compartment Temperature Sensor Inspection [Full Auto Air Conditioner]
1. Measure the temperature around the passenger compartment temperature sensor
and measure the resistance between passenger compartment temperature sensor terminals
B and D.
If the cha ...
 Vehicle Speed Sensor (VSS) Inspection [FS5 A EL]
On-Vehicle Inspection
1. Inspect the power supply circuit for the VSS.
a. Remove the insulator from the transaxle.
b. Disconnect the VSS connector.
c. Switch the ignition to ON (engine ...
Other materials:
Uniform Tire Quality Grading System
(UTQGS)
This information relates to the tire grading system developed by the U.S.
National Highway
Traffic Safety Administration for grading tires by tread wear, traction, and
temperature
performance.
Tread Wear
The tread wear grade is a comparative rating based on the wear rate of the
tire when t ...
Front Fog Light Relay Removal/Installation
1. Disconnect the negative battery cable..
2. Remove the front mudguard.(RH).
3. Remove the front fog light relay case.
4. Remove the cover.
5. Remove the front fog light relay.
6. Install in the reverse order of removal..
Front Fog Light Relay Installation Note
1. Install the front ...
Input/Turbine Speed Sensor Removal/Installation [FS5 A EL]
CAUTION:
Always use a new bolt. If the removed input/turbine speed sensor installation
bolt is reused, it may cause oil leakage.
A sealant coating is applied to the input/turbine speed sensor installation
bolt to prevent oil leakage from the installation bolt hole which passes ...
