Mazda 3 Service Manual: Positive Crankcase Ventilation (PCV) Valve Inspection [Mzr 2.0, Mzr 2.5]
Airflow Inspection
1. Disconnect the section (A) of the ventilation hose shown in the figure.
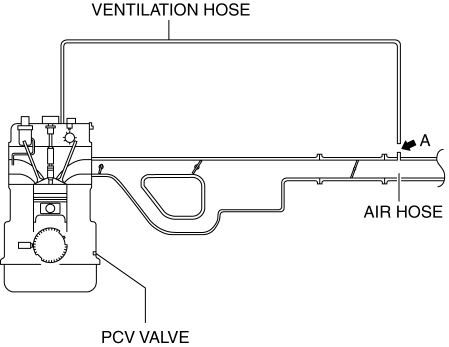
2. Start the engine and verify that vacuum is applied to the end of the disconnected ventilation hose while the engine is idling.
NOTE:
-
Because it is difficult to directly inspect the PCV valve, determine the integrity of the PCV valve by performing a simple inspection of the ventilation hose airflow condition.If the PCV valve is operating normally, vacuum occurs in the ventilation hose, however, if there is a malfunction in the PCV valve, positive pressure occurs in the ventilation hose because the blow-by gas is circulated to the air hose from the ventilation hose.
-
Verify the ventilation hose vacuum using the following methods:
-
When the tip of your finger touches the end of the ventilation hose, it is suctioned by the hose.
-
When a thin scrap of paper contacts the end of the ventilation hose, it is suctioned by the hose.
3. If it can be verified that vacuum occurs in the ventilation hose, the positive crankcase ventilation (PCV valve) system is determined to be normal.
-
If positive pressure occurs in the ventilation hose, perform the procedure from Step 4 to examine the PCV valve.
4. Remove the battery cover..
5. Disconnect the negative battery cable..
6. Remove the intake manifold and the fuel distributor component as a single unit..
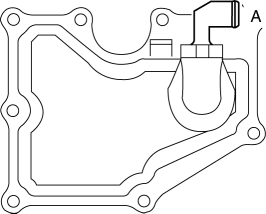
7. Remove the PCV valve and the oil separator as a single unit..
8. Verify that there is no airflow when pressure is applied to port A.
-
If there is airflow, replace the PCV valve..
9. Verify that there is airflow when vacuum is applied to port A.
-
If there is no airflow, replace the PCV valve..
 EGR Valve Removal/Installation [Mzr 2.0, Mzr 2.5]
1. Remove the battery cover..
2. Disconnect the negative battery cable..
3. Drain the engine coolant from the radiator..
4. Remove the air cleaner and the air hose as a single unit..
5. Remove ...
 Positive Crankcase Ventilation (PCV) Valve Removal/Installation [Mzr 2.0, Mzr
2.5]
Positive Crankcase Ventilation (PCV) Valve Removal/Installation [Mzr 2.0, Mzr
2.5]
1. Remove the battery cover..
2. Disconnect the negative battery cable..
3. Remove the intake manifold and the fuel distributor component as a single
unit..
4. Remove in the order indicated in ...
Other materials:
DSC Off Switch Removal/Installation
1. Remove the switch panel in the direction of the arrow shown in the figure.
2. Disconnect the connector.
3. Remove the DSC OFF switch in the direction of the arrow (2) shown in the figure
while pressing the tabs in the direction of the arrow (1).
4. Remove the DSC OFF switch.
5. ...
Moonroof
The moonroof can be opened or closed
electrically only when the ignition is
switched ON.
WARNING
Do not let passengers stand up or
extend part of the body through the
open moonroof while the vehicle is
moving:
Extending the head, arms, or other
parts of the body throu ...
Restraints SST [Two Step Deployment Control System]
49 H066 002
Deployment tool
49 D066 002
Adapter harness
49 L066 002
Adapter harness
49 G066 003
Adapter harness
49 N088 0A0
Fuel and Therm ...
