Mazda 3 Service Manual: Power Window Motor Inspection
Front Driver Side
1. Disconnect the negative battery cable..
2. Remove the inner garnish..
3. Remove the front door trim..
4. Disconnect the power window motor connector.
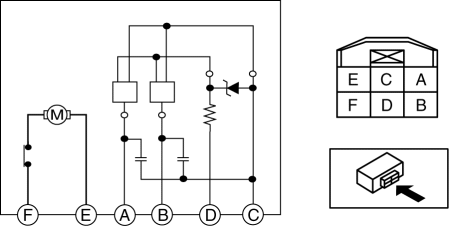
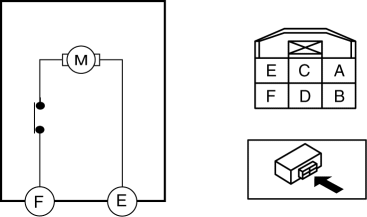
5. Apply battery positive voltage and connect the ground to power window motor terminals E and F, and then inspect the power window motor operation.
-
If the power window motor does not operate as indicated in the table, replace the power window motor.
|
Operation |
Terminal |
|
|
E |
F |
|
|
Open |
Ground |
B+ |
|
Close |
B+ |
Ground |
6. Connect the battery positive voltage to power window motor terminal D and connect terminal C to ground.
7. Operate the power window motor and measure the voltage at terminals A and B.
-
If there is any malfunction, replace the power window motor.
-
Voltage
-
Pulse: max. 5 V/min. 0 V
Front Passenger Side
1. Disconnect the negative battery cable..
2. Remove the inner garnish..
3. Remove the front door trim..
4. Disconnect the power window motor connector.
5. Apply battery positive voltage and connect the ground to power window motor terminals E and F, and then inspect the power window motor operation.
-
If the power window motor does not operate as indicated in the table, replace the power window motor.
|
Operation |
Terminal |
|
|
E |
F |
|
|
Open |
Ground |
B+ |
|
Close |
B+ |
Ground |
Rear
1. Disconnect the negative battery cable..
2. Remove the rear door trim..
3. Disconnect the power window motor connector.
4. Apply battery positive voltage and connect the ground to power window motor terminals E and F, and then inspect the power window motor operation.
-
If the power window motor does not operate as indicated in the table, replace the power window motor.
|
Operation |
Terminal |
|
|
E |
F |
|
|
Open |
Ground |
B+ |
|
Close |
B+ |
Ground |
 Power Window Main Switch Removal/Installation
1. Disconnect the negative battery cable..
2. Remove the inner garnish. (driver's side).
3. Remove the front door trim. (driver's side).
4. Remove the power window main switch..
5. Ins ...
 Power Window Motor Removal/Installation
Front Power Window Motor
1. Fully lower the front door glass.
2. Disconnect the negative battery cable..
3. Remove the inner garnish..
4. Remove the front door trim..
5. Remove the front door ...
Other materials:
Oil Seal (Differential) Replacement [C66 M R]
1. Remove the aerodynamic under cover No.2 and the splash shield as a single
unit..
2. Drain the manual transaxle oil..
3. Disconnect the drive shaft (LH) from the MTX..
4. Disconnect the drive shaft (RH) from the joint shaft..
5. Remove the joint shaft..
6. Remove the oil seal (LH).
...
Trunk Lid Latch Switch Inspection
1. Disconnect the negative battery cable..
2. Remove the trunk lid trim..
3. Remove the trunk lid latch and lock actuator..
4. Press the latch in using a flathead screwdriver to inspect the latch lever
condition.
5. Verify that the continuity is as indicated in the table.
I ...
Mounting the Spare Tire
Remove dirt and grime from the
mounting surfaces of the wheel and
hub, including the hub bolts, with a
cloth.
WARNING
Make sure the mounting surfaces of
the wheel, hub and lug nuts are clean
before changing or replacing tires:
When changing or replacing a tire,
...
