Mazda 3 Service Manual: Rear ABS Wheel Speed Sensor Inspection
Installation Visual Inspection
1. Inspect for the following:
-
If there is any malfunction, replace the part.
a. Excessive looseness or play of the rear ABS wheel-speed sensor
b. Deformation of the rear ABS wheel-speed sensor
c. Deformation or damage of the rear ABS sensor rotor
Clearance Inspection
1. Remove the rear ABS wheel-speed sensor.
2. Measure the distance between the rear ABS wheel-speed sensor installation surface and the rear ABS sensor rotor. This is dimension A.

3. Calculate the clearance between the rear ABS wheel-speed sensor and the rear ABS sensor rotor using the following formula:
-
Clearance (mm {in}) = A –13.9 {0.547}
4. Verify that the clearance between the rear ABS sensor rotor and the rear ABS wheel-speed sensor is as indicated below.
-
If there is any malfunction, replace it.
-
Clearance
-
1.46 mm {0.057 in} or less
Sensor Output Value Inspection
CAUTION:
-
Resistance inspection using other testers may cause damage to the ABS wheel-speed sensor internal circuit. Be sure to use the M-MDS to inspect the ABS wheel-speed sensor.
1. Switch the ignition to off.
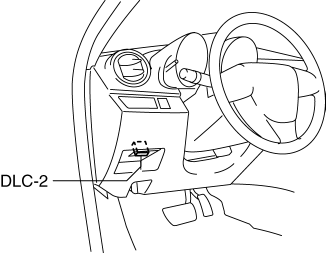
2. Connect the M-MDS to the DLC-2.
3. Select the following PIDs using the M-MDS:
-
WSPD_LR
(LR wheel-speed sensor)
-
WSPD_RR
(RR wheel-speed sensor)
4. Start the engine and drive the vehicle.
5. Verify that the display of the M-MDS shows the same value as the speedometer.
-
If there is any malfunction, replace the rear ABS wheel-speed sensor.
 Precaution [ABS]
1. Any one or a combination of the ABS warning and brake system warning lights
illuminates even when the system is normal.
Warning lights that may illuminate and/or flash
...
 Rear ABS Wheel Speed Sensor Removal/Installation
1. Remove the under cover..
2. Remove in the order indicated in the table.
3. Install in the reverse order of removal.
1
Connector
2
Bolt
...
Other materials:
PID/Data Monitor Inspection [Instrument Cluster]
1. Connect the M-MDS (IDS) to the DLC-2.
2. After the vehicle is identified, select the following items from the initialization
screen of the IDS.
a. Select “DataLogger”.
b. Select “Modules”.
c. Select “IC”.
3. Select the applicable PID from the PID table.
4. Verify the ...
Transaxle Fluid Temperature (Tft) Sensor Inspection [FS5 A EL]
CAUTION:
Water or foreign objects entering the connector can cause a poor connection
or corrosion. Be sure not to drop water or foreign objects on the connector
when disconnecting it.
On-Vehicle Inspection
1. Perform the following procedures.
a. Remove the battery cover..
b. ...
Cylinder Head Gasket Replacement [Mzr 2.0, Mzr 2.5]
WARNING:
Fuel vapor is hazardous. It can very easily ignite, causing serious injury
and damage. Always keep sparks and flames away from fuel.
Fuel line spills and leakage are dangerous. Fuel can ignite and cause serious
injuries or death and damage. Fuel can also irritate skin ...
