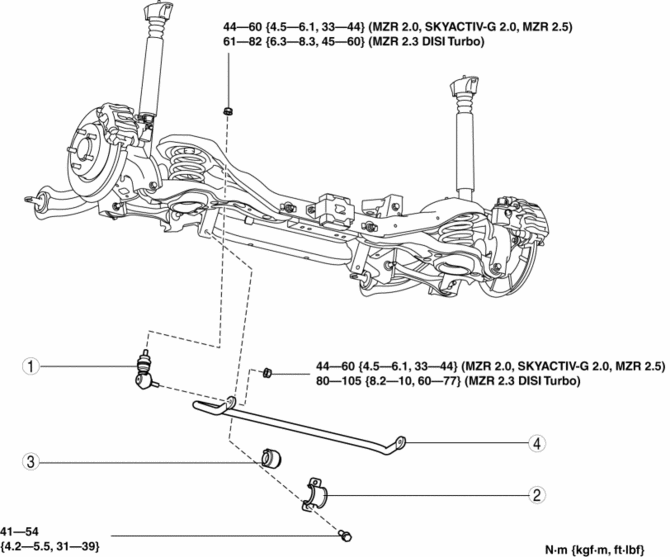
Mazda 3 Service Manual: Rear Stabilizer Removal/Installation
1. Remove in the order indicated in the table.
2. Install in the reverse order of removal.
|
1 |
Rear stabilizer control link |
|
2 |
Rear stabilizer bracket . |
|
3 |
Rear stabilizer bushing (See Rear Stabilizer, Rear Stabilizer Bushing and Rear Stabilizer Bracket Installation Note.) |
|
4 |
Rear stabilizer (See Rear Stabilizer, Rear Stabilizer Bushing and Rear Stabilizer Bracket Installation Note.) |
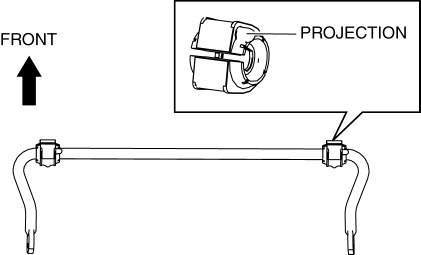
Rear Stabilizer, Rear Stabilizer Bushing and Rear Stabilizer Bracket Installation Note
1. Install the rear stabilizer bushing so that the projection points to the left side of the vehicle.
2. Install the rear stabilizer bracket.
3. Install the rear stabilizer component to the vehicle.
 Rear Stabilizer Control Link Inspection
1. Remove the rear stabilizer control link from the vehicle..
2. Inspect for bending or damage. If there is any malfunction, replace the rear
stabilizer control link.
3. Rotate the ball joint st ...
 Rear Upper Arm Removal/Installation
1. When working on the right side of the vehicle, disconnect the canister vent
(CV) solenoid valve from the rear crossmember. (MZR 2.0 (Except Mexico), SKYACTIV-G
2.0, MZR 2.3 DISI Turbo, MZR 2.5 ...
Other materials:
Condenser Inspection
1. Inspect the condenser for cracks, damage, and oil leakage.
If there is any malfunction, replace the condenser.
2. Visually inspect the fins for clogging of foreign material.
If any fins are clogged, remove the foreign material.
3. Visually inspect for bent fins.
...
Starter Removal/Installation [Mzr 2.0, Mzr 2.5]
WARNING:
Remove and install all parts when the engine is cold, otherwise they can
cause severe burns or serious injury.
When the battery cables are connected, touching the vehicle body with starter
terminal B will generate sparks. This can cause personal injury, fire, and d ...
Auto Dimming Mirror Inspection
1. Measure the voltage at each terminal.
If the voltage is not as specified in the Terminal Voltage Table (Reference),
inspect the parts under “Inspection item (s)” and related wiring harnesses.
If the system does not work properly even though the inspection items
or ...
