Mazda 3 Service Manual: Roof Carrier Bracket Removal/Installation
4SD
1. Disconnect the negative battery cable..
2. Remove the following parts:
a. Sunroof seaming welt (vehicles with sunroof)
b. Front scuff plate.
c. Rear scuff plate.
d. A-pillar trim.
e. B-pillar lower trim.
f. Upper anchor of the front seat belt installation bolt.
g. B-pillar upper trim.
h. Rear seat cushion.
i. Tire house trim.
j. C-pillar trim.
k. Map light.
l. Sunvisor.
m. Assist handle.
n. Headliner.
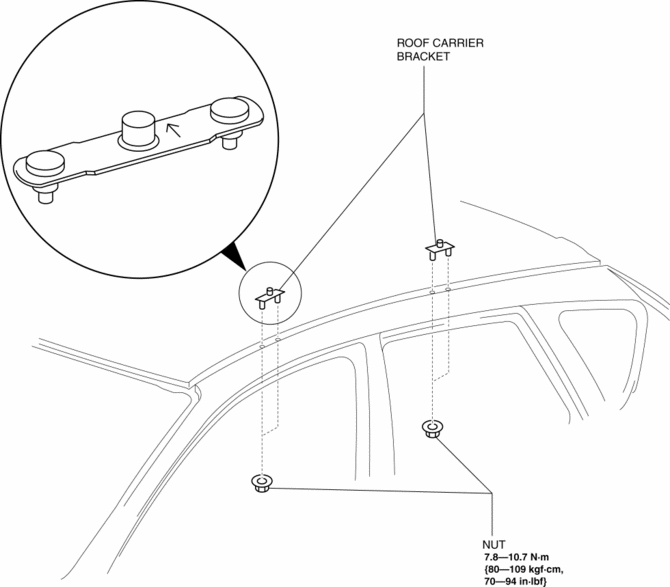
3. Remove the nuts.

4. Remove the roof carrier bracket.
5. Install in the reverse order of removal.
NOTE:
-
Install the roof carrier bracket so that the arrow on it faces inward.
5HB
1. Disconnect the negative battery cable..
2. Remove the following parts:
a. Sunroof seaming welt (vehicles with sunroof)
b. Front scuff plate.
c. Rear scuff plate.
d. A-pillar trim.
e. B-pillar lower trim.
f. Upper anchor of the front seat belt installation bolt.
g. B-pillar upper trim.
h. Rear seat cushion.
i. Tire house trim.
j. Trunk side upper trim.
k. C-pillar trim.
l. Map light.
m. Sunvisor.
n. Assist handle.
o. Headliner.
3. Remove the nuts.
4. Remove the roof carrier bracket.
5. Install in the reverse order of removal.
NOTE:
-
Install the roof carrier bracket so that the arrow on it faces inward.
 Oil Seal (Differential) Replacement [G66 M R]
1. On level ground, jack up the vehicle and support it evenly on safety stands.
2. Remove the aerodynamic under cover No.2..
3. Drain the oil from the transaxle..
4. Remove the front splash shi ...
 Driveshafts
...
Other materials:
Door Adjustment
1. Loosen the door hinge installation bolts.
2. Adjust the gap and height difference to the standard range by moving the door
back and forth, left and right.
Standard range
a: 2.5―4.5 mm {0.10―0.17 in}
b: -1.0―1.0 mm {-0.039―0.039 in}
c: 2.5& ...
SUBARU Safety Sense
The SUBARU Safety Sense suite in the Subaru Solterra integrates a
range of advanced driver assistance technologies designed to support the driver
and enhance both safety and comfort during everyday driving. These intelligent systems
work together to help reduce collision risk, improve awarenes ...
ABS HU/CM Inspection
1. Disconnect the ABS HU/CM connector..
2. Connect the negative battery cable..
3. Attach the tester lead to the ABS HU/CM wiring harness-side connector and
inspect the voltage, continuity, or resistance according to the standard (reference
value) in the table below.
Standard (reference)
...
