Mazda 3 Service Manual: Seat Belt Inspection
Belt
1. Verify that the belt is installed properly with no twists or kinks.
2. Verify that there is no damage to the seat belt and no deformation of the metal fittings.
-
If there is any malfunction, replace the seat belt.
ELR
Except 5HB (rear center seat belt)
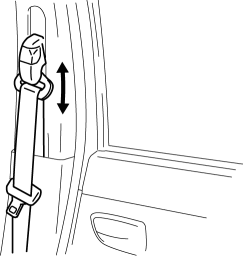
1. Verify that the belt can be pulled out smoothly, and that it retracts smoothly.
-
If there is any malfunction, replace the seat belt.
2. Verify that the retractor locks when the belt is pulled quickly.
-
If there is any malfunction, replace the seat belt.
3. Remove the retractor.
4. While pulling the seat belt out, make sure that the seat belt does not lock when the retractor is tilted slowly up to 15°
from the mounted position and locks when the retractor is tilted 40° or more.

-
If there is any malfunction, replace the seat belt.
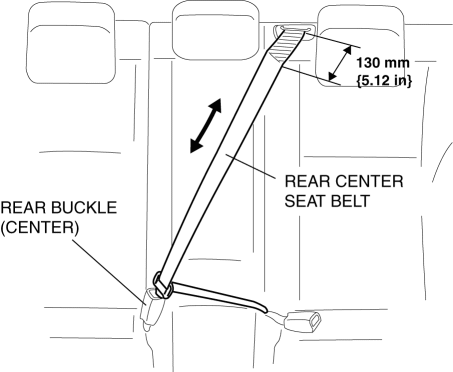
5HB (rear center seat belt)
CAUTION:
-
The rear center seat belt ELR only becomes operable after a certain amount of belt webbing is pulled out. For the ELR inspection, fasten the rear center seat belt to the rear buckle (center) and perform the inspection after pulling out the rear center seat belt 130 mm {5.12 in} (ELR operable condition). If the inspection is performed while the ELR is not in an operable condition, the integrity of the system cannot be determined.
1. Fasten the rear center seat belt to the rear buckle (center) and pull out the rear center seat belt 130 mm {5.12 in}
.
2. Verify that the belt can be pulled out smoothly, and that it retracts smoothly.
-
If there is any malfunction, replace the seat belt.
3. Verify that the retractor locks when the belt is pulled quickly.
-
If there is any malfunction, replace the seat belt.
4. Remove the rear center seat belt retractor.
5. While pulling the seat belt out, make sure that the seat belt does not lock when the retractor is tilted slowly up to 15°
from the mounted position and locks when the retractor is tilted 40° or more.
-
If there is any malfunction, replace the seat belt.
ALR
1. Pull the belt out fully to change the lock mode from ELR to ALR.
2. Verify that retractor makes a clicking sound as the belt slowly retracts. If no sound is heard, the lock mode has not changed to ALR. If necessary, repeat Step 1.
-
If there is any malfunction, replace the seat belt.
3. Verify that the retractor locks when pulled.
-
If there is any malfunction, replace the seat belt.
4. Verify that the lock mode changes to ELR when the belt is fully pulled out.
-
If there is any malfunction, replace the seat belt.
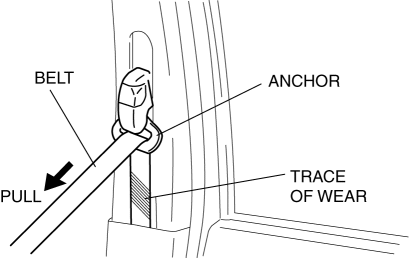
Load Limiter Retractor
WARNING:
-
When the load limiter operates, the belt and anchor rub against each other strongly leaving wear tracks. If the seat belt is used in this state, the seat belt will not function at its full capability and there is the possibility of serious injury to passengers. Be sure to replace the seat belt once the load limiter operates.
1. If the vehicle has been subjected to a shock in an accident, pull the belt from the retractor and confirm that there are no wear tracks (the load limiter has not operated) by visually inspecting and feeling the belt.
-
If there is any malfunction, replace the seat belt.
 Rear Seat Belt Removal/Installation
CAUTION:
The ELR (emergency locking retractor) has a spring that will unwind if the
retractor cover is removed. The spring cannot be rewound by hand. If this occurs,
the ELR will not w ...
 Steering
...
Other materials:
Front Door Trim Disassembly/Assembly
Driver-side
1. Disassemble in the order shown in the figure.
1
Screw A
2
Assist handle
3
Switch panel cover
4
Screw B
5
Power window main switch
...
Restraints SST [Two Step Deployment Control System]
49 H066 002
Deployment tool
49 D066 002
Adapter harness
49 L066 002
Adapter harness
49 G066 003
Adapter harness
49 N088 0A0
Fuel and Thermometer checker
...
Front Combination Light Removal/Installation
WARNING:
Incorrect servicing of the discharge headlights could result in electrical
shock. Before servicing the discharge headlights, always refer to the discharge
headlight service warnings..
1. Disconnect the negative battery cable..
2. Remove the front bumper..
3. Disconne ...
