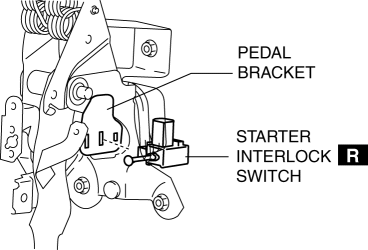
Mazda 3 Service Manual: Starter Interlock Switch Removal/Installation [C66 M R]
1. Remove the battery cover..
2. Disconnect the negative battery cable..
3. Disconnect the starter interlock switch connector.
4. Remove the starter interlock switch from the pedal bracket.
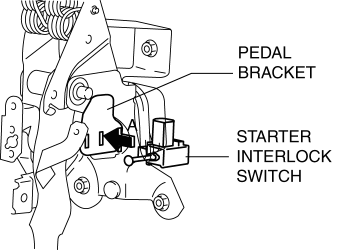
5. Insert a new starter interlock switch into the pedal bracket hole in the direction indicated by arrow A.
6. Slide the starter interlock switch pressing it in the direction indicated by arrow B until it is locked.
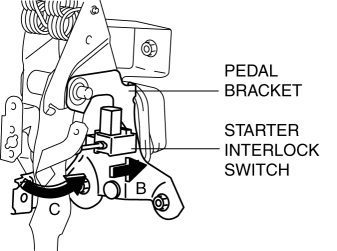
7. Fully depress the clutch pedal in the direction of arrow C, and verify that a click sound from the starter interlock switch is heard.
8. Install in the reverse order of removal.
9. Fully depress the clutch pedal, and verify that the engine starts.
 Starter Interlock Switch Inspection [Skyactiv G 2.0]
CAUTION:
Do not reuse the starter interlock switch if it is removed from the vehicle
even once. Replace with a new starter interlock switch when installing.
1. Remove the battery cove ...
 TCM Configuration [Fw6 A EL]
NOTE:
The TCM is built into the control valve body.
1. Verify TCM configuration implementation necessity for replacement parts.
Replacement part
Conf ...
Other materials:
Brakes SST
49 D043 0A0
Adapter set
49 U043 0A0A
Oil pressure gauge set
49 0221 600C
Disc brake expand tool
49 B033 001
Installer
49 G033 102
Handle
...
EGR Valve Inspection [Mzr 2.0, Mzr 2.5]
Resistance Inspection
1. Remove the battery cover..
2. Disconnect the negative battery cable..
3. Disconnect the EGR valve connector.
4. Measure the resistance between the EGR valve terminals.
EGR valve terminal
Resistance inspection (ohm)
...
Safe Exit Assist
The Subaru Solterra Safe Exit Assist is an advanced safety feature
that utilizes rear side radar sensors mounted inside the rear bumper to monitor
approaching vehicles and bicycles. This intelligent system helps occupants determine
whether opening a door could result in a collision, significan ...
