Mazda 3 Owners Manual: Tiedown Hooks
| CAUTION
Do not use the front and rear tiedown
eyelets for towing the vehicle. They have been designed only for securing the vehicle to a transport vessel during shipping. Using the eyelets for any other purpose could result in the vehicle being damaged. |
Tiedown Hooks
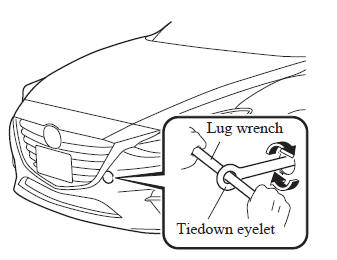
- Remove the tiedown eyelet and the lug wrench from the luggage compartment .
- Wrap a flathead screwdriver or similar tool with a soft cloth to prevent damage to a painted bumper, and open the cap located on the front or rear bumper.
Front
Rear
| CAUTION Do not use excessive force as it may damage the cap or scratch the painted bumper surface |
NOTE Remove the cap completely and store it so as not to lose it.
- Securely install the tiedown eyelet using the lug wrench.
Front
Rear
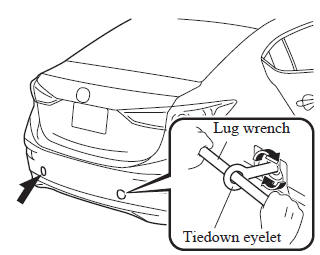
- Hook the tying rope to the tiedown eyelet.
| CAUTION If the tiedown eyelet is not securely tightened, it may loosen or disengage from the bumper when tying the vehicle. Make sure that the tiedown eyelet is securely tightened to the bumper. |
 Towing Description
We recommend that towing be done only
by an Authorized Mazda Dealer or a
commercial tow-truck service.
Proper lifting and towing are necessary
to prevent damage to the vehicle.
Government and ...

Other materials:
Crankshaft Position (CKP) Sensor Inspection [Mzr 2.0, Mzr 2.5]
Visual Inspection
CAUTION:
When foreign material such as an iron chip is on the CKP sensor, it can cause
abnormal output from the sensor because of flux turbulence and adversely affect
the engine control. Be sure there is no foreign material on the CKP sensor when
replacing.
...
Saving Fuel and Protection of the
Environment
How you operate your Mazda determines
how far it will travel on a tank of fuel. Use
these suggestions to help save fuel and
reduce CO2.
Avoid long warm-ups. Once the engine
runs smoothly, begin driving.
Avoid fast starts.
Drive at lower speeds.
Anticipate when to apply the brakes
(a ...
Commander switch operation
NOTE
For safety reasons, some operations are disabled while the vehicle is being
driven.
Volume dial operation
Press the volume dial to switch the audio MUTE on and off.
Turn the volume dial to adjust the volume. The volume increases by turning the
dial
clockwise, and decreases by tur ...
