Mazda 3 Service Manual: Transaxle Oil Replacement [G66 M R]
1. Park the vehicle on level ground.
2. Remove the aerodynamic under cover No.2..
3. Remove the drain plug and washer.
4. Drain the oil into a suitable container.
5. Install a new washer and the drain plug.
-
Tightening torque
-
39—59 N·m {4.0—6.0 kgf·m, 29—43 ft·lbf}
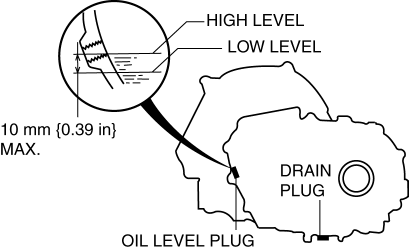
6. Remove the oil level plug and washer.
7. Add the specified amount and type of oil through the oil level plug hole until the level reaches the bottom of the oil level plug hole. Manual transaxle oil
|
Item |
Specification |
|
Grade |
API service GL-4 |
|
Viscosity |
SAE 75W-80 |
|
Capacity (approx. quantity) |
2.85 L {3.01 US qt, 2.51 lmp qt} |
8. Install a new washer and the oil level plug.
-
Tightening torque
-
39—59 N·m {4.0—6.0 kgf·m, 29—43 ft·lbf}
9. Install the aerodynamic under cover No.2..
 Transaxle Oil Replacement [G35 M R]
1. Park the vehicle on level ground.
2. Remove the aerodynamic under cover No.2..
3. Remove the drain plug and washer.
4. Drain the oil into a suitable container.
5. Install a new washer a ...
 Transaxle Range (TR) Switch Adjustment [FS5 A EL]
CAUTION:
Water or foreign objects entering the connector can cause a poor connection
or corrosion. Be sure not to drop water or foreign objects on the connector
when disconnecting it.
...
Other materials:
If you think something is wrong
If you observe any unusual behavior while operating your Subaru Solterra,
it may indicate that the vehicle requires inspection, adjustment, or repair. Promptly
contacting an authorized SUBARU dealer is strongly recommended to ensure continued
safety and reliability.
Visible symptoms
Fluid ...
If the vehicle becomes stuck
If your Subaru Solterra becomes immobilized in mud, snow, or loose
terrain, follow the steps below to safely regain traction and mobility.
Recovering procedure
1. Turn off the EV system, apply the parking brake, and set the gear selector
to P.
2. Clear away mud, snow, or sand from around the ...
Clock Spring Inspection [Standard Deployment Control System]
1. Disconnect the negative battery cable..
2. Remove the driver–side air bag module..
3. Remove the steering wheel..
4. Remove the column cover.
5. Remove the clock spring..
6. Verify that the continuity is as indicated in the table.
If not as indicated in the table, replace the ...
