Mazda 3 Service Manual: A/C Compressor Removal/Installation
1. Disconnect the negative battery cable..
2. Discharge the refrigerant..
3. Remove the aerodynamic under cover No.2..
4. Remove the drive belt..
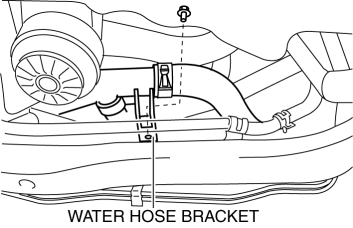
5. Remove the water hose bracket.
CAUTION:
-
If moisture or foreign material enters the refrigeration cycle, cooling ability will be lowered and abnormal noise or other malfunction could occur. Always plug open fittings immediately after removing any refrigeration cycle parts.
6. Remove the clip. (MZR 2.0).
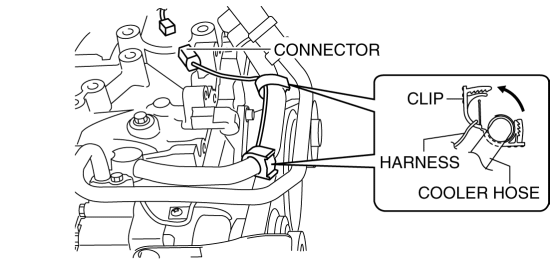
7. Disconnect the connector.
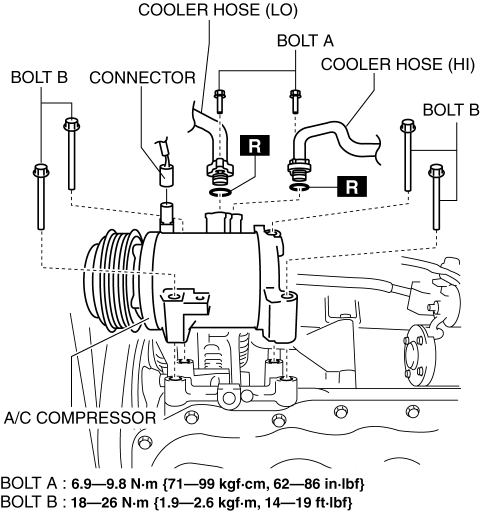
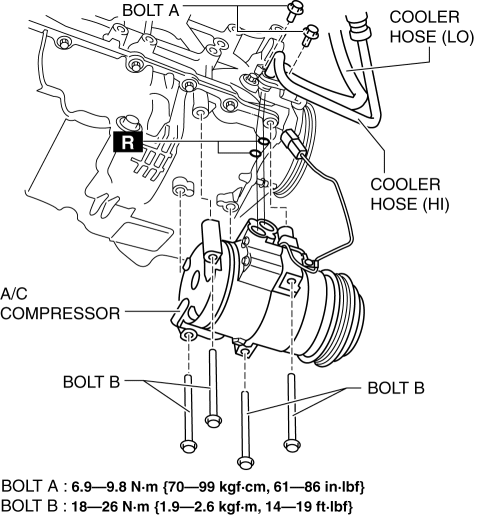
8. Remove the bolt A.
SKYACTIV-G 2.0
MZR 2.0
MZR 2.5, MZR 2.3 DISI Turbo
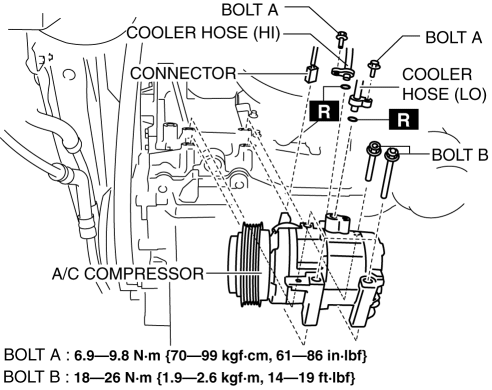
9. Remove the cooler hose (LO)..
10. Remove the cooler hose (HI)..
11. Remove the bolt B.
12. Remove the A/C compressor. Do not allow compressor oil to spill..
13. Install in the reverse order of removal.
14. Perform the refrigerant system performance test..
A/C Compressor Installation Note
CAUTION:
-
Due to the high moisture-absorption characteristics of the compressor oil, it may absorb moisture if left over a long period of time thereby negatively affecting A/C operation. Drain the compressor oil and refill within 10 min. of each other.
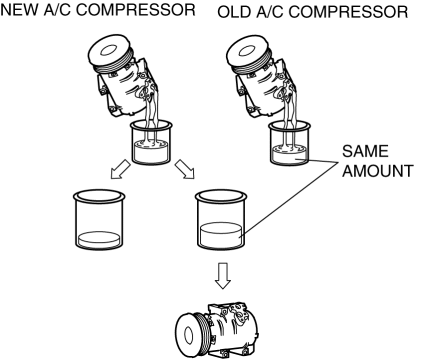
1. Rotate new A/C compressor shaft six to eight revolutions while collecting refrigerant oil in a clean measuring device. Use this refrigerant oil to refill new compressor. Do not allow refrigerant oil to become contaminated.
2. Rotate old A/C compressor shaft six to eight revolutions while collecting refrigerant oil in a separate, clean measuring device.
3. Compare those oil amounts. The amount of the oil drained from the new A/C compressor should be greater than the old one.
4. Pour the same amount oil of drained from the old A/C compressor back into the new A/C compressor.
-
A/C compressor oil type
-
FD46XG
-
A/C compressor oil sealed volume (approx. quantity)
-
SKYACTIV-G 2.0
-
100 ml {100 cc, 3.38 fl oz}
-
MZR 2.0, MZR 2.5, MZR 2.3 DISI Turbo
-
120 ml {120 cc, 4.06 fl oz}
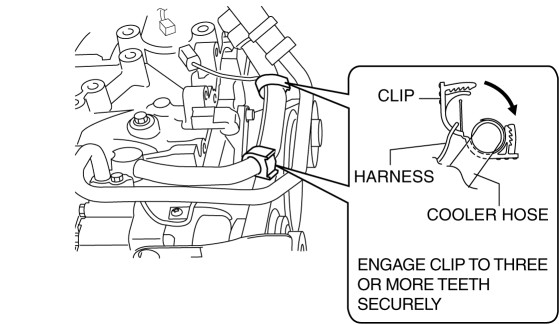
Clip Installation Note
1. Install the clip as shown in the figure.
 A/C
A/C
...
 A/C Unit Disassembly/Assembly
1. Disassemble in the order indicated in the table.
CAUTION:
If a non-specified grease is used, it may result in abnormal noise or improper
operation of the links. Apply only the specifie ...
Other materials:
Air Bypass Valve Inspection [Mzr 2.3 Disi Turbo]
1. Remove the air bypass valve..
2. Connect the vacuum pump to the vacuum ports of the air bypass valve.
3. Verify that the airflow is as indicated in the table.
Vacuum
(kPa {mmHg, inHg})
Valve operation condition
Airflow between port A—B
...
Variable Swirl Shutter Valve Actuator Inspection [Mzr 2.3 Disi Turbo]
Operation Inspection
1. Remove the air hose..
2. Disconnect the vacuum hose from the variable swirl control solenoid valve.
3. Connect a vacuum pump to the variable swirl shutter valve actuator.
4. Apply vacuum and verify that the rod moves.
Vacuum
kPa {mmHg, inHg ...
Before driving
Before operating your Subaru Solterra, carefully follow the recommendations
below to ensure maximum safety, proper vehicle control, and a confident driving
experience in all conditions.
Installing floor mats
Always use floor mats that are specifically engineered for the Subaru Solterra,
matc ...
