Mazda 3 Owners Manual: Anchor Bracket
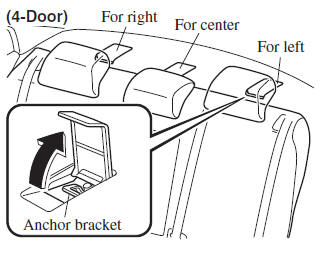
Anchor brackets for securing childrestraint systems are equipped in the vehicle. Locate each anchor position using the illustration.
To install a child-restraint system, always follow the instruction manual accompanying the child-restraint system.
Anchor bracket location
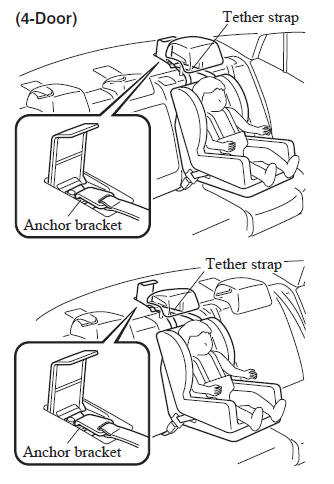
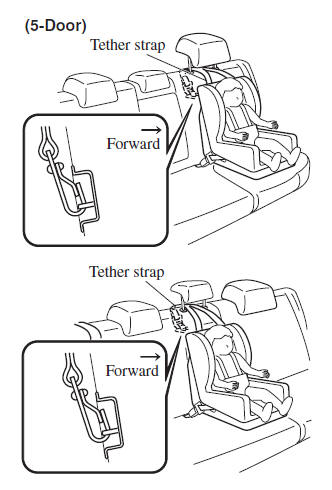
Use the indicated anchor bracket locations when installing a child-restraint system equipped with a tether.

| WARNING
Always attach the tether strap to the
correct tether anchor position:
Attaching the tether strap to the
incorrect tether anchor position is
dangerous. In a collision, the tether
strap could come off and loosen the
child-restraint system. If the childrestraint
system moves it could result
in death or injury to the child.
Always route the tether strap between the head restraint and the seatback: Routing the tether strap on top of the head restraint is dangerous. In a collision the tether strap could slide off the head restraint and loosen the childrestraint system. The child-restraint system could move which may result in death or injury to the child. |
 Installing Child-Restraint Systems
Accident statistics reveal that a child is
safer in the rear seat. The front passenger's
seat is clearly the worst choice for any
child under 12, and with rear-facing childrestraint
systems it is ...
 Using Automatic Locking Mode
Follow these instructions when using a child-restraint system, unless you are
attaching a LATCH-equipped childrestraint system to the rear LATCH lower
anchors. Refer to “Using LATCH Lower Anchor ...
Other materials:
Drive Shaft (Double Offset Joint) Disassembly/Assembly
1. Disassemble in the order indicated in the table.
2. Assemble in the reverse order of disassembly.
1
Boot band (transaxle side)
(See DRIVE SHAFT (TRIPOD JOINT) DISASSEMBLY/ASSEMBLY.)
2
Outer ring
(See Outer Ring, Clip Assembly Note. ...
Outside Temperature Display
When the ignition is switched ON, the
outside temperature is displayed.
NOTE
Under the following conditions, the
outside temperature display may differ
from the actual outside temperature
depending on the surroundings and vehicle
conditions:
Significantly cold or hot
temperatures.
...
PID/Data Monitor Inspection [Bcm]
1. Connect the M-MDS (IDS) to the DLC-2.
2. After the vehicle is identified, select the following items from the initialization
screen of the IDS.
a. Select “DataLogger”.
b. Select “Modules”.
c. Select “BCM/GEM”.
3. Select the applicable PID from the PID table.
4. Verif ...
