Mazda 3 Owners Manual: Using Automatic Locking Mode
Follow these instructions when using a child-restraint system, unless you are attaching a LATCH-equipped childrestraint system to the rear LATCH lower anchors. Refer to “Using LATCH Lower Anchor” .
NOTE Follow the child-restraint system manufacturer's instructions carefully.
If you are not sure whether you have a LATCH system or tether, check in the child-restraint system manufacturer's instructions and follow them accordingly.
Depending on the type of child-restraint system, it may use LATCH system instead of seat belts or if the belt goes across the child's chest, may recommend against using automatic locking mode.
- Make sure the seatback is securely latched by pushing it back until it is fully locked.
- Raise the head restraint to the top
locked position.
Refer to Head Restraints on .
- Secure the child-restraint system with
the lap portion of the lap/shoulder belt.
See the manufacturer's instructions on the child-restraint system for belt routing instructions.
- To get the retractor into the automatic locking mode, pull the shoulder belt portion of the seat belt until the entire length of the belt is out of the retractor.
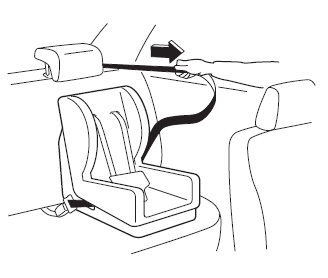
- Push the child-restraint system firmly into the vehicle seat. Be sure the belt retracts as snugly as possible. A clicking noise from the retractor will be heard during retraction if the system is in the automatic locking mode. If the belt does not lock the seat down tight, repeat this step.
NOTE Inspect this function before each use of the child-restraint system. You should not be able to pull the shoulder belt out of the retractor while the system is in the automatic locking mode. When you remove the child-restraint system, be sure the belt fully retracts to return the system to emergency locking mode before occupants use the seat belts.
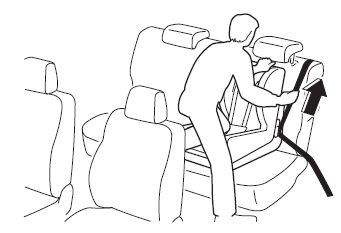
- If your child-restraint system requires the use of a tether strap, refer to the manufacturer's instructions to hook and tighten the tether strap.
| WARNING
Use the tether and tether anchor only
for a child-restraint system:
Using the tether or tether anchor to
secure anything but a child-restraint
system is dangerous. This could
weaken or damage the tether or tether
anchor and result in injury.
Always route the tether strap between the head restraint and the seatback: Routing the tether strap on top of the head restraint is dangerous. In a collision the tether strap could slide off the head restraint and loosen the childrestraint system. The child-restraint system could move which may result in death or injury to the child. Always attach the tether strap to the correct tether anchor position: Attaching the tether strap to the incorrect tether anchor position is dangerous. In a collision, the tether strap could come off and loosen the child-restraint system. If the childrestraint system moves it could result in death or injury to the child. |
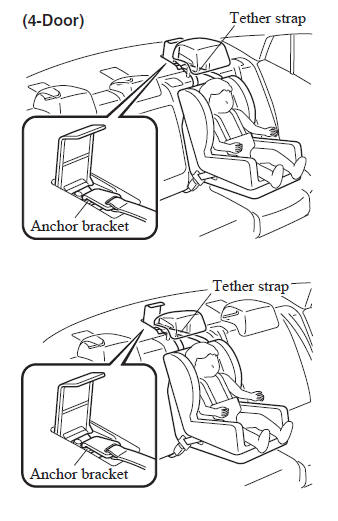
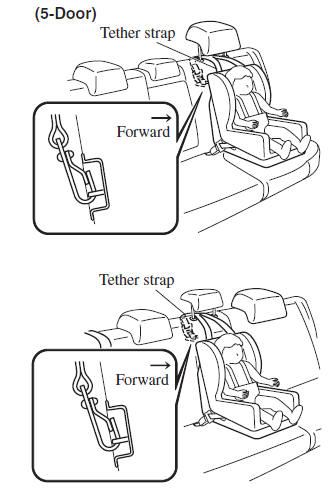
 Anchor Bracket
Anchor brackets for securing childrestraint
systems are equipped in the
vehicle. Locate each anchor position using
the illustration.
To install a child-restraint system,
always follow the instr ...
 If You Must Use the Front Seat for
Children
If You Must Use the Front Seat for
Children
If you cannot put all children in the rear
seat, at least put the smallest children
in the rear and be sure the largest child
up front uses the shoulder belt over the
shoulder.
NEVER put a rear ...
Other materials:
Luggage Compartment
Luggage compartment cover (5-door)
WARNING
Do not place anything on top of the
cover:
Placing luggage or other cargo on top
of the luggage compartment cover is
dangerous. During sudden braking or
a collision, the cargo could become
a projectile that could hit and injure
...
PCM Inspection [Mzr 2.0, Mzr 2.5]
Using M-MDS
NOTE:
PIDs for the following parts are not available on this model. Go to the appropriate
part inspection page.
CMP sensor
Main relay
1. Connect the M-MDS to the DLC-2.
2. Switch the ignition to ON.
3. Measure the PID value.
...
Pictorial index
■ Exterior
Side doors
Locking/unlocking
Opening/closing the side windows
Locking/unlocking by using the mechanical key
Warning messages related to Subaru Solterra door systems
Back door
Locking/unlocking
Opening/closing the back door
Warning messages
Power back door* f ...
