Mazda 3 Service Manual: Back Up Light Switch Removal/Installation [G66 M R]
1. Remove the battery cover..
2. Disconnect the negative battery cable.
3. Remove the battery component. (ex: battery, battery tray and PCM component).
4. Remove the aerodynamic under cover No.2..
5. Drain the oil from the transaxle..
6. Disconnect the back-up light switch connector and remove the back-up light switch.
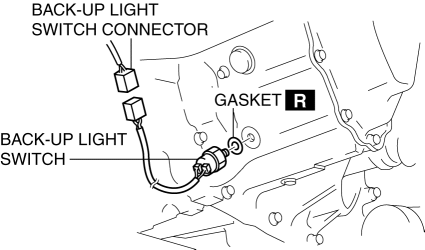
7. Install the back-up light switch (with a new gasket) to the transaxle case.
-
Tightening torque
-
20—29 N·m {2.1—2.9 kgf·m, 15—21 ft·lbf}
8. Install the battery component. (ex: battery, battery tray and PCM component).
9. Install the battery cover..
10. Add the specified amount and type of oil..
11. Install the aerodynamic under cover No.2..
 Back Up Light Switch Removal/Installation [G35 M R]
1. Remove the battery cover..
2. Disconnect the negative battery cable.
3. Remove the battery component. (ex: battery, battery tray and PCM component).
4. Remove the aerodynamic under cover No. ...
 Combination Switch Disassembly/Assembly
CAUTION:
Handling the air bag module improperly can accidentally deploy the air bag
module, which may seriously injure you. Read the air bag system service warnings
and cautions before h ...
Other materials:
Ignition Coil/Ion Sensor Removal/Installation [Skyactiv G 2.0]
1. Remove the battery cover..
2. Disconnect the negative battery cable..
3. Remove the plug hole plate..
4. Remove the plug hole plate bracket..
5. Remove in the order indicated in the table.
6. Install in the reverse order of removal.
1
Connector
...
Fuel Line Pressure Inspection [Mzr 2.0, Mzr 2.5]
WARNING:
Fuel line spills and leakage from the pressurized fuel system are dangerous.
Fuel can ignite and cause serious injury or death and damage. To prevent this,
complete the following inspection with the engine stopped.
Fuel is very flammable liquid. If fuel spills or leaks ...
Key Reminder Switch Removal/Installation
1. Disconnect the negative battery cable. (See BATTERY REMOVAL/INSTALLATION [MZR
2.0, MZR 2.5].)(See BATTERY REMOVAL/INSTALLATION [MZR 2.3 DISI Turbo].)(See BATTERY
REMOVAL/INSTALLATION [SKYACTIV-G 2.0].)
2. Remove the column cover. (See COLUMN COVER REMOVAL/INSTALLATION.)
3. Disconnect the ...
