Mazda 3 Service Manual: Before Service Precaution [Mzr 2.0, Mzr 2.5]
WARNING:
-
Fuel vapor is hazardous. It can very easily ignite, causing serious injury and damage. Always keep sparks and flames away from fuel.
-
Fuel line spills and leakage from the pressurized fuel system are dangerous. Fuel can ignite and cause serious injury or death and damage. Fuel can also irritate skin and eyes. To prevent this, always complete the “Fuel Line Safety Procedure”.
-
A person charged with static electricity could cause a fire or explosion, resulting in death or serious injury. Before performing work on the fuel system, discharge static electricity by touching the vehicle body.
Fuel Line Safety Procedure
1. Remove the battery cover..
2. Disconnect the negative battery cable..
3. Remove the fuel-filler cap to release the pressure inside the fuel tank.
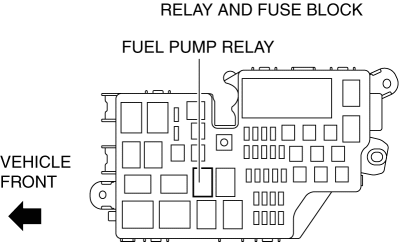
4. Remove the fuel pump relay.

5. Connect the negative battery cable..
6. Start the engine.
7. After the engine stalls, crank the engine 2—3 times.
8. Switch the ignition to off.
9. Disconnect the negative battery cable..
10. Install the fuel pump relay.
 After Service Precaution [Mzr 2.0, Mzr 2.5]
WARNING:
Fuel line spills and leakage are dangerous. Fuel can ignite and cause serious
injuries or death and damage. When installing the fuel hose, perform “Fuel Leakage
Inspection” desc ...
 Fuel Filler Cap Inspection [Mzr 2.0, Mzr 2.5]
Leakage Inspection
1. Perform the following SST (Evaporative Emission System Tester 134-01049A)
self-test:
NOTE:
If the tester does not work correctly during self-test, refer to the teste ...
Other materials:
Outside Temperature Display
When the ignition is switched ON, the
outside temperature is displayed.
NOTE
Under the following conditions, the
outside temperature display may differ
from the actual outside temperature
depending on the surroundings and vehicle
conditions:
Significantly cold or hot
temperatures.
...
Transaxle Oil Inspection [G66 M R]
1. Park the vehicle on level ground.
2. Remove the aerodynamic under cover No.2..
3. Remove the oil level plug and washer.
4. Verify that the oil is near the brim of the plug port.
If the oil level is lower than the low level, add the specified amount and
type of oil through the ...
Filament Repair
1. Clean the filament using isopropyl alcohol.
2. Attach tape to both sides of the filament.
3. Using a small brush or marking pen, apply silver paint.
4. After 2—3 min, carefully remove the tape without damaging the applied
area.
CAUTION:
Do not operate the rear window defrost ...
