Mazda 3 Service Manual: Center Roof Antenna Inspection
4SD
1. Disconnect the negative battery cable..
2. Remove the rain sensor cover. (Vehicles with auto light/wiper system).
3. Disconnect the rain sensor connector. (Vehicles with auto light/wiper system)
4. Partially peel back the seaming welts.
5. Remove the following parts:
a. Sunroof seaming welt (vehicles with sunroof)
b. A-pillar trim.
c. Front scuff plate.
d. Rear scuff plate.
e. B-pillar lower trim.
f. Upper anchor of the front seat belt.
g. B-pillar upper trim.
h. Rear seat cushion.
i. Tire house trim.
j. C-pillar trim.
k. Map light.
l. Sunvisor.
m. Assist handle.
n. Headliner.
o. Center roof antenna.
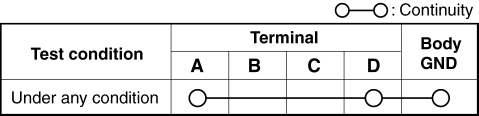
6. Verify that there is no continuity between the center roof antenna terminals A and B using an ohmmeter.
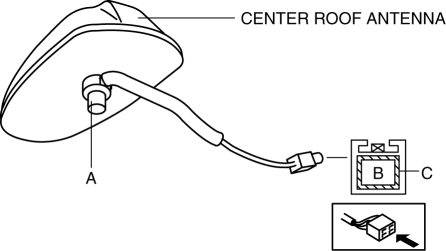
7. Inspect for continuity between the center roof antenna terminals using an ohmmeter.
-
If not as indicated in the table, replace the center roof antenna.
5HB
NOTE:
-
The center roof antenna has a built-in antenna amplifier.
Antenna Amplifier Inspection
1. Disconnect the negative battery cable..
2. Remove the rain sensor cover. (Vehicles with auto light/wiper system).
3. Disconnect the rain sensor connector. (Vehicles with auto light/wiper system)
4. Partially peel back the seaming welts.
5. Remove the following parts:
a. Sunroof seaming welt (vehicles with sunroof)
b. A-pillar trim.
c. Front scuff plate.
d. Rear scuff plate.
e. B-pillar lower trim.
f. Upper anchor of the front seat belt.
g. B-pillar upper trim.
h. Rear seat cushion.
i. Tire house trim.
j. Trunk side upper trim.
k. C-pillar trim.
l. Map light.
m. Sunvisor.
n. Assist handle.
o. Headliner.
6. Connect the negative battery cable..
7. Switch the ignition to ON.
8. Turn the audio unit power to ON.
9. Tune in the radio.
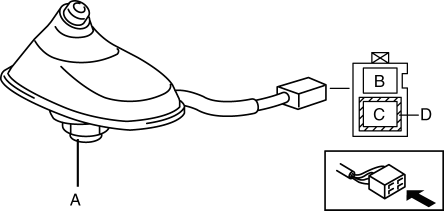
10. Verify that voltage is B+ at the antenna amplifier terminal B.
-
If the battery voltage cannot be verified, replace the center roof antenna.
-
If the battery voltage can be verified, go to the feeder line inspection.
Feeder Line Inspection
1. Remove the center roof antenna..
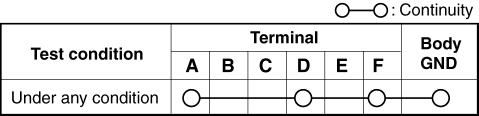
2. Verify that there is no continuity between the center roof antenna terminals A and C using an ohmmeter.
AM/FM type
AM/FM/SIRIUS type
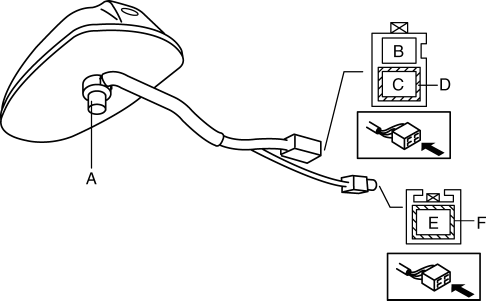
3. Inspect for continuity between the center roof antenna terminals using an ohmmeter.
-
If not as indicated in the table, replace the center roof antenna.
AM/FM type
AM/FM/SIRIUS type
 Bass Box Removal/Installation
1. Disconnect the negative battery cable..
2. Disconnect the connector.
3. Remove the short-cord.
4. Remove the bolt.
5. Remove the bass-box.
6. Install in the reverse order of removal. ...
 Center Roof Antenna Removal/Installation
4SD
1. Disconnect the negative battery cable..
2. Remove the rain sensor cover. (Vehicles with auto light/wiper system).
3. Disconnect the rain sensor connector. (Vehicles with auto light/wiper s ...
Other materials:
Front Door Trim Removal/Installation
1. Disconnect the negative battery cable..
2. Remove the inner garnish..
3. Move the hook in the direction of arrow shown in the figure using a tape-lapped
flathead screwdriver and detach it from the front door trim.
CAUTION:
Affix protective tape to the front door trim and assis ...
Washer Fluid Level Sensor Inspection
1. Disconnect the negative battery cable..
2. Remove the front bumper..
3. Verify that continuity between the washer fluid-level sensor terminals is
as indicated in the table.
If not as specified, replace the washer fluid-level sensor.
...
Fuel Gauge Sender Unit Inspection
MZR 2.3 DISI Turbo, SKYACTIV-G 2.0
NOTE:
The fuel gauge sender unit is integrated with the fuel pump unit.
1. Disconnect the negative battery cable..
2. Remove the rear seat cushion..
3. Remove the fuel pump unit..
4. Verify that the resistance between terminals A and C of the f ...
