Mazda 3 Service Manual: Decoration Panel Removal/Installation
1. Remove the following parts:
a. Passenger-side front scuff plate.
b. Passenger-side front side trim.
c. Glove compartment.
d. Passenger-side lower panel.
2. Remove the screw.
3. Pull the decoration panel in the direction of the arrow (1), (2) shown in the figure, while remove the hook A and hooks B.
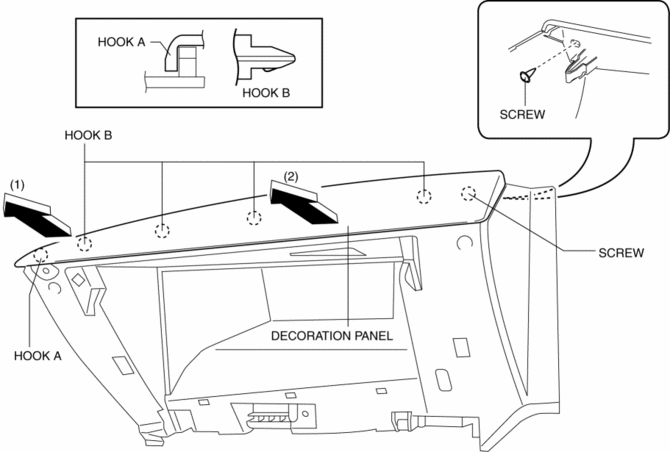
4. Remove the decoration panel.
5. Install in the reverse order of removal.
 Dashboard Upper Panel Removal/Installation
Vehicles Without Bose®
1. Disconnect the negative battery cable..
2. Remove the following parts:
a. Upper column cover.
b. Instrument cluster.
c. Center panel.
d. Center cover.
3. Remove ...
 Fire Extinguisher Installation [Arab Gulf Cooperation Council]
WARNING:
Handling a front seat (with built-in side air bag) improperly can accidentally
operate (deploy) the air bag, which may seriously injure you. Read the service
warnings before han ...
Other materials:
Manual Transaxle Removal/Installation [C66 M R]
1. Remove the battery cover..
2. Disconnect the negative battery cable..
3. Remove the aerodynamic under cover No.2 and the splash shield as a single
unit..
4. Drain the manual transaxle oil..
5. Disconnect and/or remove the following parts in the engine compartment.
a. Remove the batte ...
Vanity Mirror Illumination Bulb Removal/Installation
1. Disconnect the negative battery cable..
2. Insert a tape-wrapped fastener remover into the service hole, and pry it in
the direction indicated by the arrow to remove the lens.
3. Remove the vanity mirror illumination bulb.
4. Install in the reverse order of removal. ...
Front Oil Seal Replacement [Mzr 2.0, Mzr 2.5]
1. Remove the battery cover..
2. Disconnect the negative battery cable..
3. Remove the plug hole plate..
4. Disconnect the wiring harness.
5. Remove the ignition coils..
6. Remove the spark plugs..
7. Remove the ventilation hose.
8. Remove the oil level gauge.
9. Remove the cylinder ...
