Mazda 3 Service Manual: Dashboard Upper Panel Removal/Installation
Vehicles Without Bose®
1. Disconnect the negative battery cable..
2. Remove the following parts:
a. Upper column cover.
b. Instrument cluster.
c. Center panel.
d. Center cover.
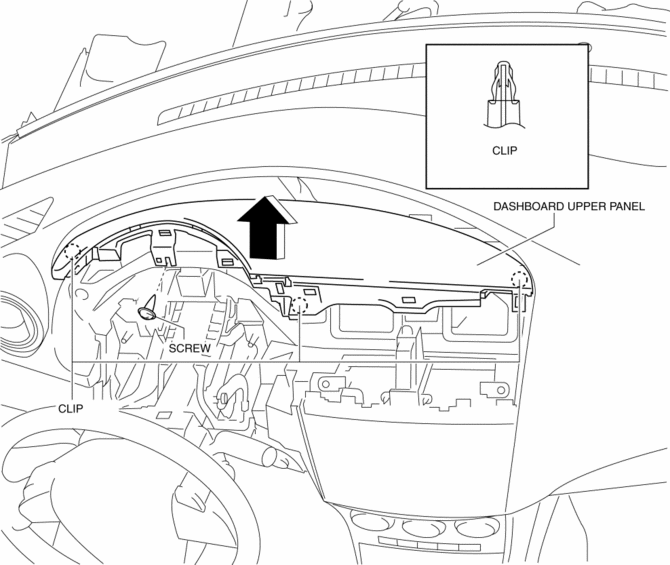
3. Remove the screw.
4. Pull up the dashboard upper panel in the direction of arrow shown in the figure, then remove the clips.
5. Pull up the dashboard upper panel in the direction of arrow shown in the figure, then remove the clips.
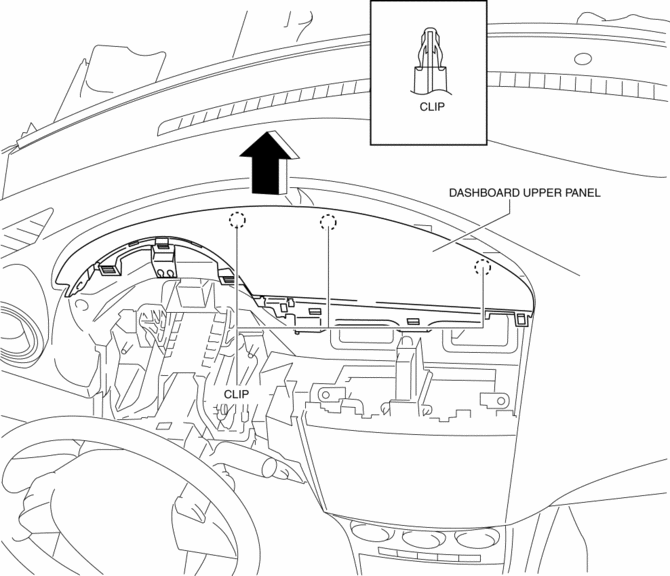
6. Remove the dashboard upper panel.
7. Install in the reverse order of removal.
Vehicles With Bose®
1. Disconnect the negative battery cable..
2. Remove the following parts:
a. Upper column cover.
b. Instrument cluster.
c. Center panel.
d. Center cover.
3. Remove the screw.
4. Pull up the dashboard upper panel in the direction of arrow shown in the figure, then remove the clips.
5. Pull up the dashboard upper panel in the direction of arrow shown in the figure, then remove the clips.
6. Remove the dashboard upper panel.
7. Disconnect the center speaker connector.
8. Disconnect the microphone connector.
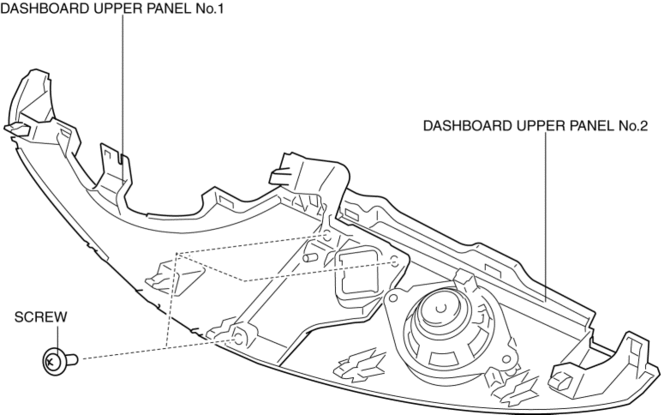
9. Remove the screws then remove the dashboard upper panel No.2 from the dashboard upper panel No.1.
10. Install in the reverse order of removal.
 Dashboard Under Cover Removal/Installation
1. Detach the hooks in the direction of arrow (1) shown in the figure.
2. Pull the dashboard under cover in the direction of arrow (2).
3. Remove the dashboard under cover, then remove the gui ...
 Decoration Panel Removal/Installation
1. Remove the following parts:
a. Passenger-side front scuff plate.
b. Passenger-side front side trim.
c. Glove compartment.
d. Passenger-side lower panel.
2. Remove the screw.
3. Pull the ...
Other materials:
Operating Tips for Audio System
WARNING
Always adjust the audio while the
vehicle is stopped:
Do not adjust the audio control
switches while driving the vehicle.
Adjusting the audio while driving
the vehicle is dangerous as it could
distract your attention from the vehicle
operation which could lead ...
Power Window Main Switch Inspection
1. Disconnect the negative battery cable.
2. Remove the inner garnish. (driver's side).
3. Remove the front door trim. (driver's side).
4. Remove the main switch panel. (driver's side).
5. Connect the power window main switch connector.
6. Connect the negative battery cable..
...
Digital inner mirror
In the Subaru Solterra, the Digital inner mirror is an advanced visibility
system that utilizes a rear-mounted camera to project a real-time video image onto
the mirror display, significantly enhancing rearward visibility in various driving
conditions.
The Subaru Solterra Digital inner mirr ...
