Mazda 3 Service Manual: Sirius Satellite Radio Unit Removal/Installation
1. Disconnect the negative battery cable..
2. Remove the following parts:
a. Passenger-side front scuff plate.
b. Passenger-side front side trim.
c. Dashboard under cover.
d. Grove compartment.
e. Passenger-side lower panel.
3. Remove in the order indicated in the table.
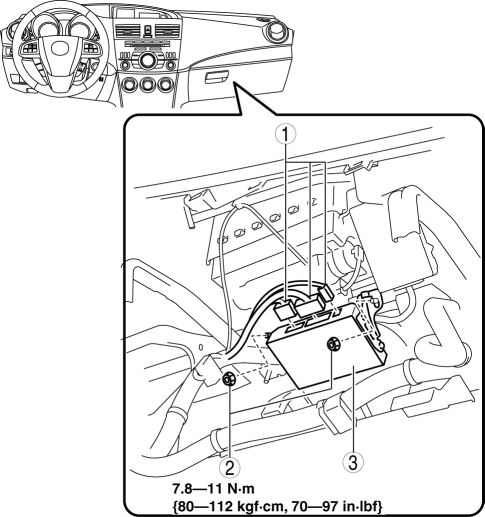
|
1 |
Connector |
|
2 |
Nut |
|
3 |
SIRIUS satellite radio unit |
4. Install in the reverse order of removal.
 Sirius Satellite Radio Antenna Feeder Removal/Installation
SIRIUS Satellite Radio Antenna Feeder No.1
NOTE:
SIRIUS satellite radio antenna feeder No.1 is integrated with the dashboard
wiring harness.
1. Refer to DASHBOARD DISASSEMBLY/ASSEMBL ...
 Supplier Identification Procedure [Audio]
Identification Using the Label or Inscribed Lettering
1. Disconnect the negative battery cable..
2. Remove the center panel..
3. Remove the audio unit..
4. Verify the supplier by referring to t ...
Other materials:
Refrigerant Pressure Sensor Inspection [Manual Air Conditioner]
MZR 2.0, MZR 2.5
1. Install the manifold gauge.
2. Verify the high-pressure side reading of the manifold gauge.
3. Measure the terminal voltage of the climate control unit.
1G,1H and 2J
4. Verify that below graph as measure the terminal voltage 2J.
5. Follow the climate control ...
How to use USB mode (Type A)
Type
Playable data
USB mode
MP3/WMA/AAC file
This unit does not support a USB 3.0
device. In addition, other devices may not
be supported depending on the model or
OS version.
Playback
Switch the ignition to ACC or ON.
Press the power/volume dial to ...
Advanced Park cancelation/ suspension
■ Assistance will be canceled when
Under the following conditions, the Subaru Solterra Advanced Park system will
automatically terminate its operation. When this occurs, immediately take control
by firmly holding the steering wheel and pressing the brake pedal to safely stop
the Subaru Solt ...
