Mazda 3 Service Manual: Fire Extinguisher Installation [Arab Gulf Cooperation Council]
WARNING:
-
Handling a front seat (with built-in side air bag) improperly can accidentally operate (deploy) the air bag, which may seriously injure you. Read the service warnings before handling a front seat (with built-in side air bag)..
CAUTION:
-
After removing a front seat, do not operate the slider lever. If the slider lever is operated, the left and right slide positions will deviate, and the slide adjuster may be damaged after the front seat is installed.
-
Verify that there are no malfunctions in the sliding mechanism after installing a front seat.
-
If any of the following work is performed, perform the seat weight sensor calibration using the M-MDS..
-
Replacement with a new seat weight sensor
-
Replacement with a new seat weight sensor control module
-
Replacement with new passenger-side seat par
-
Disassembly of the passenger-side seat
-
If any of the following work is performed, perform the seat weight sensor inspection using the M-MDS..
-
Removal of the passenger-side seat
-
Loosening and retightening of passenger-side seat fixing bolts
1. Switch the ignition to off.
2. Disconnect the negative battery cable and wait 1 min or more
..
3. Remove the following parts:
a. Front seat.
b. Audio amplifier (Vehicles with Bose®).
c. Front scuff plate.
d. Front side trim.
4. Partially peel back the floor covering..
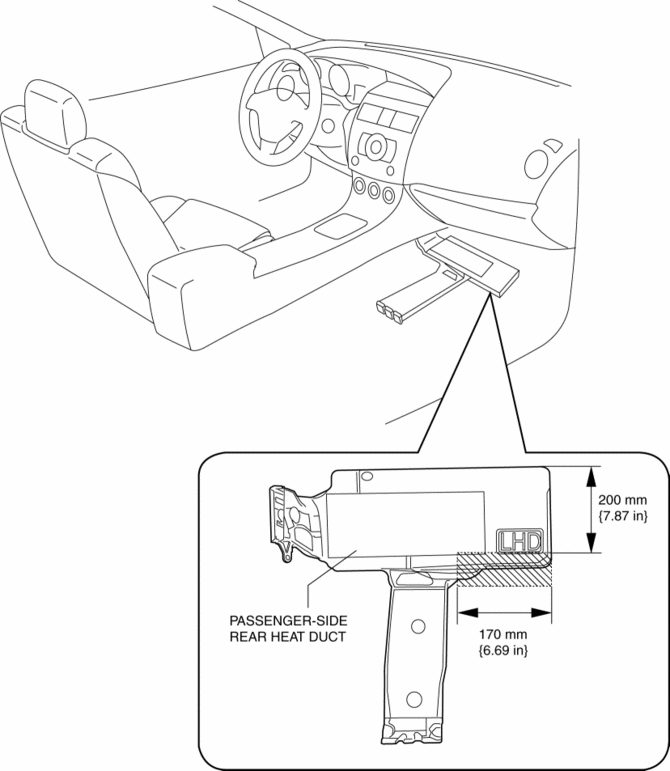
5. Cut the passenger-side rear heater duct cover shown in the figure.
CAUTION:
-
When cutting out the portion of the passenger-side rear heat duct, do not cut it outside of the indicated area shown in the figure. Otherwise, the airflow passage could be damaged and cause the air from the heater to leak.
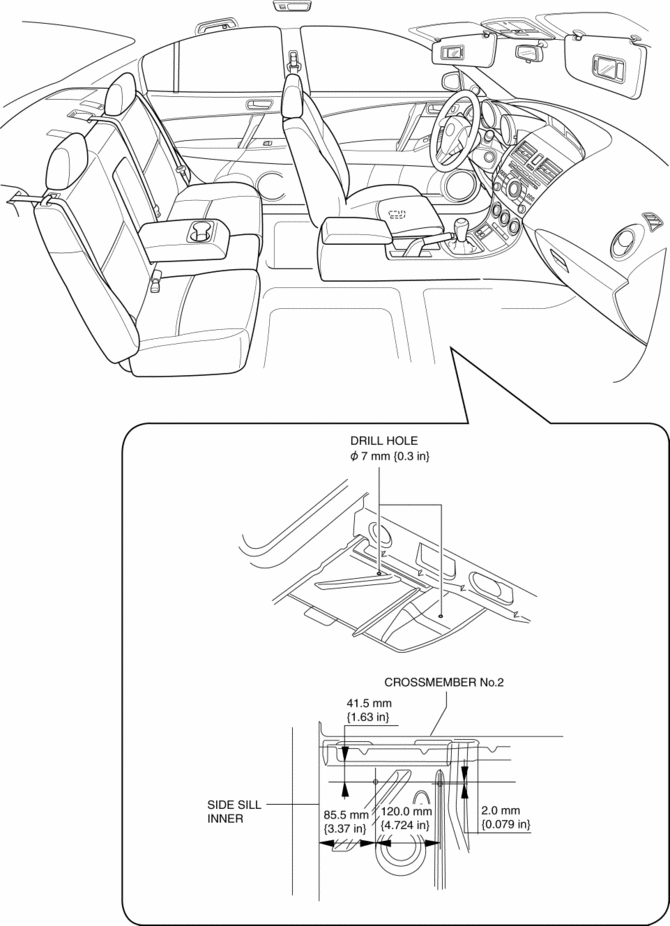
6. Drill a 7 mm {0.3 in}
diameter hole at the point shown in the figure.
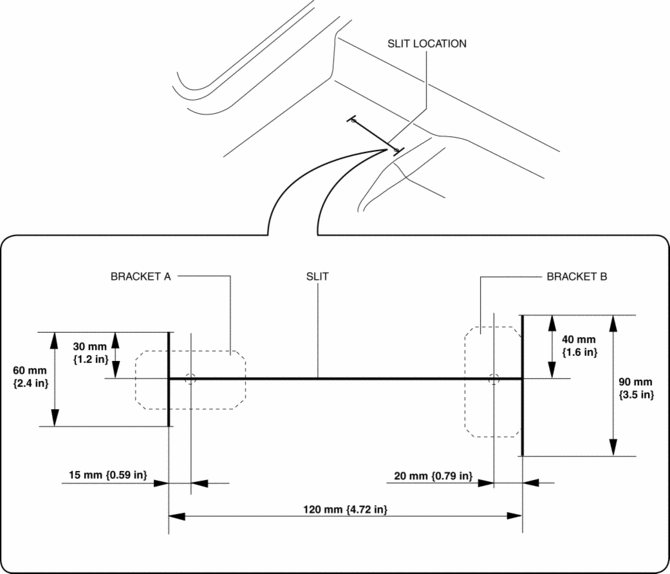
7. Return the floor covering to its original position and open the slit at the position shown in the figure.
8. Install in the order shown in the figure.

|
1 |
Bracket A |
|
2 |
Bracket B |
|
3 |
Spacer C |
|
4 |
Spacer D |
|
5 |
Bracket assembly |
|
6 |
Spring washer |
|
7 |
Bolt E |
|
8 |
Plate nut F |
|
9 |
Plate nut G |
|
10 |
Fire extinguisher |
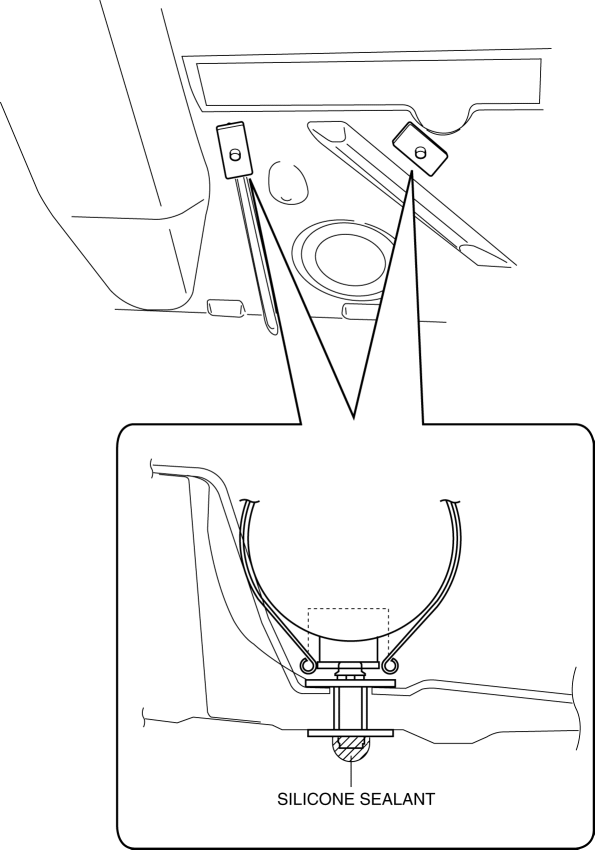
9. Apply silicone sealant to the shaded area on the under body as shown in the figure.
10. Install the following parts:
a. Front side trim.
b. Front scuff plate.
c. Audio amplifier (Vehicles with Bose®).
d. Front seat.
 Decoration Panel Removal/Installation
1. Remove the following parts:
a. Passenger-side front scuff plate.
b. Passenger-side front side trim.
c. Glove compartment.
d. Passenger-side lower panel.
2. Remove the screw.
3. Pull the ...
 Floor Covering Removal/Installation
1. Disconnect the negative battery cable..
2. Remove the following parts:
a. Front seat.
b. Audio amplifier (Vehicles with Bose®).
c. Front scuff plate.
d. Joint cover.
e. Front side trim ...
Other materials:
Front seats
In the Subaru Solterra, the front seats are designed for precise
adjustment in multiple directions (forward/backward, height, and angle), allowing
the driver and passenger to achieve an optimal and ergonomically correct driving
position for comfort and safety.
Adjustment procedure
Manual sea ...
Warranties for Your Mazda
New Vehicle Limited Warranty
Powertrain Limited Warranty
Safety Restraint System Limited Warranty
Anti-perforation Limited Warranty
Federal Emission Control Warranty/California Emission Control Warranty
Emission Defect Warranty
Emission Performance Warranty
Emission Control ...
Front Seat Slide Adjuster Removal/Installation
WARNING:
Handling the front seats improperly can accidentally deploy the side air
bag, which may seriously injure you. Read air bag system service warnings and
cautions before handling the front seats..
CAUTION:
After removing a front seat, do not operate the slider leve ...
