Mazda 3 Service Manual: Floor Covering Removal/Installation
1. Disconnect the negative battery cable..
2. Remove the following parts:
a. Front seat.
b. Audio amplifier (Vehicles with Bose®).
c. Front scuff plate.
d. Joint cover.
e. Front side trim.
f. Fuel-filler lid opener lever bezel.
g. Selector lever knob (ATX).
h. Shift lever knob (MTX).
i. Upper panel.
j. Shift panel.
k. Side wall.
l. Console.
m. Rear scuff plate.
n. Lower anchor of the front seat belt.
o. B-pillar lower trim.
p. Rear seat cushion.
q. Tire house trim.
3. Remove fasteners A and B.
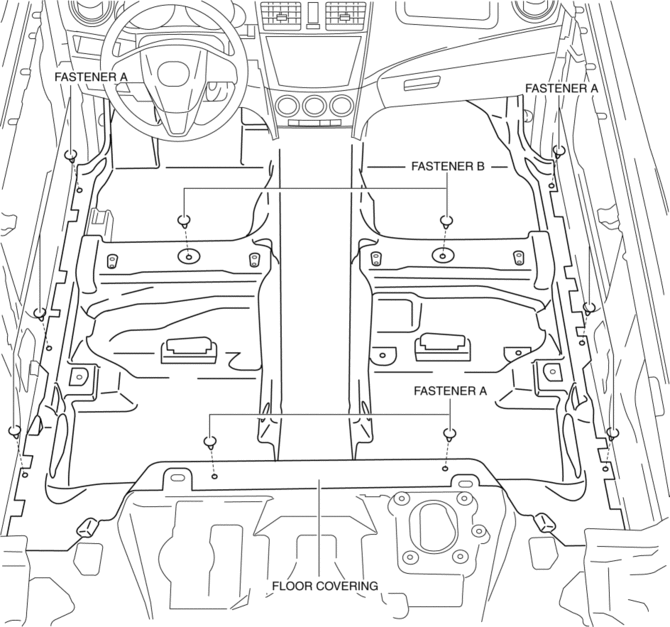
4. Take the floor covering out from the opened door.
5. Install in the reverse order of removal.
 Fire Extinguisher Installation [Arab Gulf Cooperation Council]
WARNING:
Handling a front seat (with built-in side air bag) improperly can accidentally
operate (deploy) the air bag, which may seriously injure you. Read the service
warnings before han ...
 Front Scuff Plate Removal/Installation
1. Detach tab A while pulling the front scuff plate in the direction of the arrow
(1) shown in the figure, then detach hook B, clips C, and pins D while pulling in
the direction of the arrow (2). ...
Other materials:
Air Filter Inspection [Mzr 2.0, Mzr 2.5]
Except for Mexico
Airflow inspection
1. Remove the air filter..
2. Blow from port A and verify that there is airflow from port B.
If there is no airflow, replace the air filter..
3. Blow from port B and verify that there is airflow from port A.
If there is no airflow, r ...
Compression Inspection [Skyactiv G 2.0]
WARNING:
Hot engines and oil can cause severe burns. Be careful not to burn yourself
during removal/installation of each component.
Fuel vapor is hazardous. It can very easily ignite, causing serious injury
and damage. Always keep sparks and flames away from fuel.
Fuel ...
Heated Oxygen Sensor (HO2 S) Removal/Installation [Mzr 2.0, Mzr 2.5]
WARNING:
A hot engine and exhaust system can cause severe burns. Turn off the engine
and wait until they are cool before removing the exhaust system.
1. Remove the battery cover..
2. Disconnect the negative battery cable..
3. Disconnect the HO2S connector.
4. Remove the HO2S u ...
