Mazda 3 Service Manual: Electro Hydraulic Power Assist Steering (EHPAS) Control Module Inspection
Terminal Voltage Table (Reference)
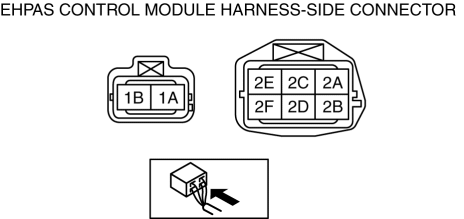
|
Terminal |
Signal name |
Connected to |
Measured item |
Measured terminal (measured condition) |
Standard |
Inspection item(s) |
|
1A |
Ground |
Ground point |
Voltage |
Under any condition |
1 V or less |
|
|
1B |
Battery power supply |
Battery |
Voltage |
Under any condition |
B+ |
|
|
2A |
— |
— |
— |
— |
— |
— |
|
2B |
CAN_L |
— |
Inspect under DTC inspection. |
— |
||
|
2C |
— |
— |
— |
— |
— |
— |
|
2D |
CAN_H |
— |
Inspect under DTC inspection. |
— |
||
|
2E |
— |
— |
— |
— |
— |
— |
|
2F |
Ignition power supply |
Ignition switch or IG1 relay |
Voltage |
Switch the ignition to ON |
B+ |
|
|
Switch the ignition to off |
1 V or less |
|||||
 Electro Hydraulic Power Assist Steering (EHPAS) Control Module Configuration
CAUTION:
If the EHPAS CM configuration is not completed, the EHPAS will not operate
properly. If the EHPAS CM is replaced, always carry out the EHPAS CM configuration
so that the EHPAS o ...
 Oil Control Valve (OCV) Inspection [Mzr 2.0, Mzr 2.5]
Coil Resistance Inspection
1. Remove the battery cover..
2. Disconnect the negative battery cable..
3. Remove the plug hole plate..
4. Disconnect the OCV connector.
5. Measure the resistance ...
Other materials:
Transaxle Range (TR) Switch Inspection [FS5 A EL]
CAUTION:
Water or foreign objects entering the connector can cause a poor connection
or corrosion. Be sure not to drop water or foreign objects on the connector
when disconnecting it.
Operation Inspection
1. Perform the following procedures to inspect the TR switch.
If t ...
Sunroof Motor Inspection
1. Disconnect the negative battery cable..
2. Remove the rain sensor cover. (Vehicles with auto light/wiper system).
3. Disconnect the rain sensor connector. (Vehicles with auto light/wiper system)
4. Partially peel back the seaming welts.
5. Remove the following parts:
a. Sunroof seaming ...
Air Bag Module And Pre Tensioner Seat Belt Disposal Procedures
WARNING:
A live (undeployed) air bag module or pre-tensioner seat belt may accidentally
operate (deploy) when it is disposed of and cause serious injury. Always refer
to the “AIR BAG MODULE AND PRE-TENSIONER SEAT BELT DEPLOYMENT PROCEDURES” and
dispose of air bag modules and p ...
