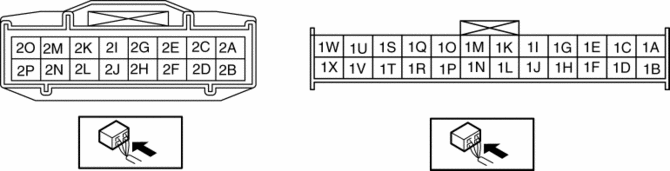
Mazda 3 Service Manual: Climate Control Unit Inspection [Full Auto Air Conditioner]
1. Remove the climate control unit with the connector connected..
2. Switch the ignition to ON.
3. Connect the negative (-) lead of the tester to body ground.
4. By inserting the positive (+) lead of the tester into each climate control unit terminal, measure the voltage according to the terminal voltage table.
-
If there is any malfunction, inspect the parts under “Inspection item (s)”.
-
If the parts under “Inspection item (s)” are found to be normal (except for terminal 1M), replace the climate control unit.
-
For terminal 1M, first try replacing the power MOS FET. If there is still any malfunction, replace the climate control unit.
Terminal Voltage Table (Reference)
|
Terminal |
Signal name |
Connected to |
Measurement condition |
Voltage (V) |
Inspection item (s) |
|
1A |
— |
— |
— |
— |
— |
|
1B |
— |
— |
— |
— |
— |
|
1C |
+5V |
|
Switch the ignition to ON |
5 |
|
|
Switch the ignition to Off |
1.0 or less |
||||
|
1D |
GND |
Body ground |
Under any condition |
1.0 or less |
|
|
1E |
Sensor GND |
|
Under any condition |
1.0 or less |
|
|
1F |
Solar radiation sensor (RH) input |
Solar radiation sensor |
Sunlight shined directly on the solar radiation sensor |
4 |
|
|
Blocking light to solar radiation sensor |
1.0 or less |
||||
|
1G |
Potentiometer input |
Driver-side air mix actuator |
Set temperature at MAX HOT |
4.3 or more |
|
|
Set temperature at MAX COLD |
1.0 or less |
||||
|
1H |
Solar radiation sensor (LH) input |
Solar radiation sensor |
Sunlight shined directly on the solar radiation sensor |
4 |
|
|
Blocking light to solar radiation sensor |
1.0 or less |
||||
|
1I |
Potentiometer input |
Passenger-side air mix actuator |
Set temperature at MAX COLD |
1.0 or less |
|
|
Set temperature at MAX HOT |
4.3 or more |
||||
|
1J |
— |
— |
— |
— |
— |
|
1K |
Potentiometer input |
Airflow mode actuator |
VENT |
4.3 or more |
|
|
BI-LEVEL |
3.4 |
||||
|
HEAT |
2.5 |
||||
|
HEAT/DEF |
1.6 |
||||
|
DEFROSTER |
0.7 or less |
||||
|
1L |
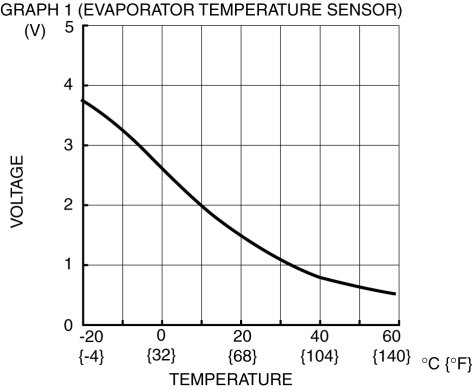
Evaporator temperature sensor input |
Evaporator temperature sensor |
Compared with temperature detected by evaporator temperature sensor |
Refer to graph 1 |
|
|
1M |
Blower fan speed control |
Power MOS FET |
Fan stopped |
1.0 or less |
|
|
Fan: manual 1st |
2.2 |
||||
|
Fan: manual 7th |
9.7 |
||||
|
1N |
Blower motor feedback |
|
Fan stopped |
B+ |
|
|
Fan: manual 1st |
9.8 |
||||
|
Fan: manual 7th |
0.4 or less |
||||
|
1O |
— |
— |
— |
— |
— |
|
1P |
— |
— |
— |
— |
— |
|
1Q |
Motor operation (COLD) |
Passenger-side air mix actuator |
Moving towards HOT |
1.0 or less |
|
|
Moving towards COLD |
B+ |
||||
|
1R |
Motor operation (FRESH) |
Air intake actuator |
Moving towards RECIRCULATE |
1.0 or less |
|
|
Moving towards FRESH |
B+ |
||||
|
1S |
Motor operation (HOT) |
Passenger-side air mix actuator |
Moving towards HOT |
B+ |
|
|
Moving towards COLD |
1.0 or less |
||||
|
1T |
Motor operation (RECIRCULATE) |
Air intake actuator |
Moving towards RECIRCULATE |
B+ |
|
|
Moving towards FRESH |
1.0 or less |
||||
|
1U |
Motor operation (COLD) |
Driver-side air mix actuator |
Moving towards HOT |
1.0 or less |
|
|
Moving towards COLD |
B+ |
||||
|
1V |
Motor operation (DEFROSTER) |
Airflow mode actuator |
Moving towards DEFROSTER |
B+ |
|
|
Moving towards VENT |
1.0 or less |
||||
|
1W |
Motor operation (HOT) |
Driver-side air mix actuator |
Moving towards HOT |
B+ |
|
|
Moving towards COLD |
1.0 or less |
||||
|
1X |
Motor operation (VENT) |
Airflow mode actuator |
Moving towards VENT |
B+ |
|
|
Moving towards DEFROSTER |
1.0 or less |
||||
|
2A |
Illumination control |
Instrument cluster |
Headlight switch ON and panel light control switch at MAX |
1.0 or less |
|
|
Headlight switch ON and panel light control switch at MIN |
11.5 |
||||
|
2B |
B+ |
ROOM 15 A fuse |
Under any condition |
B+ |
|
|
2C |
— |
— |
— |
— |
— |
|
2D |
— |
— |
— |
— |
— |
|
2E |
MS_CAN_H |
CAN related module |
Because this terminal is for communication, good/no good judgment by terminal voltage is not possible. |
|
|
|
2F |
TNS signal |
TNS relay |
TNS ON |
B+ |
|
|
TNS OFF |
1.0 or less |
||||
|
2G |
MS_CAN_L |
CAN related module |
Because this terminal is for communication, good/no good judgment by terminal voltage is not possible. |
|
|
|
2H |
IG2 |
HEATER 10 A fuse |
Switch the ignition to ON |
B+ |
|
|
Switch the ignition to Off |
1.0 or less |
||||
|
2I |
— |
— |
— |
— |
— |
|
2J*1 |
Refrigerant pressure sensor input |
Refrigerant pressure sensor |
Compared with temperature detected by refrigerant pressure sensor |
(See REFRIGERANT PRESSURE SENSOR INSPECTION [FULL-AUTO AIR CONDITIONER].) |
|
|
2K |
— |
— |
— |
— |
— |
|
2L |
— |
— |
— |
— |
— |
|
2M |
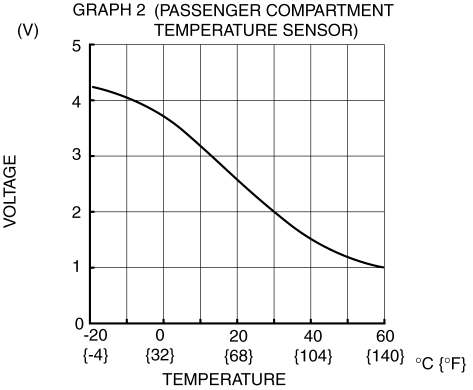
Passenger compartment temperature sensor input |
Passenger compartment temperature sensor |
Compared with temperature detected by passenger compartment temperature sensor |
Refer to graph 2 |
|
|
2N |
Passenger compartment temperature sensor GND |
Passenger compartment temperature sensor |
Under any condition |
1.0 or less |
|
|
2O |
— |
— |
— |
— |
— |
|
2P |
— |
— |
— |
— |
— |
*1 MZR 2.3 DISI Turbo, MZR 2.5
|
|
|
 Climate Control Unit Disassembly/Assembly [Manual Air Conditioner]
1. Disassemble in the order indicated in the figure.
1
Dial
2
Airflow mode wire
(See Wire Removal Note.)
(See Wire Installation Note.)
...
 Climate Control Unit Inspection [Manual Air Conditioner]
1. Remove the climate control unit with the connector connected..
2. Switch the ignition to ON.
3. Connect the negative (-) lead of the tester to the body ground.
4. By inserting the positive (+ ...
Other materials:
Steering Gear And Linkage Disassembly
CAUTION:
To prevent damage to the steering gear, secure it to the vise using a copper
plate or clean cloth.
1. Disassemble in the order indicated in the table.
1
Floor seal
2
Oil pipe
3
Tie-rod end ...
Variable Intake Air Solenoid Valve Inspection [Mzr 2.0, Mzr 2.5]
Airflow Inspection
1. Remove the battery cover..
2. Disconnect the negative battery cable..
3. Remove the variable intake air solenoid valve..
4. Inspect airflow between the ports under the following conditions.
If not as specified, replace the variable intake air solenoid val ...
Thermostat Removal/Installation [Mzr 2.0, Mzr 2.5]
WARNING:
Never remove the cooling system cap or loosen the radiator drain plug while
the engine is running, or when the engine and radiator are hot. Scalding engine
coolant and steam may shoot out and cause serious injury. It may also damage
the engine and cooling system.
Tu ...
