Mazda 3 Service Manual: Energy Absorbing Form Removal/Installation
1. Disconnect the negative battery cable..
2. Remove the rear combination light..
3. Remove the rear bumper..
4. Remove the fasteners.
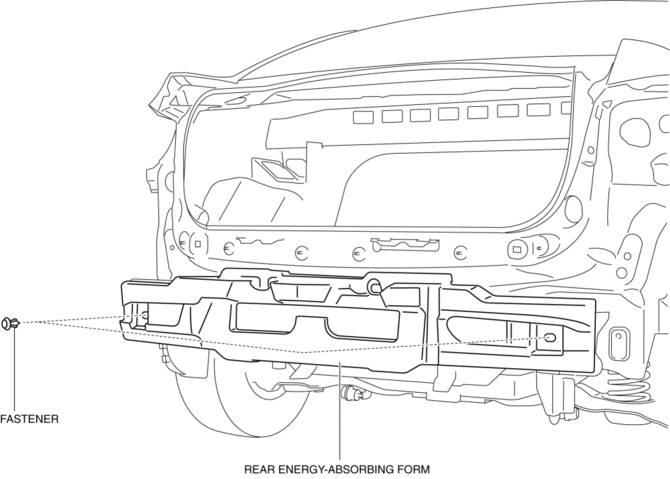
5. Remove the rear energy-absorbing form.
6. Install in the reverse order of removal.
 Cowl Panel Removal/Installation
1. Disconnect th negative battery cable..
2. Remove the windshield wiper arm and blade..
3. Remove the front fender molding..
4. Remove the cowl grille..
5. Remove the washer hose grommet from ...
 Extractor Chamber Removal/Installation
1. Disconnect the negative battery cable..
2. Remove the rear combination light..
3. Remove the rear bumper..
4. Remove the clips.
5. Install in the reverse order of removal. ...
Other materials:
Automatic Transaxle Fluid (ATF) Adjustment [Fw6 A EL]
CAUTION:
Only adjust the ATF level when the ATF temperature is 45—55 °C {113—131 °F}.
If the ATF level is incorrect, it could damage the transaxle.
Do not add ATF over the specification. Otherwise, the transaxle performance
could be reduced and ATF could leak.
1. Re ...
Variable Intake Air Solenoid Valve Inspection [Mzr 2.0, Mzr 2.5]
Airflow Inspection
1. Remove the battery cover..
2. Disconnect the negative battery cable..
3. Remove the variable intake air solenoid valve..
4. Inspect airflow between the ports under the following conditions.
If not as specified, replace the variable intake air solenoid val ...
Electric Power Steering Oil Pump Component Removal/Installation
CAUTION:
Be careful not to drop the electric power steering oil pump component as
the internal parts of the EHPAS CM could be damaged. Replace the electric power
steering oil pump component if it is subjected to an impact.
1. Remove the front mudguard (RH)..
2. Remove the aerod ...
