Mazda 3 Service Manual: Front Door Key Cylinder Switch Inspection
1. To access the glass installation bolt, position the front door glass so that the distance from the top of the front door glass to the upper part of the front beltline molding is approx. 80 mm {3.1 in}
.

2. Disconnect the negative battery cable..
3. Remove the following parts:
a. Inner garnish.
b. Front door trim.
c. Front door speaker.
d. Front door glass.
e. Front door module panel.
f. Front door latch and lock actuator.
4. Move the rod of the door key cylinder switch in the direction of the arrow shown in the figure, and verify that the continuity is as indicated in the table.
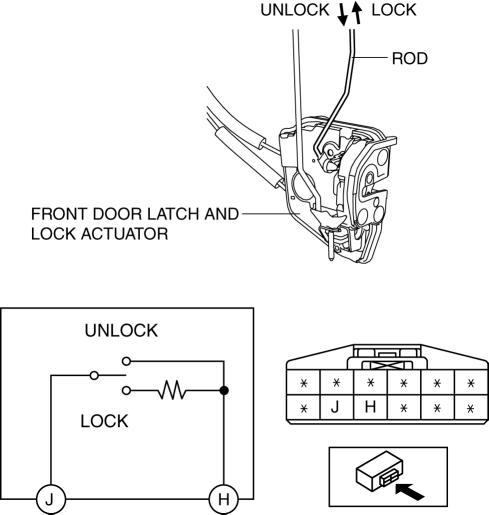
-
If not as indicated in the table, replace the front door latch and lock actuator.

 Front Door Key Cylinder Removal/Installation
1. To access the glass installation bolt, position the front door glass so that
the distance from the top of the front door glass to the upper part of the front
beltline molding is approx. 80 mm { ...
 Trunk Lid Key Cylinder Removal/Installation
1. Disconnect the negative battery cable..
2. Remove the trunk lid trim..
3. Lift the clip in the direction of the arrow (1), and pull out the key rod
in the direction of the arrow (2).
4. ...
Other materials:
Hydraulic Variable Valve Timing Actuator Inspection [Skyactiv G 2.0]
WARNING:
A hot engine can cause severe burns. Turn off the engine and wait until it
is cool before servicing.
CAUTION:
Do not disassemble the hydraulic variable valve timing actuator because it
is a precision unit.
1. Remove the battery cover..
2. Disconnect the n ...
Discharge Headlight Service Warnings
Discharge Headlight Service Warnings
To prevent electrical shock when replacing the discharge headlight bulb,
always perform the servicing with dry hands and in an area where it does not
get wet.
Never probe the discharge headlight bulb connector directly with a finger
o ...
Fuel Tank Removal/Installation [Mzr 2.0, Mzr 2.5]
WARNING:
Fuel is very flammable liquid. If fuel spills or leaks from the pressurized
fuel system, it will cause serious injury or death and facility breakage. Fuel
can also irritate skin and eyes. To prevent this, always complete the “Fuel
Line Safety Procedure”, while referring ...
