Mazda 3 Service Manual: Front Oil Seal Replacement [Mzr 2.0, Mzr 2.5]
1. Remove the battery cover..
2. Disconnect the negative battery cable..
3. Remove the plug hole plate..
4. Disconnect the wiring harness.
5. Remove the ignition coils..
6. Remove the spark plugs..
7. Remove the ventilation hose.
8. Remove the oil level gauge.
9. Remove the cylinder head cover..
10. Remove the front wheel and tire. (RH).
11. Remove the aerodynamic under cover No.2 and splash shield as a single unit..
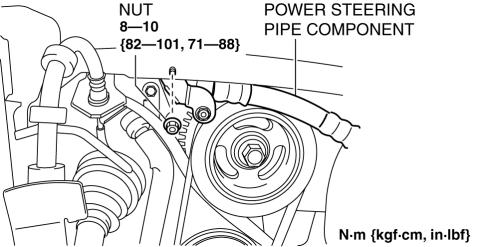
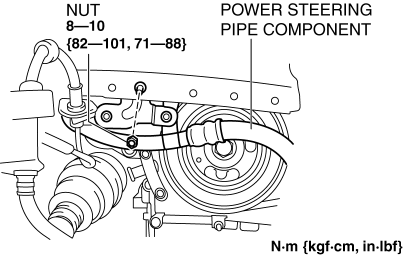
12. Remove the nut shown in the figure and set the power steering pipe component out of the way.
MZR 2.0
MZR 2.5
13. Remove the drive belt..
14. Disconnect the drive shaft (RH) from joint shaft, set the drive shaft (RH) out of the way. (MTX).
15. Remove in the order indicated in the table.
16. Install in the reverse order of removal.
|
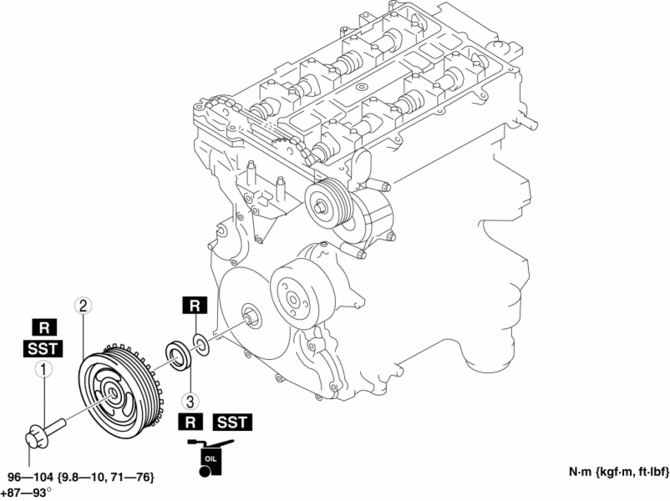
1 |
Crankshaft pulley lock bolt (See Crankshaft Pulley Lock Bolt Removal Note.) (See Crankshaft Pulley Lock Bolt Installation Note.) |
|
2 |
Crankshaft pulley |
|
3 |
Front oil seal (See Front Oil Seal Removal Note.) (See Front Oil Seal Installation Note.) |
Crankshaft Pulley Lock Bolt Removal Note
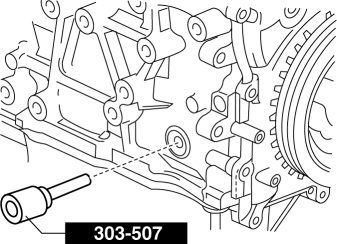
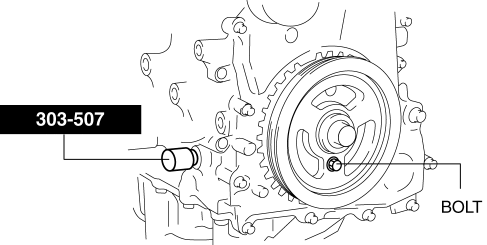
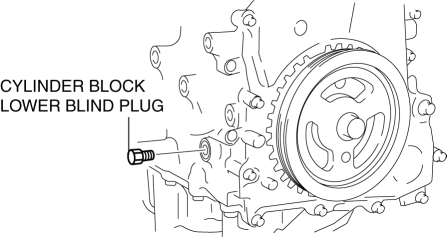
1. Remove the cylinder block lower blind plug.
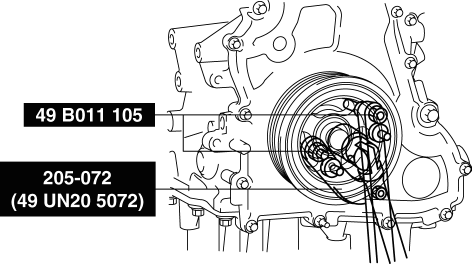
2. Install the SST
.
3. Turn the crankshaft clockwise until the crankshaft is in the No.1 cylinder top dead center (TDC) position (until the balance weight is attached to the SST
).
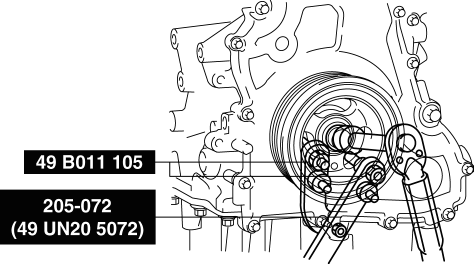
4. Hold the crankshaft pulley using the SSTs
.
Front Oil Seal Removal Note
1. Cut the oil seal lip using a utility knife.
2. Remove the oil seal using a screwdriver wrapped with a rag.

Front Oil Seal Installation Note
1. Apply clean engine oil to the oil seal lip.
2. Push the oil seal slightly in by hand.
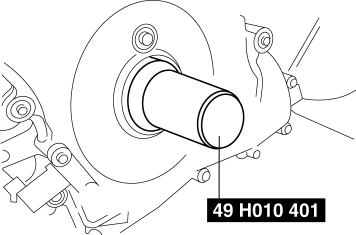
3. Tap the oil seal in evenly using the SST
and a hammer.
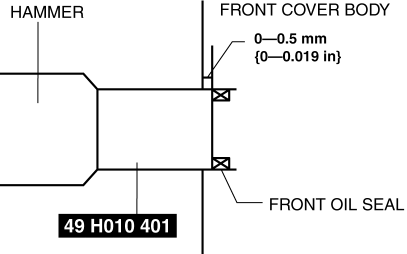
-
Front oil seal press-in amount
-
0—0.5 mm {0—0.019 in}
Crankshaft Pulley Lock Bolt Installation Note
1. Install the SST
on the camshaft as shown in the figure.
2. Verify that No.1 cylinder is at TDC of the compression stroke. (Position counterweight contacts SST
.)
3. To position the crankshaft pulley, temporarily tighten it and, using a suitable bolt (M6 X 1.0)
, fix the crankshaft pulley to the engine front cover.
4. Hold the crankshaft pulley using the SSTs
.
5. Tighten the crankshaft pulley lock bolt in the order shown in the following two steps.
-
Tightening torque
-
Step 1: 96—104 N·m {9.8—10 kgf·m, 71—76 ft·lbf}
-
Step 2: 87—93°
6. Remove the M6 x 1.0
bolt.
7. Remove the SST
from the camshaft.
8. Remove the SST
from the cylinder block lower blind plug hole.
9. Verify that the teeth of the crankshaft pulley pulse wheel and the detection area of the crankshaft position sensor are installed to the correct positions..
10. Rotate the crankshaft clockwise 2 turns until the TDC position.
-
If not aligned, loosen the crankshaft pulley lock bolt and repeat from Step 1.
11. Install the cylinder block lower blind plug.
-
Tightening torque
-
18—22 N·m {1.9—2.2 kgf·m, 14—16 ft·lbf}
 Engine Oil Replacement [Mzr 2.0, Mzr 2.5]
WARNING:
Hot engines and engine oil can cause severe burns. Turn off the engine and
wait until it and the engine oil have cooled.
A vehicle that is lifted but not securely supported ...
 Oil Control Valve (OCV) Inspection [Mzr 2.0, Mzr 2.5]
Coil Resistance Inspection
1. Remove the battery cover..
2. Disconnect the negative battery cable..
3. Remove the plug hole plate..
4. Disconnect the OCV connector.
5. Measure the resistance ...
Other materials:
Tire Pressure Adjustment (With TPMS)
1. Use of a digital gauge is recommended for accurate measurement of the air
pressure.
2. Tire pressure lowers gradually as time passes. Due to this, monthly air pressure
inspection is recommended.
3. Perform tire pressure adjustment before driving. (When tires are cold.)
Tire press ...
Vacuum Pump Removal/Installation [Skyactiv G 2.0]
1. Remove the plug hole plate..
2. Remove the battery and battery tray..
3. Pinch open the clamp using pliers and disconnect the vacuum hose from the
vacuum pump.
4. Remove in the order shown in the table.
5. Install in the reverse order of removal.
1
Vacu ...
Overhead Lights
With Map Lights
Front
Rear
Without Map Lights
NOTE (With map lights) The rear overhead light also turn on and off when the front overhead light switch is operated.
Map Lights *
When the overhead light switch is in the door or off position, press the lens ...
