Subaru Solterra 2023-2026 Owner's Manual: Gauges and meters
In the Subaru Solterra, the gauges and meters are designed to provide the driver with clear, real-time driving information, helping to maintain awareness of vehicle performance, battery condition, and overall system status during every journey.
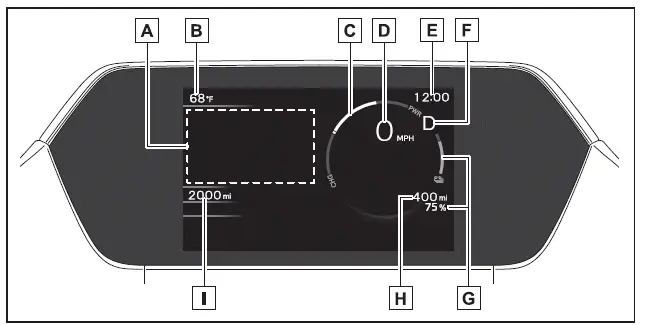
Meter display
■ Locations of gauges and meters
The measurement units and display configuration in the Subaru Solterra may vary depending on the destination market and regional specifications.
- Multi-information display
In the Subaru Solterra, this central display provides a wide range of vehicle data, including driving information and system status.
It also shows warning messages whenever a malfunction or alert condition is detected.
The visibility of the multi-information display can be customized according to driver preference. - Outside temperature
Displays ambient temperature within a range of -40ºF (-40ºC) to 140ºF (60ºC), helping drivers of the Subaru Solterra anticipate road and weather conditions. - Power meter
Indicates the EV system output level or regenerative braking intensity in the Subaru Solterra. - Speedometer
Displays the current vehicle speed clearly and accurately. - Clock
Also integrates shift position information and regenerative braking indicators depending on system mode. - SOC (State of Charge) gauge
Shows the remaining charge level of the traction battery in the Subaru Solterra. - Driving range
Displays the estimated remaining driving distance based on current battery charge.
When the climate control system is active, and the adjusted driving range with air conditioning usage are shown, allowing
more accurate planning.
and the adjusted driving range with air conditioning usage are shown, allowing
more accurate planning. - Odometer and trip meter display
■ Power meter
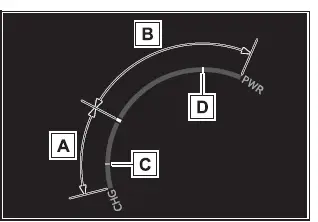
- Charge area
Indicates regenerative braking status*1 in the Subaru Solterra.
Recovered energy is redirected to recharge the traction battery, improving efficiency. - Power area
Displays the output of the electric drive system, reflecting acceleration demand while driving. - Regeneration*1 restrictions reference display*2
Under certain conditions in the Subaru Solterra, regenerative braking may be limited. When this occurs, the system will display reference indicators within the charge area.
- When the traction battery is nearly full and cannot accept additional regenerated energy
- When the traction battery temperature is excessively high or low
- Output restrictions reference display* 2
In specific situations, the Subaru Solterra may also restrict power output, and corresponding indicators will appear in the power area.
- When the traction battery charge is too low to deliver full power
- When the traction battery temperature is outside optimal operating limits
*1: In the Subaru Solterra, “regeneration” refers to converting kinetic energy
into electrical energy to recharge the battery.
*2: Actual restriction levels may vary depending on driving conditions and battery
status.
■ Outside temperature display
- In the Subaru Solterra, the outside temperature reading may not immediately
reflect actual conditions in the following cases:
- When the vehicle is stationary or moving at low speeds (below 16 mph [25 km/h])
- When there is a sudden temperature change, such as entering or exiting a garage or tunnel
- If “--” is displayed, the system may be experiencing a malfunction. Have the Subaru Solterra inspected by a qualified dealer.
- When the outside temperature drops to approximately 37ºF (3ºC) or lower,
the indicator
 will flash briefly and then remain illuminated to alert the driver.
■ Customization
The Subaru Solterra allows customization of gauges and meter displays via
 within the multi-information display interface.
WARNING
■ The information display at low temperatures
Before operating the Subaru Solterra in extremely cold conditions, allow the interior to warm up. The liquid crystal display may respond slowly, and transitions between displayed values may be delayed.
For example, a delay between gear selection and the display of regenerative braking may cause the driver to apply additional input unintentionally, potentially leading to excessive braking force and increasing the risk of an accident.
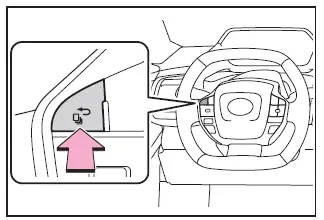
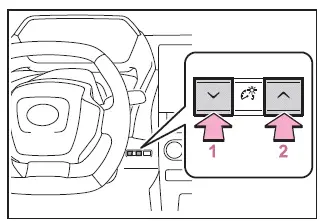
Switching the meter display
The multi-information display in the Subaru Solterra can be toggled between visible and hidden modes as needed.
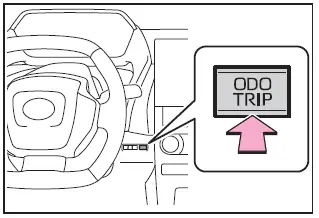
Odometer and trip meter display
■ Display items
- Odometer
Shows the total distance traveled by the Subaru Solterra throughout its lifetime. - Trip meter A/Trip meter B
Tracks distance driven since the last reset, allowing independent monitoring of multiple trips.
■ Switching the display
Each press of the control switch cycles through the available displays. Holding the switch while viewing the trip meter will reset the distance value to zero in the Subaru Solterra.
Adjusting the clock
The clock settings in the Subaru Solterra can be configured via the multimedia system interface.
- Multi-information display
- Audio system screen
For additional details, refer to the multimedia system manual.
If
 is displayed when
 is selected, the system may require inspection.
Have the Subaru Solterra checked by an authorized SUBARU dealer.
Adjusting the instrument panel light control
The brightness of the instrument panel lighting in the Subaru Solterra can be adjusted to match ambient lighting conditions.
- Darker
- Brighter
■ Instrument panel illumination adjustment
The illumination level can be fine-tuned for optimal visibility in both daytime and nighttime driving conditions, enhancing comfort and safety in the Subaru Solterra.
 Warning lights and indicators
The Subaru Solterra is equipped with a comprehensive set of warning
lights and indicators located on the instrument cluster and exterior mirrors, designed
to clearly communicate the current condit ...
 Multi-information display
Display and menu icons
■ Display
Driving support system status display area
In the Subaru Solterra, this area dynamically presents visual information whenever
advanced driver assista ...
Other materials:
Cleaning the Window Interiors
If the windows become covered with an
oily, greasy, or waxy film, clean them with
glass cleaner. Follow the directions on the
container.
CAUTION
Do not scrape or scratch the inside of
the window glass. It could damage the
thermal fi laments and the antenna lines.
When wash ...
Front Stabilizer Removal/Installation [Mzr 2.0, Skyactiv G 2.0, Mzr 2.5]
1. Remove the joint cover..
2. Disconnect the steering shaft from the steering gear and linkage..
3. Remove the front crossmember component..
4. Remove in the order indicated in the table.
5. Install in the reverse order of removal.
6. Inspect the wheel alignment and adjust it if necessary ...
Warning Light
The warning light turns on when the
system has a malfunction.
Refer to Warning Lights on .
Brake Pad Wear Indicator
When the disc brake pads become worn,
the built-in wear indicators contact the
disc plates. This causes a screeching noise
to warn that the pads should be replaced.
When ...
