Mazda 3 Service Manual: Headlight Auto Leveling System Initialization
CAUTION:
-
If the headlight auto leveling initial setting is not stored correctly, the headlight auto leveling system may not operate normally. To store the initial setting correctly, perform the initial setting with the vehicle under the following conditions:
-
No occupants inside vehicle
-
Cargo other than spare tire, jack, and tools not loaded
-
Tire pressure is at specification.
NOTE:
-
The headlight auto leveling system initial setting has a procedure which uses the M-MDS and one which does not. Because the procedure differs depending on the part which is replaced in the method not using the M-MDS, refer to the following and perform the initial setting.
-
If the following servicing is to be done, perform the procedure for the case where system initialization has never been done..
-
AFS (adaptive front lighting system) control module is newly replaced.
-
If the following servicing is done, perform the procedure for the case where the system is reset after initialization has already been completed..
-
Auto leveling sensor is removed/installed.
-
Auto leveling sensor is replaced.
-
Procedure for changing vehicle height is performed such as changing suspension.
Using M-MDS
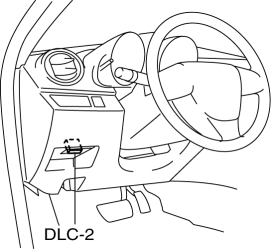
1. Connect the M-MDS to the DLC-2.
2. After the vehicle is identified, select the following items from the initial screen of the M-MDS.
-
When using the IDS (laptop PC)
-
Select “Electrical”.
-
Select “Exterior Lighting”.
-
Select “Headlamp”.
-
Select "Auto Leveling Sensor Re-zero Procedure"
3. Adjust the headlight aiming..
Without using M-MDS
Initialization has never been performed
1. Switch the ignition ON.
NOTE:
-
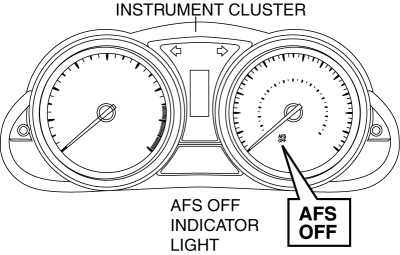
If the headlight auto leveling system initial setting is not completed, the AFS OFF indicator light flashes at 0.5 s intervals when the ignition is switched ON. This does not indicate a system malfunction, therefore, perform the initial setting.
2. Ground the DLC-2 B terminal 3 times or more at 1 s intervals using the jumper wire.

3. If the headlight auto leveling system initial setting is completed normally, the AFS OFF indicator light flashes three times at 0.5 s intervals and it turns off.
NOTE:
-
If the AFS OFF indicator light continues to flash at 0.5 s intervals, the following malfunction can be considered. Repair or replace the malfunctioning area, then repeat the procedure from Step 1..
-
With the normal completion of the headlight auto leveling system initial setting, the headlight leveling actuator operation can also be verified. If the headlight auto leveling system initial setting is completed normally, the headlight leveling actuator lowers from its current position for approx. 2 s and returns to its original position.
4. Disconnect the jumper wire from DLC-2.
5. Verify that the AFS OFF indicator light is not illuminated.
6. Adjust the headlight aiming..
Initialization operation implemented and resetting to be performed
CAUTION:
-
Perform the procedures in Steps 2 to 3 within 5 s.
-
With DRL (Discharge type) or without DRL
-
Switch the ignition ON.
-
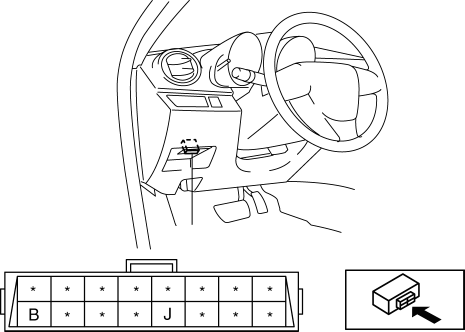
Connect terminal B (INIT) of the DLC-2 to terminal J (GND) using a jumper wire.
CAUTION:
-
If the terminals are mistakenly connected, vehicle damage or fire could occur. When connecting with the jumper wire, thoroughly verify what terminals are being connected to prevent a miss-connection.
-
-
The light switch switches in the following order: OFF→HEAD→OFF→HEAD→OFF→HEAD→OFF
CAUTION:
-
If Step 3 is not completed within 5 s after Step 2, the initial setting is not stored. If Step 3 cannot be completed within 5 s after Step 2, switch the ignition to LOCK and repeat the procedure from Step 1.
-
-
If the headlight auto leveling system initial setting is completed normally, the AFS OFF indicator light flashes three times at 0.5 s intervals and it turns off.
NOTE:
-
If the AFS OFF indicator light continues to flash at 0.5 s intervals, the following malfunction can be considered. Repair or replace the malfunctioning area, then repeat the procedure from Step 1..
-
With the normal completion of the headlight auto leveling system initial setting, the headlight leveling actuator operation can also be verified. If the headlight auto leveling system initial setting is completed normally, the headlight leveling actuator lowers from its current position for approx. 2 s and returns to its original position.
-
-
Pull out the jumper wire from DLC-2.
-
Verify that the AFS OFF indicator light is not illuminated.
-
Adjust the headlight aiming..
CAUTION:
-
Perform the procedures in Steps 3 to 4 within 5 s.
-
With DRL (Halogen type)
-
Turn on the headlights TNS position.
-
Switch the ignition ON.
-
Connect terminal B (INIT) of the DLC-2 to terminal J (GND) using a jumper wire.
CAUTION:
-
If the terminals are mistakenly connected, vehicle damage or fire could occur. When connecting with the jumper wire, thoroughly verify what terminals are being connected to prevent a miss-connection.
-
-
The light switch switches in the following order: TNS→HEAD→OFF→HEAD→OFF→HEAD→OFF
CAUTION:
-
If Step 4 is not completed within 5 s after Step 3, the initial setting is not stored. If Step 4 cannot be completed within 5 s after Step 3, switch the ignition to LOCK and repeat the procedure from Step 1.
-
-
If the headlight auto leveling system initial setting is completed normally, the AFS OFF indicator light flashes three times at 0.5 s intervals and it turns off.
NOTE:
-
If the AFS OFF indicator light continues to flash at 0.5 s intervals, the following malfunction can be considered. Repair or replace the malfunctioning area, then repeat the procedure from Step 1..
-
With the normal completion of the headlight auto leveling system initial setting, the headlight leveling actuator operation can also be verified. If the headlight auto leveling system initial setting is completed normally, the headlight leveling actuator lowers from its current position for approx. 2 s and returns to its original position.
-
-
Pull out the jumper wire from DLC-2.
-
Verify that the AFS OFF indicator light is not illuminated.
-
Adjust the headlight aiming..
 Headlight Aiming
CAUTION:
If the headlight aiming is adjusted with cargo in the vehicle, it may not
adjust correctly. Adjust the headlight aiming with the vehicle under the following
conditions:
...
 Headlight Bulb Removal/Installation
Halogen Type
Low-beam
1. Disconnect the negative battery cable..
2. Disconnect the connector.
3. Remove the cover.
4. Remove the adaptor.
5. Remove the headlight bulb (LO).
CAUTION ...
Other materials:
Climate Control Unit Inspection [Full Auto Air Conditioner]
1. Remove the climate control unit with the connector connected..
2. Switch the ignition to ON.
3. Connect the negative (-) lead of the tester to body ground.
4. By inserting the positive (+) lead of the tester into each climate control
unit terminal, measure the voltage according to the ter ...
Armrest
The rear armrest in the center of the rear
seatback can be used (no occupant in the
center seat) or placed upright.
WARNING
Never put your hands and fi ngers
around the moving parts of the seat and
armrest:
Putting your hands and fi ngers around
the moving parts of the s ...
Oil Seal (Differential) Replacement [A26 M R]
1. On level ground, jack up the vehicle and support it evenly on safety stands.
2. Drain the oil from the transaxle..
3. Remove the front tires..
4. Remove the splash shield..
5. Remove the aerodynamic under cover No.2..
6. Separate the drive shaft and joint shaft from the transaxle..
7 ...
