Mazda 3 Service Manual: Manual Transaxle Removal/Installation [G66 M R]
CAUTION:
-
Secure the steering wheel using tape or a cable to prevent the steering shaft from rotating after disconnecting the steering shaft. If the steering wheel rotates after the steering shaft and the steering gear and linkage are disconnected, the internal parts of the clock spring could be damaged.
1. Remove the battery cover..
2. Disconnect the negative battery cable.
3. Remove the battery component. (ex: battery, battery tray and PCM component).
4. Remove the air cleaner component..
5. Remove the exhaust manifold insulator installation bolts and set the exhaust manifold insulator aside.
6. Remove the following parts:
a. Exhaust manifold bracket
b. Front splash shields.
c. Aerodynamic under cover No.2.
d. Starter.
7. Drain the transaxle oil into a suitable container.
8. Remove in the order indicated in the table.
9. Install in the reverse order of removal.
10. Add the specified amount of specified transaxle oil..
NOTE:
-
If the transaxle is overhauled and installed to the vehicle, perform the 'INSPECTION AFTER TRANSAXLE INSTALLATION' and verify that there is no abnormality..
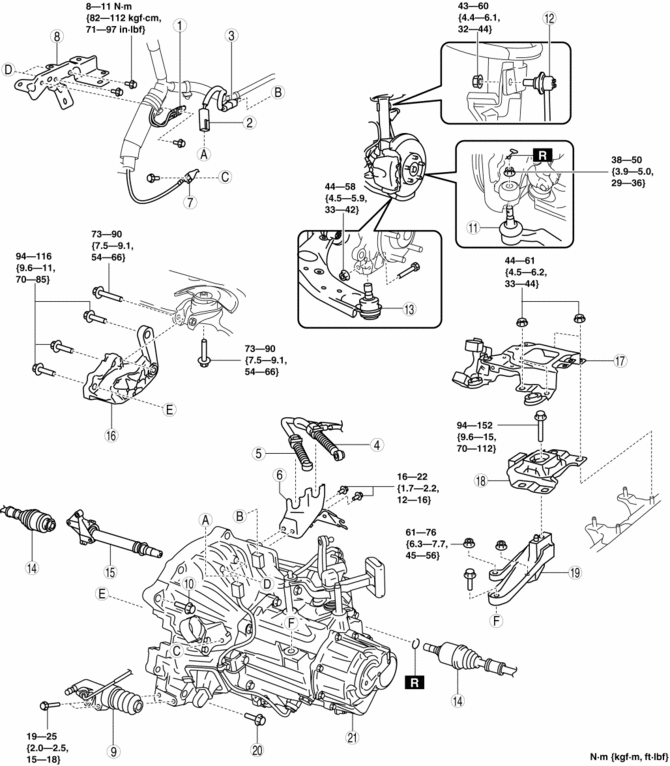
|
1 |
Ground |
|
2 |
Back-up light switch connector |
|
3 |
Neutral switch connector |
|
4 |
Select cable (See Shift Cable And Select Cable Removal Note.) |
|
5 |
Shift cable (See Shift Cable And Select Cable Removal Note.) |
|
6 |
Cable bracket |
|
7 |
Ground |
|
8 |
Harness bracket |
|
9 |
Clutch release cylinder |
|
10 |
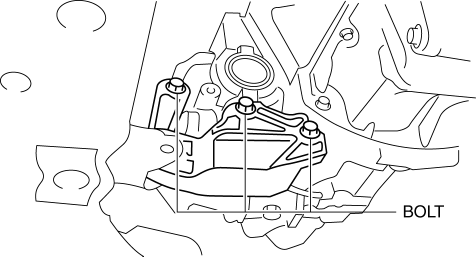
Transaxle mounting bolt (upper side) |
|
11 |
Tie-rod end ball joint (See FRONT CROSSMEMBER REMOVAL/INSTALLATION.) |
|
12 |
Stabilizer control link |
|
13 |
Lower arm ball joint |
|
14 |
Drive shaft (See DRIVE SHAFT REMOVAL/INSTALLATION.) |
|
15 |
Joint shaft (See JOINT SHAFT REMOVAL/INSTALLATION [MZR 2.0, MZR 2.3 DISI Turbo, MZR 2.5].) |
|
16 |
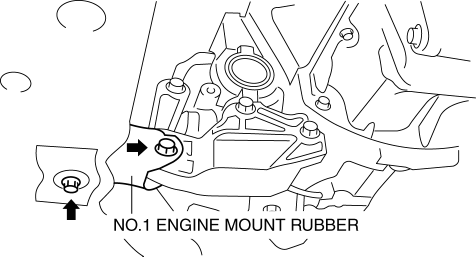
No.1 engine mount bracket (See No.1 Engine Mount and No.4 Engine Mount Installation Note.) |
|
17 |
Battery tray bracket |
|
18 |
No.4 engine mount rubber (See No.4 Engine Mount Removal Note.) (See No.1 Engine Mount and No.4 Engine Mount Installation Note.) |
|
19 |
No.4 engine mount bracket (See No.4 Engine Mount Removal Note.) (See No.1 Engine Mount and No.4 Engine Mount Installation Note.) |
|
20 |
Transaxle mounting bolt (lower side) |
|
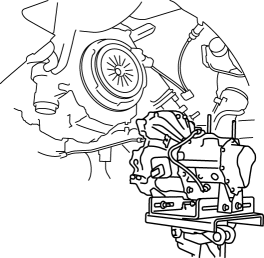
21 |
Manual transaxle (See Manual Transaxle Removal Note.) (See Manual Transaxle Installation Note.) |
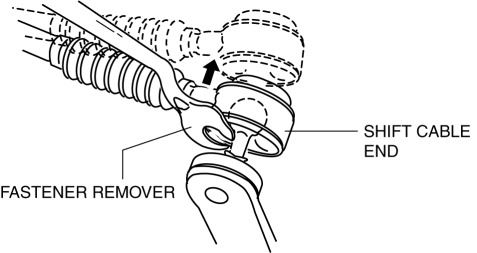
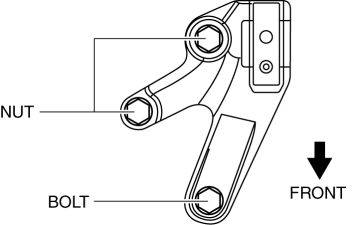
Shift Cable And Select Cable Removal Note
1. Remove the shift and selector cable outer ends as shown in the figure.
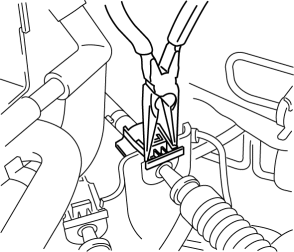
2. Remove the both shift cable end and select cable end using a fastener remover.
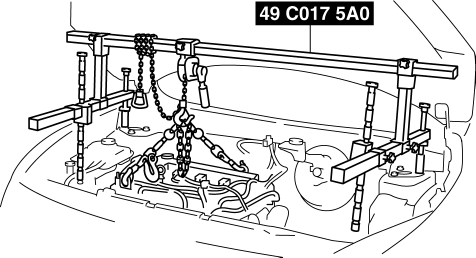
No.4 Engine Mount Removal Note
1. Install the SST
using the following procedure.
CAUTION:
-
Refer to the SST instruction manual for the basic handing procedure.
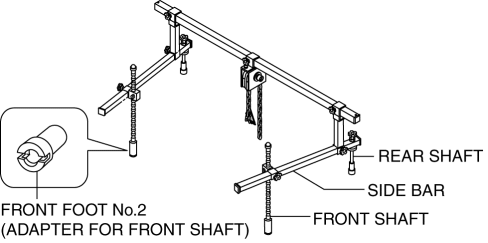
a. Align the bolt of the shock absorber (right side) shown in the figure with the rear shaft hole for the right side of the SST
.
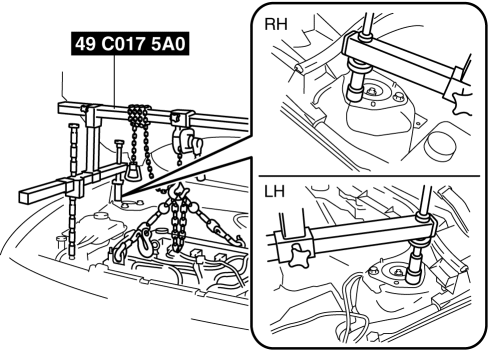
b. Align the bolt of the shock absorber (left side) shown in the figure with the rear shaft hole for the left side of the SST
.
c. Install one front foot No.2 to each of the left and right front shafts of the SST
, and then align the holes of the SST
front shafts with the bolt on the left and right side of each front side frame.
d. Adjust the height of the left and right side bars so that they are leveled, then tighten each part of the SST
.
e. Make sure each joint is securely tightened.
2. Support the engine using the SST
.
3. Remove the No.4 engine mount rubber and bracket.
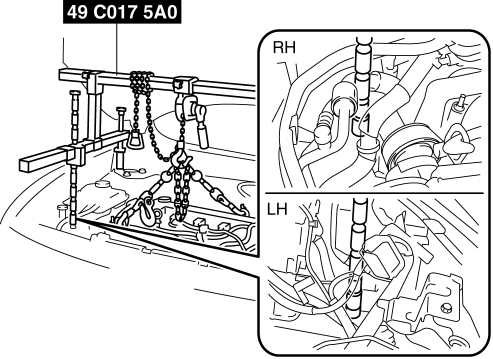
Manual Transaxle Removal Note
WARNING:
-
Remove the transaxle carefully, holding it steady. If the transaxle falls it could be damaged or cause injury.
1. Adjust the SST
and lean the engine toward the transaxle.
2. Support the transaxle on a jack.

3. Remove the transaxle mounting bolts.
4. Remove the transaxle.
Manual Transaxle Installation Note
WARNING:
-
Install the transaxle carefully, holding it steady. If the transaxle falls it could be damaged or cause injury.
1. Set the transaxle on a jack and lift into place.
2. Install the transaxle mounting bolts.
3. Adjust the SST
(49 C017 5A0) so that the engine is located at the specified position.
No.1 Engine Mount and No.4 Engine Mount Installation Note
1. Install the No.4 engine mount bracket on the transaxle case and tighten bolt and nuts.
-
Tightening torque
-
61—76 N·m {6.3—7.7 kgf·m, 45—56 ft·lbf}
2. Install the No.1 engine mount bracket to the transaxle case, and then tighten the bolts.
-
Tightening torque
-
94—116 N·m {9.6—11 kgf·m, 70—85 ft·lbf}
3. Install the No.1 engine mount rubber to the front crossmember, and then temporarily tighten the bolts.
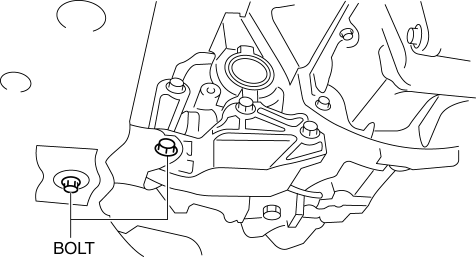
4. Place the No.4 engine mount rubber with the body stud bolts passing through the holes and tighten the bolt in the figure.
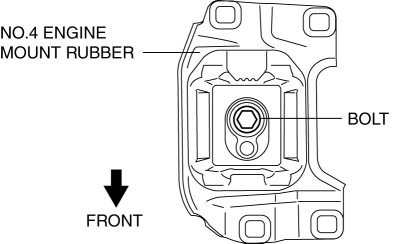
-
Tightening torque
-
94—152 N·m {9.6—15 kgf·m, 70—112 ft·lbf}
5. Fully tighten the bolts.
-
Tightening torque
-
73—90 N·m {7.5—9.1 kgf·m, 54—66 ft·lbf}
6. Place the battery bracket on the No.4 Engine mount rubber with the body stud bolts passing through the holes and tighten bolts and nuts in the order shown in the figure.
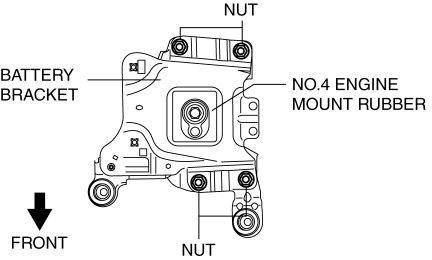
-
Tightening torque
-
73—90 N·m {7.5—9.1 kgf·m, 54—66 ft·lbf}
7. Remove the SST
(49 C017 5A0).
 Manual Transaxle Removal/Installation [G35 M R]
CAUTION:
Secure the steering wheel using tape or a cable to prevent the steering shaft
from rotating after disconnecting the steering shaft. If the steering wheel
rotates after the steer ...
 Manual Transaxle Shift Mechanism Removal/Installation [A26 M R]
1. Remove the battery cover..
2. Disconnect the negative battery cable.
3. Remove the battery and battery tray..
4. Remove the air cleaner and air inlet hose..
5. Remove the aerodynamic under ...
Other materials:
Battery Electric Vehicle driving tips
When operating the Subaru Solterra, it is important to understand
that battery electric vehicles behave differently from conventional gasoline-powered
cars. At sustained high speeds—such as on highways or freeways—the efficiency
of electricity consumption decreases, which can significantly ...
High Mount Brake Light Removal/Installation
4SD
1. Disconnect the negative battery cable..
2. Remove the trunk lid trim..
3. Disconnect the connector.
4. Remove the nuts.
5. While pressing the tabs shown in the figure, pull the high-mount brake light
outward and remove it.
6. Remove the high-mount brake light.
7. Instal ...
Manual Transaxle Removal/Installation [G35 M R]
CAUTION:
Secure the steering wheel using tape or a cable to prevent the steering shaft
from rotating after disconnecting the steering shaft. If the steering wheel
rotates after the steering shaft and the steering gear and linkage are disconnected,
the internal parts of the clock spr ...
