Mazda 3 Service Manual: High Mount Brake Light Bulb Removal/Installation
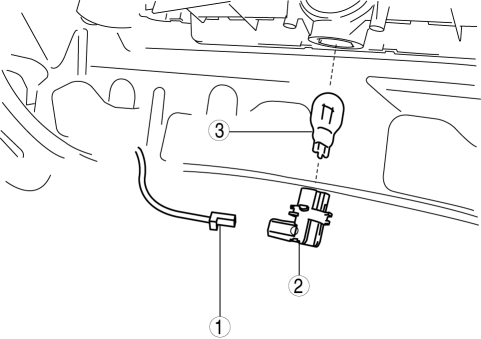
4SD
1. Disconnect the negative battery cable..
2. Remove the trunk lid trim..
3. Remove in the order indicated in the table.
|
1 |
Connector |
|
2 |
Socket |
|
3 |
High-mount brake light bulb |
4. Install in the reverse order of removal.
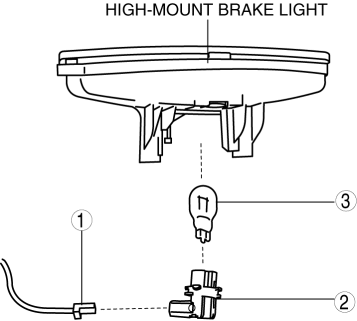
5HB
1. Disconnect the negative battery cable..
2. Remove the liftgate upper trim..
3. Remove the high-mount brake light..
4. Remove in the order indicated in the table.
|
1 |
Connector |
|
2 |
Socket |
|
3 |
High-mount brake light bulb |
5. Install in the reverse order of removal.
 Headlight Leveling Actuator Inspection
NOTE:
Headlight leveling actuator are integrated with the front combination light.
For the actuator inspection of the headlight auto leveling system, perform
the headlight leveling ...
 High Mount Brake Light Disassembly/Assembly
4SD
1. Disconnect the negative battery cable..
2. Remove the trunk lid trim..
3. Remove the high-mount brake light..
4. Remove the high-mount brake light outer lens.
5. Remove the high-mo ...
Other materials:
Neutral Switch Removal/Installation [G66 M R]
1. Remove the battery cover..
2. Disconnect the negative battery cable.
3. Remove the battery component. (ex: battery, battery tray and PCM component).
4. Remove the aerodynamic under cover No.2..
5. Drain the oil from the transaxle..
6. Remove the neutral switch.
7. Install the neu ...
Wheel Hub, Steering Knuckle Removal/Installation
CAUTION:
Performing the following procedures without first removing the ABS wheel-speed
sensor may possibly cause an open circuit in the wiring harness if it is pulled
by mistake. Before performing the following procedures, disconnect the ABS wheel-speed
sensor connector (axle side) ...
Front Bumper Reinforcement Removal/Installation
1. Disconnect the negative battery cable..
2. Remove the following parts:
a. Front bumper.
b. Seal plate.
3. Remove the bolts A.
4. Remove the bolts B.
5. Remove the front bumper reinforcement.
6. Install in the reverse order of removal. ...
