Mazda 3 Service Manual: Hood Disassembly/Assembly
Except Mazdaspeed3
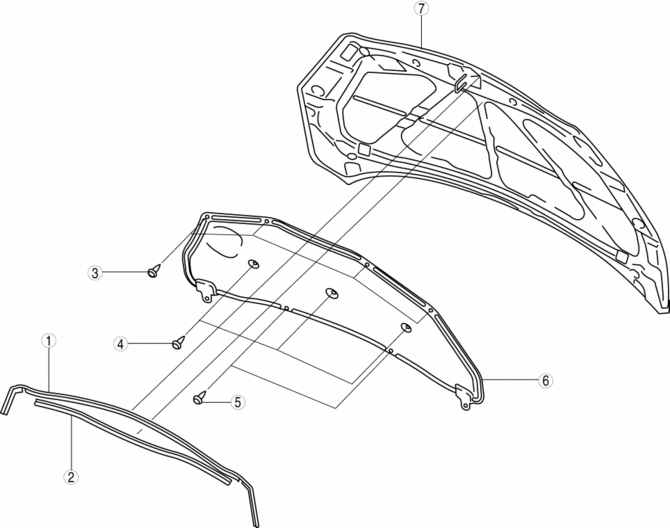
1. Disassemble in the order indicated in the table.
|
1 |
Weather strip parting seal |
|
2 |
Weather strip shroud seal |
|
3 |
Fasteners A |
|
4 |
Fasteners B |
|
5 |
Fasteners C |
|
6 |
Hood insulator |
|
7 |
Hood component |
2. Assemble in the reverse order of disassembly.
Mazdaspeed3
1. Disassemble in the order indicated in the table.

|
1 |
Weather strip parting seal |
|
2 |
Weather strip shroud seal |
|
3 |
Nut A |
|
4 |
Fasteners B |
|
5 |
Charge air cooler duct |
|
6 |
Fasteners C |
|
7 |
Hood insulator |
|
8 |
Nut D |
|
9 |
Charge air cooler duct cover |
|
10 |
Grommet |
|
11 |
Hood component |
2. Assemble in the reverse order of disassembly.
 Hood Adjustment
Gap Adjustment
1. Verify that the gap between the hood and the body is within the specification.
Standard clearance
a: -2.8—0.8 mm {-0.11—0.03 in}
b: –1.2—1.2 mm {–0. ...
 Hood Latch And Release Lever Removal/Installation
Hood latch
1. Open the hood.
2. Disconnect the negative battery cable..
3. Disconnect the hood latch switch connector. (vehicles with theft-deterrent
system)
4. Remove the bolts.
5. ...
Other materials:
Driving range
The driving range displayed on the multi-information display of the
Subaru Solterra represents an estimated reference distance based on current conditions.
The actual distance that can be traveled may vary depending on multiple factors
and may differ from the displayed value.
Displayed value
...
Airflow Mode Actuator Inspection [Full Auto Air Conditioner]
CAUTION:
If the lever position exceeds the operation range shown in the figure, the
circuit in the actuator could be damaged. Always perform an actuator operation
inspection with the lever movement within the range shown in the figure.
1. Connect battery positive voltage to airfl ...
Manual Shift Mode
The manual shift mode gives you the feel
of driving a manual transaxle vehicle by
allowing you to operate the selector lever
manually. This allows you to control
engine rpm and torque to the drive wheels
much like a manual transaxle when more
control is desired.
To change to manual shift mo ...
