Mazda 3 Service Manual: Horn Removal/Installation
1. Disconnect the negative battery cable..
2. Remove the front bumper..
3. Disconnect the connector.
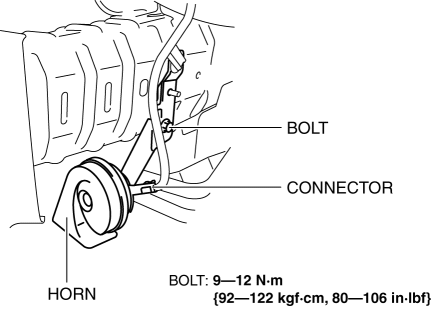
4. Remove the bolt.
5. Remove the horn.
6. Install in the reverse order of removal.
 Horn Inspection
1. Disconnect the negative battery cable..
2. Remove the front bumper..
3. Remove the horn..
4. Apply battery positive voltage and connect the ground as shown in the figure
and verify the horn ...

Other materials:
Opening and Closing the Liftgate/
Trunk Lid
Opening the liftgate (5–door)
Using the electric liftgate opener
Unlock the doors and liftgate, then press
the electric liftgate opener on the liftgate
and raise it when the latch releases.
NOTE
(With the advanced keyless function)
A locked liftgate can also be opened
while the key ...
Abbreviations
ABS
Antilock Brake System
ABDC
After Bottom Dead Center
ACC
Accessories
ALC
Auto Level Control
ALR
Automatic Locking Retractor
AT
Automa ...
Precaution
Intermittent Concern Troubleshooting
Vibration method
If a malfunction occurs or becomes worse while driving on a rough road or
when the engine is vibrating, perform the following steps.
NOTE:
There are several reasons why vehicle or engine vibration could cause an
electr ...
