Subaru Solterra 2023-2026 Owner's Manual: How to use DC charging
This section provides a comprehensive overview of the DC fast charging procedure for the Subaru Solterra traction battery, allowing drivers to quickly and efficiently recharge when needed.
When using a DC charger with the Subaru Solterra, always review and follow the specific instructions provided by the charging station to ensure correct operation and compatibility.
WARNING
■ When using a DC charger
Always observe the following precautions when charging the Subaru Solterra using DC fast charging.
Failure to follow these instructions may result in hazardous situations, including serious injury or fatal accidents.
- Only use DC chargers that comply with the SAE J1772 standard to ensure safe and proper charging of the Subaru Solterra.
- Do not use charging cables longer than 30 meters, as excessive cable length may cause performance issues or safety risks.
When charging
1. Open the charging port lid of the Subaru Solterra.
2. Confirm that the charging inlet light illuminates, indicating that the system is ready for connection.

3. Open both the AC charging inlet cap and the DC charging inlet cap.
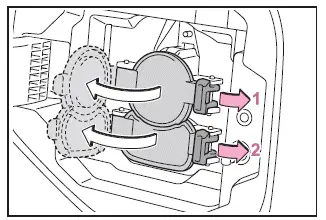
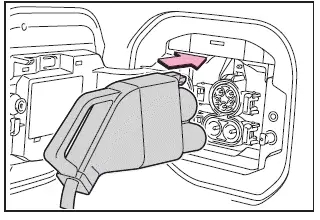
4. Insert the DC charging connector firmly and completely into the Subaru Solterra charging inlet.
Since connector designs may vary depending on the charging station, always follow the specific handling procedures for the charger being used.
5. Start the charging process using the controls provided on the DC charging station.
The Subaru Solterra will perform an internal system check before charging begins.
If you need to stop charging, follow the procedures specified by the charging station.
■ If a message indicating vehicle error on the DC charger side is displayed
If the charging station displays an error message related to the vehicle (such as “vehicle error detected”), it does not necessarily indicate a fault in the Subaru Solterra.
In many cases, this may be caused by a communication issue between the vehicle and the charger or a poor connection at the charging terminals.
If no vehicle malfunction is present, contact the operator or facility manager of the charging station for assistance.
■ During DC charging
- The current charging status of the Subaru Solterra can be monitored via the multi-information display.
- The actual charging time may differ from the estimate shown on the charger due to various operating conditions.
- Radio interference or noise may occur during DC charging due to high electrical activity.
- As the battery approaches full charge, the charging speed will gradually decrease to protect battery health.
- Depending on the charger specifications, charging may stop before reaching a full charge level.
- Charging duration and final charge level may vary depending on battery condition, ambient temperature, and charger capabilities.
- Frequent use of DC fast charging should be minimized to help preserve long-term battery capacity in the Subaru Solterra.
- After completing DC charging, promptly move the vehicle to allow access for other users.
- In cold conditions, steam or condensation may appear around the motor compartment as the traction battery warms. This is normal and not a malfunction.
- Some chargers may automatically stop charging before reaching maximum capacity based on system limitations.
- The displayed battery percentage may be recalibrated after charging, so it may not always show exactly 100%.
■ How to set the DC charging power
The Subaru Solterra allows adjustment of the DC charging power limit via the multi-information display or multimedia system, enabling users to optimize charging performance based on conditions.
- Setting operations on multi-information display
1. Press
 or
or
 of the meter control switches to select
 .
.
By understanding and correctly applying these DC charging procedures, Subaru Solterra owners can achieve faster charging times, improved efficiency, and better long-term battery health while ensuring safe operation at all times.
2. Using the meter control switches in the Subaru Solterra, press
 or
or
 to navigate and select "Vehicle Settings", then press and hold
 to enter the menu.
3. Continue navigating by pressing
 or
or
 to highlight "Charging Settings", then confirm by pressing
 .
.
The "Charging Settings" screen will appear on the Subaru Solterra multi-information display.
4. Press
 or
or
 to select "DC charging power", then press
 .
.
The "DC charging power" selection screen will be displayed.
5. Choose the desired charging power level for the Subaru Solterra by pressing
 or
or
 ,
and select from options such as "MAX", "125kW", "100kW", "75kW", or "50kW", then
confirm by pressing
,
and select from options such as "MAX", "125kW", "100kW", "75kW", or "50kW", then
confirm by pressing
 .
.
The maximum charging power for the Subaru Solterra will be limited to the selected value or lower depending on system conditions.
If "MAX" is selected, the Subaru Solterra will charge at the highest power level supported by the vehicle and the connected DC charger.
- Setting operations on multimedia
1. Select
 .
.
2. Select "Vehicle customize".
3. Select "Charging".
4. Select "DC charging power".
5. Choose from "MAX", "75kW", or "50kW" depending on your preferred charging speed and conditions.
As with the instrument cluster settings, the Subaru Solterra will restrict charging power to the selected level or below.
Selecting "MAX" allows the system to utilize the full available charging capacity provided by the DC charger.
■ If "Check Charging System Close Charging Port Lid See Owner's Manual" is displayed on the multi-information display
If this message appears in the Subaru Solterra after DC charging, it indicates that the system check has not completed successfully. In this state, the EV system will not start even if the power switch is pressed while the brake pedal is depressed.
Follow these steps to complete the system check:
1. Engage the parking brake securely and turn the power switch off.
2. Close both the charging inlet cap and the charging port lid of the Subaru Solterra.
3. Turn the power switch to ON and confirm that the message "Checking Charging System" appears on the display.
Do not open the charging port lid during this process.
Once the system check is complete, the power switch will turn off automatically.
4. Press the power switch while pressing the brake pedal. The "READY" indicator should illuminate, indicating that the Subaru Solterra is ready for operation.
If the message remains after completing this procedure, contact an authorized SUBARU dealer for inspection and assistance.
WARNING
■ Warnings for DC charging
Always follow these safety precautions when performing DC charging with the Subaru Solterra.
Failure to comply may result in dangerous situations, including severe injury or fatal accidents.
- Inspect the DC charger and the Subaru Solterra DC charging inlet for
any visible damage before use.
If damage is found, do not attempt to charge and have the vehicle inspected immediately by a SUBARU dealer.
- Do not touch the charging terminals with metal objects such as wires or needles, and never allow foreign objects to cause a short circuit.
- Insert only the appropriate DC charging connector into the DC charging inlet of the Subaru Solterra.
- Ensure that the DC charging cable is not coiled, twisted, or trapped under heavy objects.
- Always confirm that the DC charging connector is fully and securely inserted into the charging inlet to ensure proper electrical contact.
By properly configuring DC charging settings and following these safety procedures, Subaru Solterra drivers can achieve efficient fast charging while maintaining battery health and ensuring safe operation in all environments.
Never use conversion adapters, extension cords, or similar devices between the DC charging connector and the DC charging inlet of the Subaru Solterra, as this may compromise safety and proper electrical contact.
If you notice abnormal conditions such as excessive heat, smoke, unusual sounds, or strange odors while charging the Subaru Solterra, immediately stop the charging process and disconnect safely.
If lightning occurs during charging, do not touch the Subaru Solterra or the DC charging cable to prevent potential electric shock hazards.
■ When connecting the DC charging connector
- Follow the correct connection procedures provided by the DC charging station when attaching the DC charging connector to the Subaru Solterra. Improper connection may prevent the system from recognizing the charger and could allow the EV system to start unintentionally.
After DC charging is completed, always disconnect the DC charging connector from the Subaru Solterra before attempting to start the vehicle.
Starting the Subaru Solterra while the connector is still attached may result in dangerous situations, including possible accidents or severe injury.
NOTICE
■ When using DC charging
Always follow the operational procedures specified by the DC charger manufacturer. Failure to follow proper instructions may cause damage to both the Subaru Solterra and the charging equipment.
After charging
1. Use the DC charging station controls to safely stop the charging process.
Once charging is complete, the Subaru Solterra will automatically unlock the DC charging connector.
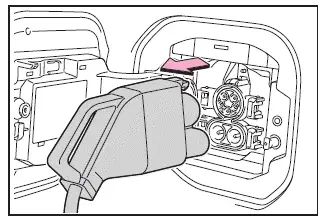
2. Carefully remove the DC charging connector from the Subaru Solterra.
The design and handling method of the connector may vary depending on the charging station, so always follow the appropriate instructions.
After removal, return the DC charging connector to its designated holder.
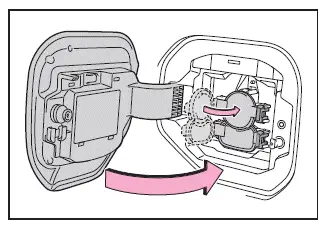
3. Close the DC charging inlet cap securely, and then close the charging port lid of the Subaru Solterra.
■ When DC charging cannot be stopped
If DC charging cannot be stopped using the charging station controls due to a malfunction or communication issue, alternative methods are available in the Subaru Solterra.
You can press the door unlock button on the wireless remote control or use the switch located near the driver's seat.
Charging can also be stopped by pressing the door unlock switch three times at approximately one-second intervals.
■ After DC charging
After completing DC charging, the charge level displayed on the DC charging station may differ slightly from the actual battery level shown in the Subaru Solterra. This is normal and reflects differences in measurement methods between the charger and the vehicle system.
NOTICE
■ Caution after DC charging
- After removing the DC charging connector, always close the DC charging
inlet cap securely and then close the charging port lid of the Subaru Solterra.
If the inlet cap is left open, dust, water, or debris may enter the charging port, potentially causing malfunctions or damage to the charging system.
By carefully following these DC charging precautions and procedures, Subaru Solterra owners can ensure safe operation, prevent potential hazards, and maintain the long-term reliability of the vehicle’s charging system.
 How to use AC charging
This section provides a detailed step-by-step guide for charging
the traction battery of the Subaru Solterra using an AC charging cable, ensuring
safe and efficient operation in everyday condition ...
 Using the charging schedule function
The Subaru Solterra allows AC charging to be conveniently scheduled
in advance, enabling drivers to optimize charging times according to their daily
routine and energy cost preferences.
■ Calen ...
Other materials:
Parking Support Brake function (moving vehicles rear of the vehicle)
In the Subaru Solterra, the Parking Support Brake system utilizes
rear radar sensors to continuously monitor traffic approaching from either side
behind the vehicle. When a moving vehicle is detected and the system determines
that the likelihood of a collision is significant, automatic brake c ...
Joint Shaft Disassembly [Mzr 2.0, Mzr 2.5]
1. Disassemble in the order indicated in the table.
1
Joint shaft component
.
2
Bearing
.
3
Dust seal (LH)
4
Joint shaft
5
Dust seal (RH)
...
Splash Shield Removal/Installation
Front Splash Shield
1. Remove the bolts and fastener then remove the front splash shield.
2. Install in the reverse order of removal.
Rear Splash Shield
1. Remove the fastener, screws and capnut .
2. Pull the rear splash shield in the direction of the arrow shown in the figure,
the ...
