Subaru Solterra 2023-2026 Owner's Manual: Using the charging schedule function
The Subaru Solterra allows AC charging to be conveniently scheduled in advance, enabling drivers to optimize charging times according to their daily routine and energy cost preferences.
■ Calendar settings
The charging schedule of the Subaru Solterra operates based on the date and time configured within the multi-information display system.
For proper setup, refer to the instructions for the multi-information display and ensure that all time-related settings are accurate.
If a calendar verification screen appears when attempting to register a charging schedule, carefully check that the current date and time are correctly set. Any discrepancies must be corrected immediately.
If the calendar data is incorrect, the Subaru Solterra charging schedule function may not operate as intended, potentially leading to missed or delayed charging events.
Settings of the charging schedule function
When configuring the charging schedule for the Subaru Solterra, several customizable parameters can be adjusted to suit individual needs.
■ Select the charging mode
Two charging modes are available for the Subaru Solterra:
"Start"
This mode initiates charging at the specified start time and continues until the traction battery reaches full capacity.
"Start-Stop"
This mode allows charging to begin and end at predefined times, providing greater control over charging duration.
*: A slight delay in the start time may occur depending on the condition and temperature of the traction battery.
■ Repeated setting
The Subaru Solterra supports recurring charging schedules. Users can select specific days of the week or multiple days to create a repeating charging routine that aligns with their driving habits.
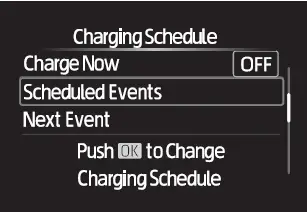
■ Turning "Charge Now" on and off
The "Charge Now" function allows immediate charging without modifying the existing schedule settings.
By activating "Charge Now", the Subaru Solterra temporarily overrides the scheduled charging plan and begins charging as soon as the AC charging connector is connected.*
*: If the connector is disconnected while "Charge Now" is active, the function will automatically turn off.
■ "Next Event"
The Subaru Solterra identifies the upcoming scheduled charging session as the "Next Event".
Charging operations will follow this next scheduled event based on the current time and configured schedule.
Registering the charging schedule
Charging schedules for the Subaru Solterra can be configured either through the multi-information display or via the multimedia system interface.
- Multi-information display operation
- Multimedia operation
■ Charging schedule function
- The charging schedule cannot be configured while the Subaru Solterra is in motion.
- Up to 15 individual charging schedules can be stored in the system.
If the charging mode is set to "Start-Stop" and both the start and stop times are identical, the Subaru Solterra will continue charging for a full 24-hour period starting from the designated time.
The charging schedule function is applicable only to AC charging and cannot be used with DC fast charging.
■ To ensure proper operation of the charging schedule function, check the following:
- Verify that the system clock is set to the correct time
- Confirm that the calendar date is accurate
- Ensure that the power switch is turned off
- After setting the schedule, connect the AC charging connector securely
The Subaru Solterra determines the charging start time based on the schedule active at the moment the AC charging connector is connected.
- Always connect the AC charging connector before the scheduled start time
When using the "Start" mode, if the connector is attached after the scheduled start time, the system will defer to the next scheduled charging event.
When using the "Start-Stop" mode, if the connector is attached after the start time, charging will begin immediately and continue until the specified stop time.
- After connecting the AC charging connector, verify that the charging indicator is flashing, confirming that the schedule is active
- Avoid using outlets equipped with automatic power cutoff or built-in scheduling functions
Always use a stable power source that provides continuous electricity. If power is interrupted due to an external outlet timer or schedule, the Subaru Solterra may not charge as planned.
■ When the AC charging connector remains connected to the vehicle
- When using "Start" mode, even if multiple schedules are configured, subsequent charging sessions will not begin automatically unless the AC charging connector is disconnected and reconnected after charging is completed. Additionally, if the battery is already fully charged, scheduled charging will not occur.
- When using "Start-Stop" mode, if charging stops before the battery is fully charged, the Subaru Solterra will automatically move to the next scheduled event and continue charging until full capacity is reached.
By properly utilizing the charging schedule function, Subaru Solterra owners can improve energy efficiency, reduce electricity costs, and ensure that the vehicle is always ready for use at the desired time.
■ Smartphone-linked operation
After registering in the SUBARU Solterra Connect Mobile App, Subaru Solterra owners can conveniently manage and modify charging schedule settings directly from their smartphone, providing greater flexibility and remote control over the charging process.
■ When charging schedules are ignored
In certain situations, the Subaru Solterra may temporarily override the configured charging schedule and begin charging immediately. This occurs when specific functions are activated while the schedule is in standby mode.
- When the Remote Air Conditioning System is activated
- When "My Room Mode" is enabled
- When the "Charge Now" function is turned on
- When any operation that temporarily cancels the charging schedule is performed
■ Battery heater / "Battery Cooler"
Depending on the temperature of the traction battery, the Subaru Solterra may automatically activate the battery heater or battery cooler while waiting for the scheduled charging time. During this process, the charging indicator may illuminate, indicating that the system is actively managing battery temperature even before charging begins.
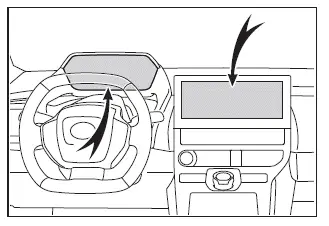
Setting operations on multi-information display
To configure the charging schedule in the Subaru Solterra, use the meter control switches located on the steering wheel.
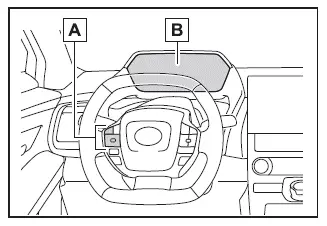
- Meter control switches
- Multi-information display
■ Display the "Charging Schedule" screen
1. Press
 or
or
 of the meter control switches to select
 .
.
2. Press
 or
or
 of the meter control switches to select "Vehicle Settings", then press and hold
 to enter.
3. Press
 or
or
 to highlight "Charging Settings", then press
 .
.
4. Press
 or
or
 to select "Charging Schedule", then press
 .
.
The "Charging Schedule" screen will now be displayed on the Subaru Solterra multi-information display.
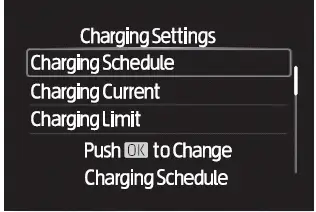
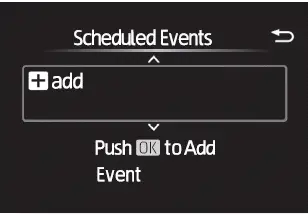
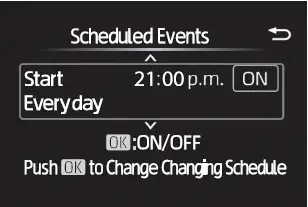
■ Registering the charging schedule
1. Access the "Charging Schedule" screen on the Subaru Solterra display.
2. Press
 or
or
 to select "Scheduled Events", then press
 .
.
The "Scheduled Events" menu will appear.

3. Press
 or
or
 to select "+add", then press
 .
.
The "Charging Mode" selection screen will be displayed.
4. Use
 or
or
 to move the cursor and select the desired setting. Adjust values using
 or
or
 ,
then confirm with
,
then confirm with
 .
.
When the charging mode is set to "Start", define the desired start time for charging.
When using the "Start-Stop" mode, set both the charging start time and the desired completion time.
5. After configuring the desired charging schedule, confirm the settings by pressing
 .
.
By utilizing these advanced scheduling features, Subaru Solterra drivers can optimize charging efficiency, align charging sessions with electricity tariffs, and ensure that the vehicle is always ready for use when needed.
If the "Start-Stop" charging mode was selected in step 4 for the Subaru Solterra, proceed with configuring the desired stop time to complete the schedule setup.
6. Use
 or
or
 on the meter control switches to choose the specific days for repeated charging,
then confirm by pressing
on the meter control switches to choose the specific days for repeated charging,
then confirm by pressing
 .
.
Each time
 is pressed, the repeat function toggles between ON and OFF.
When enabled, the Subaru Solterra charging schedule will automatically repeat on the selected days. Multiple days can be selected to create a flexible recurring schedule.
Once all settings are configured, select "Done" and confirm by pressing
 .
.
A confirmation screen will appear, allowing the settings to be saved.
7. Select "Save" and press
 to store the configured charging schedule.
After completing the setup, whenever the AC charging connector is connected to the Subaru Solterra, charging will automatically follow the configured schedule settings.
■ Switching charging schedules between on and off
The Subaru Solterra allows stored charging schedules to be individually activated or deactivated depending on current needs.
1. Display the "Charging Schedule" screen.
2. Select "Scheduled Events" and press
 .
.
A list of all registered charging schedules will be displayed on the Subaru Solterra screen.
3. Select the schedule you wish to enable or disable, then press
 .
.
Each time
 is pressed, the selected schedule toggles between ON and OFF.
When set to OFF, the Subaru Solterra will ignore that particular schedule and charging will not follow its settings.
■ Changing the registered charging schedules
Previously saved charging schedules in the Subaru Solterra can be edited or deleted as required.
1. Display the "Charging Schedule" screen.
2. Select "Scheduled Events" and press
 .
.
The "Scheduled Events" screen will be displayed.
3. Select the desired schedule entry and choose the required operation.
- "Edit"
Select the schedule to modify, press and hold
 ,
then choose "Edit".
,
then choose "Edit".
Adjust the desired parameters following the same procedure described from step 4 in the "Registering the charging schedule" section.
After making changes, select "Save" and press
 to apply the updated settings.
- "Delete"
Select the schedule you wish to remove, press and hold
 ,
then select "Delete".
,
then select "Delete".
A confirmation screen will appear before deletion.
Press
 or
or
 to select "Yes", then press
 to remove the selected charging schedule.
To cancel the deletion process, select "No" and press
 .
.
■ Setting "Charge Now" to on
The "Charge Now" function on the Subaru Solterra allows immediate charging without modifying existing schedules and can be activated using the following procedure:
Operation on "Charging Schedule" screen
1. Display the "Charging Schedule" screen.
2. Use
 or
or
 to select "Charge Now", then press
 .
.
Each time
 is pressed, the "Charge Now" setting switches between ON and OFF.
Using these flexible scheduling and control options, Subaru Solterra drivers can tailor charging behavior to match daily routines, optimize energy usage, and ensure the vehicle is always ready when needed.
Operation on "Closing Display" screen
1. Turn the power switch of the Subaru Solterra OFF.
The "Closing Display" screen* will automatically appear on the multi-information display, providing quick access to charging-related functions.
(If a door is opened while the Subaru Solterra is waiting for a scheduled charge, this same screen will also be displayed.)
*: If the "Closing Display" option is not configured to show "Charging Schedule"
on the
 screen, the "Closing Display" will not appear. In this case, verify and adjust the
display settings within the Subaru Solterra system.
screen, the "Closing Display" will not appear. In this case, verify and adjust the
display settings within the Subaru Solterra system.
2. Press the appropriate control to activate "Charge Now".
Once this setting is enabled, the Subaru Solterra will begin charging immediately when the AC charging connector is connected, regardless of any previously configured schedule.
■ Displaying "Next Event"
1. Access the "Charging Schedule" screen on the Subaru Solterra.
2. Use
 or
or
 to highlight "Next Event", then press
 .
.
The "Next Event" screen will display the upcoming scheduled charging session for the Subaru Solterra.
■ When charging schedule setting operations are canceled
Charging schedule configuration for the Subaru Solterra may be automatically canceled under the following conditions:
- If the power switch is operated before confirming the settings
- If the vehicle begins moving
- If a higher-priority system display overrides the charging schedule interface
■ When charging schedules are changed while charging
If the charging schedule is modified while the Subaru Solterra is actively charging, the "Next Event" will be updated accordingly, and charging may temporarily stop.
After making changes, always verify the updated "Next Event" information.
If continuous charging is required, activate the "Charge Now" function to override the schedule.
NOTICE
■ While performing the setting operation
When adjusting charging schedule settings while the EV system of the Subaru Solterra is turned off, take care to avoid excessive use of electrical systems, as this may lead to discharge of the 12-volt battery.
Setting operations on multimedia
For detailed instructions on using the multimedia interface, refer to the "MULTIMEDIA OWNER'S MANUAL".
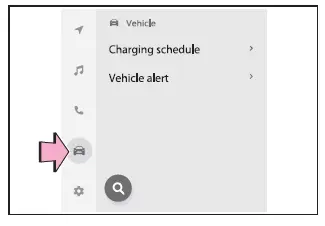
All charging schedule-related configurations for the Subaru Solterra can be accessed through the "Charging Schedule" screen within the multimedia system.
■ Displaying the "Charging Schedule" screen
1. Turn the power switch ON and open the main menu screen.
Charging schedule settings cannot be accessed while the Subaru Solterra is in Accessory Mode.
2. Select
 followed by "Charging Schedule". The corresponding screen will then be displayed.
■ How to read the "Charging Schedule" screen
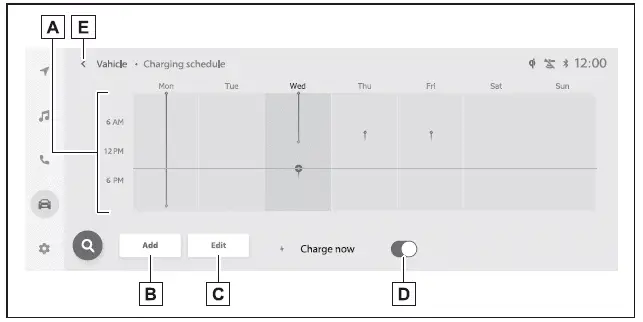
- Charging schedules
Displays all registered Subaru Solterra charging schedules for the week in an easy-to-read list format using icons. - "Add" button
Allows the user to create a new charging schedule entry. - "Edit" button
Enables modification or deletion of existing charging schedules. - "Charge Now" button
Each press toggles the "Charge Now" function between ON and OFF for immediate charging override. - Return button
Closes the "Charging Schedule" screen and returns to the previous menu.
■ Registering the charging schedule
1. Open the "Charging Schedule" screen on the Subaru Solterra.
2. Select "Add".
The "Add event" screen will be displayed.
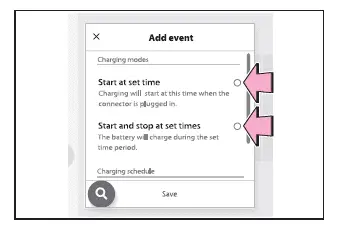
3. Choose the desired charging mode.
Select either "Start at set time" or "Start and stop at set times" depending on your preferred charging behavior.
4. Configure the desired start time using the "Start at set time" screen, then
confirm by selecting
 .
.
When using the "Start at set time" mode, only the charging start time needs to be defined.
When using the "Start and stop at set times" mode, both the start and stop times must be specified.
5. To enable repeated charging, select the desired days of the week, then confirm
by pressing
 .
.
By effectively using these multimedia-based controls, Subaru Solterra drivers can fine-tune charging schedules, improve energy efficiency, and ensure that the vehicle is always charged according to their daily routine.
Each time a specific day is selected within the Subaru Solterra charging schedule settings, the repeat function for that day toggles between enabled and disabled.
When the repeat option is activated, the corresponding checkbox is highlighted, confirming that the Subaru Solterra will automatically follow the charging schedule on that selected day. Multiple days can be enabled simultaneously, allowing for a fully customized weekly charging routine.
6. Once all desired settings have been configured, press "Save" to finalize the setup.
The newly created charging schedule will be added to the list, and a corresponding icon will appear on the Subaru Solterra "Charging Schedule" screen, providing a clear visual representation of active schedules.
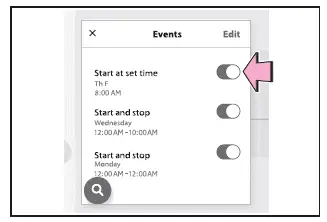
■ Switching charging schedules between on and off
1. Open the "Charging Schedule" screen on the Subaru Solterra.
2. Select "Edit".
The "Scheduled Events" screen will then be displayed.
3. From the list of available schedules, tap the ON/OFF toggle next to the charging schedule you wish to modify.
If the desired schedule is not immediately visible, scroll through the list to locate it.
Each time the toggle is pressed, the selected Subaru Solterra charging schedule switches between active (ON) and inactive (OFF).
■ Changing the registered charging schedules
1. Access the "Charging Schedule" screen on the Subaru Solterra display.
2. Press "Edit" to enter the schedule management interface.
The "Scheduled Events" screen will appear.
3. Press "Edit" within the "Events" menu to begin modifying existing entries.
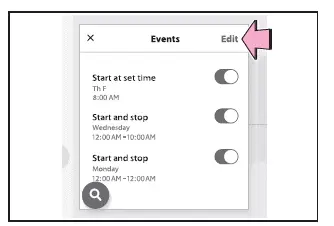
4. Select "Edit" next to the specific charging schedule you wish to update.
- Changing registered items:
Adjust the necessary parameters by following the same steps described in the "Registering the charging schedule" procedure starting from step 3.
Whenever a schedule is updated, its corresponding icon on the Subaru Solterra calendar interface will also change to reflect the new configuration.
- Deleting registered items:
Select "Delete" for the schedule you wish to remove.
A confirmation prompt will appear to prevent accidental deletion.
Press "Delete" again to permanently remove the selected charging schedule from the Subaru Solterra system.
Once deleted, the associated icon will also disappear from the "Charging Schedule" screen.
■ Turning "Charge Now" on
1. Open the "Charging Schedule" screen.
2. Press "Charge Now".
Each press toggles the "Charge Now" function between ON and OFF.
When activated, the Subaru Solterra will begin charging immediately once the AC charging connector is connected, bypassing any existing schedule.
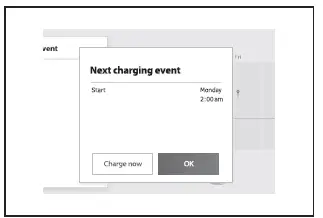
■ Displaying Next Event
Turn the power switch of the Subaru Solterra OFF.
The next scheduled charging event will be displayed automatically according to the configured charging schedule.*
*: If the multimedia customization option "ACC customize" is not set to OFF, the closing screen will not appear. In this situation, verify and adjust the multimedia settings accordingly in the Subaru Solterra system.
Press "OK" to close the Next Event screen.
Press "Charge Now" to immediately activate charging override mode.
■ When all charging schedules are turned off
If all charging schedules are disabled, no schedule icons will be displayed on the Subaru Solterra "Charging Schedule" screen.
To restore visibility, enable at least one schedule from the "Events" screen.
■ When charging schedule setting operations are canceled
The Subaru Solterra may automatically cancel charging schedule configuration under the following conditions:
- The power switch is turned off before confirming the settings
- The vehicle begins moving
- A higher-priority system display interrupts the charging schedule interface
■ When charging schedules are changed while charging
If a charging schedule is modified during an active charging session, the "Next Event" will be updated and the current charging process may temporarily stop.
After making adjustments, always review the updated "Next Event" details.
If uninterrupted charging is required, activate the "Charge Now" function to override the schedule.
NOTICE
■ While performing the setting operation
When configuring charging settings while the EV system of the Subaru Solterra is turned off, minimize electrical usage to prevent unnecessary discharge of the 12-volt battery.
Using these advanced scheduling controls, Subaru Solterra drivers can precisely manage charging routines, enhance efficiency, and ensure the vehicle remains fully prepared for everyday driving needs.
 How to use DC charging
This section provides a comprehensive overview of the DC fast charging
procedure for the Subaru Solterra traction battery, allowing drivers to quickly
and efficiently recharge when needed.
When u ...
 Using My Room Mode
In the Subaru Solterra, when the charging cable is connected, selected
electrical systems such as the climate control and audio setup can operate using
energy supplied directly from an external po ...
Other materials:
Magnetic Clutch Disassembly/Assembly [Full Auto Air Conditioner]
1. Disassemble in the order indicated in the table.
SKYACTIV-G 2.0
1
Bolt
(See Bolt Removal/Installation Note.)
2
Pressure plate
3
Shim
(See Shim Installation Note.)
4
Snap ring
...
Drive mode select switch
The drive modes of the Subaru Solterra can be adjusted to match different
driving conditions, ensuring optimal performance, efficiency, and comfort.
Selecting a drive mode
By pressing the drive mode select switch, the Subaru Solterra cycles through
three distinct driving modes: Power mode, Nor ...
SRS airbags
The SRS airbag system in the Subaru Solterra is engineered to deploy
during specific types of severe impacts that may otherwise cause serious harm to
vehicle occupants. These advanced airbags function in combination with seat belts
to significantly reduce the risk of fatal or severe injuries.
...
