Mazda 3 Service Manual: Inner Garnish Removal/Installation
1. Disconnect the negative battery cable..
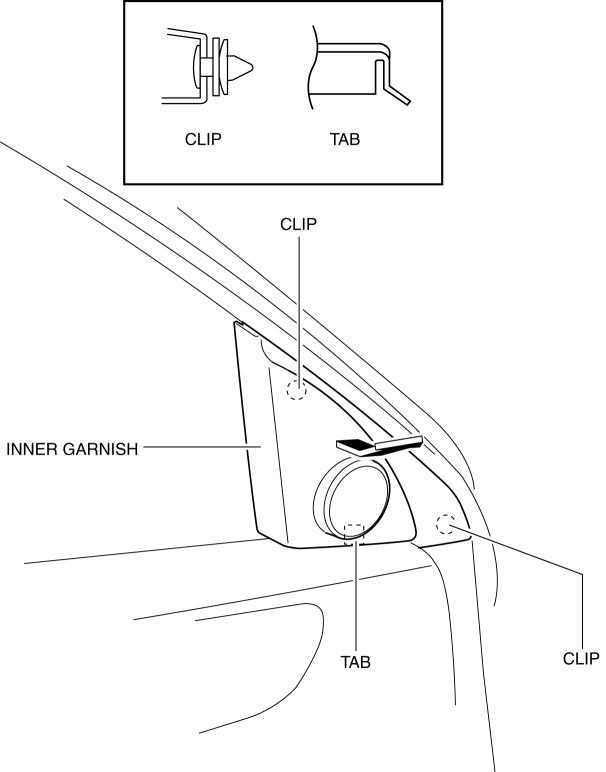
2. Pull the inner garnish in the direction of the arrow shown in the figure and remove it while detaching clips and tab.
CAUTION:
-
When pulling out the inner garnish, be careful not to damage the tab.
3. Disconnect the front tweeter connector. (Vehicles with tweeter)
4. Install in the reverse order of removal.
 Hole Cover Removal/Installation
With Car-navigation system
1. Disconnect the negative battery cable..
2. Remove the following parts:
a. Upper column cover.
b. Instrument cluster.
c. Center panel.
d. Center cover.
e. Das ...
 Lower Panel Removal/Installation
Driver-side
1. Disconnect the negative battery cable..
2. Remove the following parts:
a. Driver-side front scuff plate.
b. Driver-side front side trim.
c. Hood release lever.
d. Upper panel ...
Other materials:
Wastegate Actuator Inspection [Mzr 2.3 Disi Turbo]
1. Remove the air hose and air duct..
2. Disconnect the hose from the wastegate actuator.
3. Plug the wastegate actuator as shown in the figure.
4. Connect the vacuum pump to the port
5. Raise the pressure slowly and take a measurement of the pressure when the
rod stroke is 1.5 mm {0.0 ...
Rear Brake (Disc) Removal/Installation
CAUTION:
If the brake hose is installed to the caliper on the vehicle, the tool cannot
be installed correctly resulting in brake fluid leakage due to improper installation.
Therefore, remove the caliper and brake hose as a single unit when removing
the caliper or brake hose, and tig ...
Steering Wheel And Column Inspection
Play Inspection
1. With the wheels in the straight-ahead position, start the engine.
2. Turn the steering wheel to the left and right gently, then verify that the
steering wheel play is within the specification.
Steering wheel play
0—30 mm {0—1.18 in} (When hydraulic operating)
...
